You can preserve your garden's bounty with five cost-effective DIY dehydrators. Convert an old cabinet into a powered unit using a heat source and insulation, or construct a solar box dryer with angled windows for natural drying. A window-mounted dehydrator offers convenient sun-powered preservation, while a foldable screen system provides portable drying capabilities. For off-grid solutions, build a solar panel dehydrator using plywood and polyester glazing. Each project requires basic tools and common materials, making food preservation accessible to any gardener. Discover how these simple builds can transform your seasonal harvest into long-lasting, nutritious snacks.
Converting Old Cabinet to Dehydrator
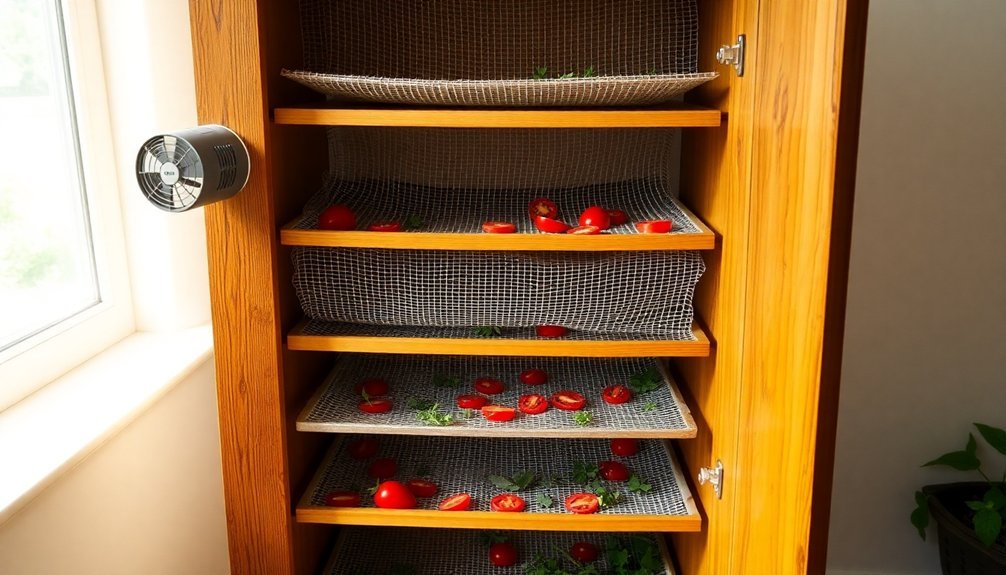
With a bit of ingenuity, you can transform an old server cabinet or filing cabinet into a powerful food dehydrator. Start by insulating the cabinet with 2-inch rigid insulation to maintain consistent temperatures. The target temperature of 115 degrees Fahrenheit provides optimal dehydration conditions.
Install a George Forman Grill or light bulb as your heat source at the bottom, placing tiles around it to control radiant heat distribution.
Create a plenum by attaching a wooden piece at the back to direct hot air flow upward. You'll need to install shelving units that promote air circulation – either commercial kitchen racks or custom-made wooden frames with screens.
Don't seal the front door completely tight; this allows fresh air to enter while moisture escapes through ventilation holes you'll create.
For air circulation, mount server cabinet fans or similar alternatives to keep air moving constantly. Power everything using a 5-volt supply from an old PC.
You'll control the system with an Arduino setup, including Dallas Temperature Sensors positioned at different heights, an LCD Button Shield for monitoring, and a 10-amp relay to manage the heating element.
Wire everything carefully, ensuring all electrical connections are secure and safe.
Solar Box Garden Dryer
Looking for a more energy-efficient alternative to powered dehydrators? A solar box garden dryer harnesses the sun's energy using a simple vertical structure with an angled front face. You'll need old wooden-framed windows for the front panel, though aluminum frames can work with additional framing support. Adding high and low vents is crucial for maintaining proper airflow through the dryer.
The key to successful solar drying lies in proper positioning and ventilation. You'll want to angle your collector between 20-77 degrees from vertical, depending on your location and season. Use online solar calculators to determine the best angle for maximum sun exposure in your area.
Inside the box, arrange diagonal layers of black metal screen to enhance air circulation and heat distribution. Build your base frame from half-inch plywood, and don't forget to add hinges so you can adjust the collector's angle.
Insulation is essential – it helps maintain high internal temperatures for effective drying. Create a chimney effect by allowing hot air to rise and escape while drawing fresh air through the bottom. For food safety, thoroughly clean and sanitize all surfaces before use.
Remember to position your dryer where it'll receive maximum sunlight throughout the day.
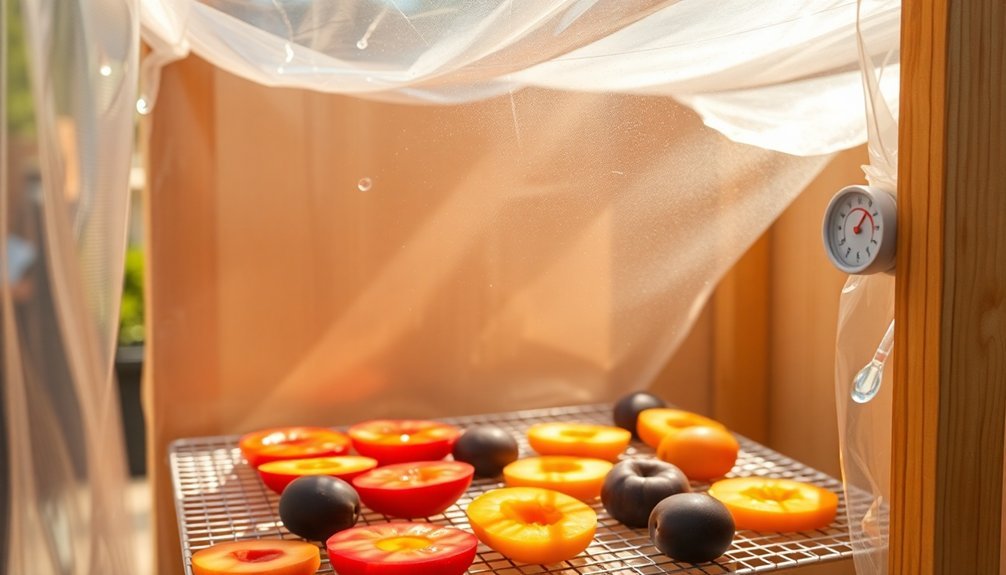
Window-Mounted Sun Dehydrator
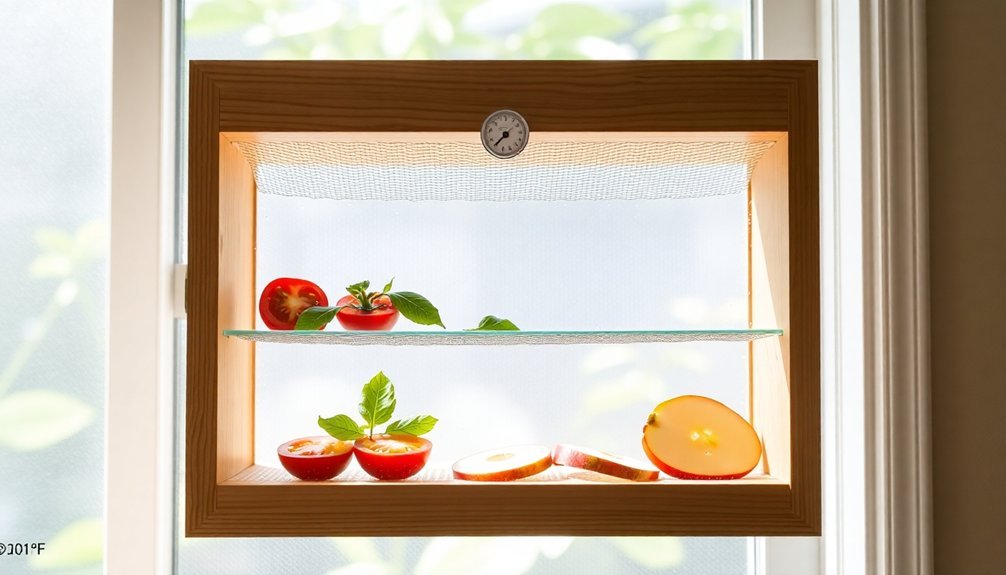
A window-mounted sun dehydrator offers a space-saving solution for apartment dwellers and those with limited outdoor space. You'll need a window-sized frame built from 2×4 planks, fitted with a transparent panel and wire mesh racks. Install adjustable vents to control airflow and prevent overheating while maintaining temperatures between 120-150°F. The effective use of proper ventilation systems remains crucial for successful dehydration results.
| Feature | Purpose | Benefits |
|---|---|---|
| Wire Mesh Racks | Supports produce | Promotes even airflow |
| Adjustable Vents | Controls temperature | Prevents food spoilage |
| Transparent Panel | Lets in sunlight | Maintains consistent heat |
| Protective Screen | Keeps out insects | Guarantees food safety |
Mount your dehydrator at an angle that maximizes sun exposure throughout the day. For best results, use silicone sealant around edges to prevent heat loss and keep out moisture. You'll find that herbs dry quickly, while fruits and vegetables may take several days. During humid weather, use solar-powered DC fans to speed up the drying process. Remember to clean the mesh racks regularly and check seals to maintain peak performance. This design's efficiency depends on proper sun orientation and adequate ventilation, so monitor your first few batches closely.
Foldable Screen Drying System
Building a foldable screen drying system offers an innovative way to preserve your garden's bounty while maximizing space efficiency.
You'll need timber planks, galvanized screws, flyscreen offcuts, and basic tools to construct this versatile dehydrator that you can easily store when not in use.
Start by creating a frame with hinged sections, drilling ventilation holes along the sides for proper airflow. Cover these holes with flyscreen netting to keep insects out while allowing air circulation.
Install drying racks made from flyscreen material stretched across timber supports, making certain they fit snugly within the frame.
- Position your screen system at a slight angle to enhance air movement and heat distribution
- Slice produce thinly and evenly to make certain consistent drying times
- Monitor temperatures between 50-60°C on sunny days for best results
- Store dried items immediately in airtight containers to maintain quality
When you're using the system, avoid overcrowding the screens to make certain even drying.
You'll know your produce is ready when it reaches a pliable, leathery texture.
Regular cleaning of the screens and frame will extend the life of your drying system and maintain food safety standards.
Off-Grid Solar Panel Dehydrator
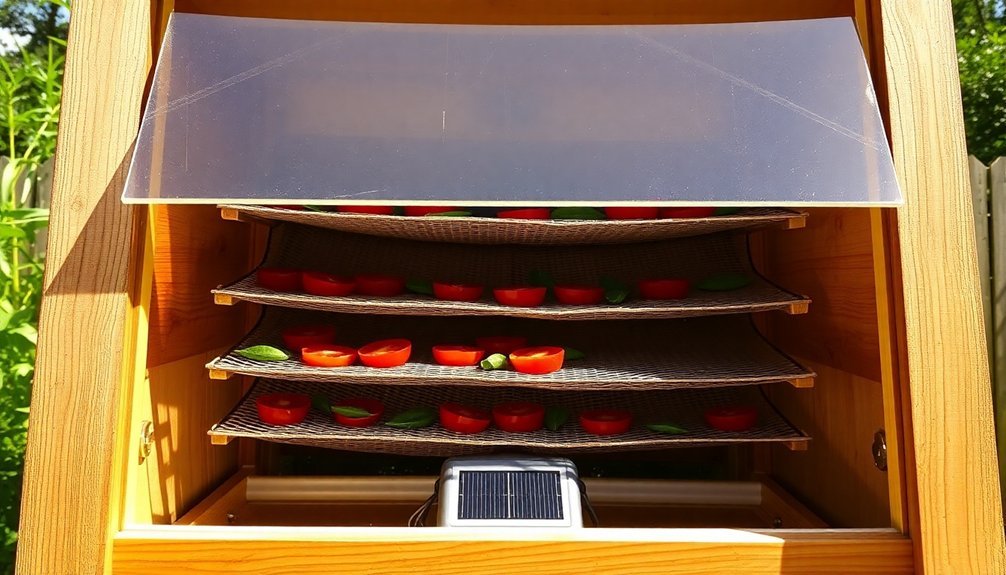
Creating an off-grid solar panel dehydrator combines sustainable energy with food preservation, letting you dry produce without electricity costs. You'll need readily available materials like exterior-grade plywood, fiberglass-reinforced polyester glazing, and metal screening, or you can repurpose old materials to reduce expenses.
Design your solar collector to face the sun at an ideal angle, using dark-colored materials to absorb maximum heat. The collector warms the air, which naturally rises into your drying chamber. You can enhance airflow by adding a small solar-powered fan, though it's not essential.
Include proper ventilation with screened holes to prevent humidity buildup while keeping insects out.
Build your drying chamber with adjustable racks made from flyscreen or similar mesh materials to promote good airflow. You'll want to maintain a temperature gradient that allows warm air to rise naturally through your produce.
Remember that drying times vary by food type – herbs dry quickly, while tomatoes need more time. Always clean and sanitize your equipment and food before use, and store dried items in airtight containers to maintain freshness.
Frequently Asked Questions
What Types of Paint Are Food-Safe for DIY Dehydrator Interiors?
You'll want to use FDA-approved epoxy, food-grade ceramic, or silicone-based paints for your dehydrator's interior. These options are non-toxic and heat-resistant when properly cured, ensuring your food stays safe.
How Long Can Dehydrated Produce Be Safely Stored at Room Temperature?
You can safely store dehydrated fruits for up to 1 year and vegetables for about 6 months at room temperature. While they'll remain safe indefinitely, you'll notice quality and nutrient declines after these periods.
Can Multiple Types of Produce Be Dried Simultaneously Without Flavor Transfer?
You can dry multiple produce types simultaneously, but you'll need to group them carefully. Use separate trays for strong-flavored items and pair similar foods together to prevent unwanted flavor transfer during dehydration.
What Materials Should Be Avoided When Building DIY Dehydrators?
You'll need to avoid particle board, treated woods, and materials that off-gas chemicals. Don't use flammable items, metals near heating elements, or porous materials that could harbor bacteria or affect food safety.
How Do You Prevent Mold Growth During the Dehydration Process?
You'll prevent mold by maintaining humidity below 60%, ensuring proper airflow with fans, monitoring moisture levels regularly, keeping surfaces clean, and using dehumidifiers. Don't forget to remove any damaged produce immediately.
In Summary
You've now got five budget-friendly ways to preserve your garden's bounty without expensive equipment. Whether you're repurposing an old cabinet, harnessing the sun's power, or creating a simple screen system, these DIY dehydrators will help you store fruits, vegetables, and herbs for months to come. Start with whichever method matches your space and resources, and you'll soon be enjoying your own dried produce year-round.


Leave a Reply