
You can create effective solar cooking stations using simple household items. Start with a basic pizza box oven that reaches 200°F using aluminum foil and plastic wrap, or try a dual-reflector cardboard box setup for temperatures up to 220°F. Other beginner-friendly options include an upcycled window cooker, portable umbrella reflector, or aluminum foil box system. For more advanced setups, consider a nested box heat collector reaching 350°F or a windshield shade cooking station. You'll also find solutions for water purification and emergency solar kitchens. These DIY projects open up a world of sustainable cooking possibilities.
The Basic Pizza Box Oven
While a solar oven might seem complex, you can create a simple yet effective version using just a pizza box and common household materials.
Start by cutting a flap in the box's lid, leaving one edge intact. Cover the flap's underside with aluminum foil, shiny side up, and seal a double layer of clear plastic wrap over the opening to create an airtight window.
Line the box's interior with foil and black construction paper to maximize heat absorption. You'll need to prop up the reflective flap using straws or dowels to direct sunlight inside. This eco-friendly cooking method requires no fuel source to operate.
Once assembled, your oven can reach temperatures around 200°F after 30 minutes in direct sunlight. It's perfect for making simple treats like s'mores, cheese roll-ups, or even baked potatoes.
Remember to adjust the flap throughout cooking to maintain ideal sun exposure.
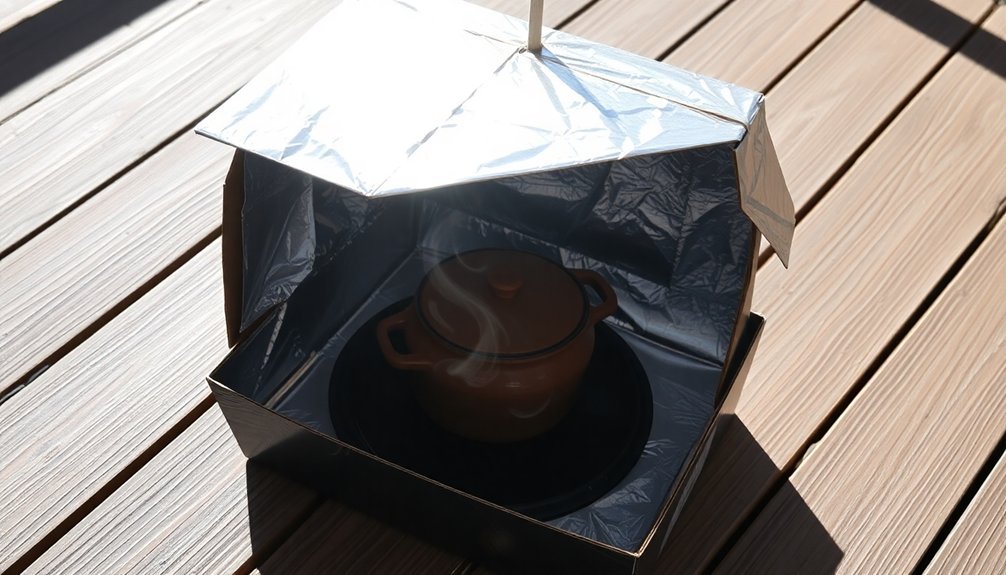
Dual-Reflector Cardboard Box Setup
Building on the pizza box concept, a dual-reflector cardboard box setup offers enhanced cooking power and temperature control.
You'll need two cardboard boxes, with the smaller one fitting inside the larger, leaving a one-inch gap for insulation.
Line the space between boxes with newspaper, and cover the inner box's opening with plastic wrap or Plexiglas.
Paint the interior black to maximize heat absorption.
You'll create reflectors by covering cardboard pieces with aluminum foil, hinging them to the lid in a semi-circle arrangement.
For best results, use a pot-in-pot system: place a dark-colored cooking pot inside a clear container.
When properly positioned in sunlight, your dual-reflector oven can reach 220°F.
Verify the box dimensions are proportional, with long sides less than twice the length of short sides.
For optimal performance, make sure to clean and sanitize your solar oven after each cooking session to prevent bacterial growth.
Upcycled Window Solar Cooker
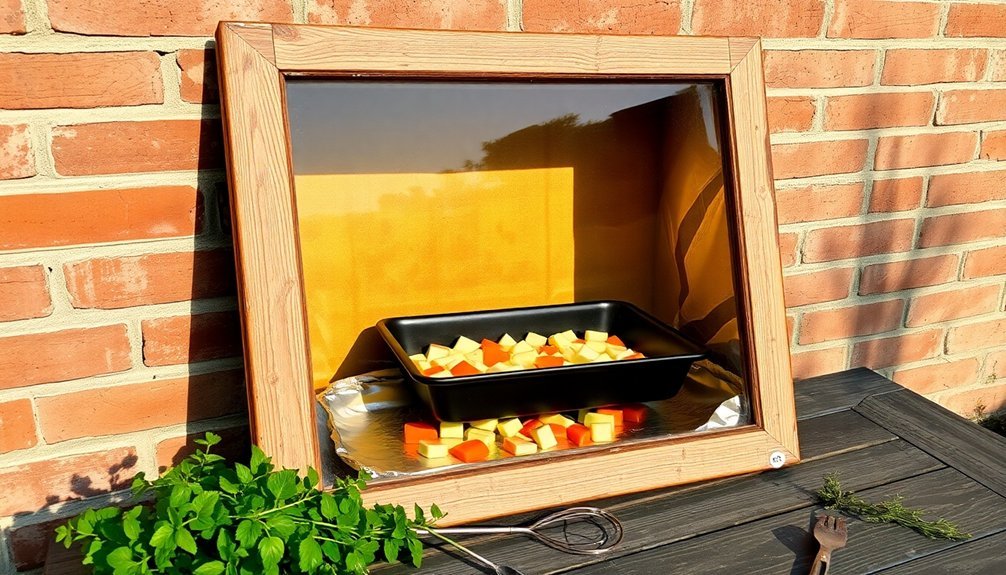
Anyone can transform an old window into an efficient solar cooker by combining recycled materials with basic construction principles.
Similar to using a desk drawer and fabric, you can construct an effective solar cooker from items commonly found in recycling bins.
Using insulating techniques similar to the cardboard box method, you'll create an airtight cooking chamber that can reach temperatures up to 200°F (93°C).
To maximize your window cooker's performance:
- Line the interior with aluminum foil for reflection and add black-painted surfaces to absorb heat.
- Create a double-layered clear plastic barrier using oven bags or plastic wrap for better insulation.
- Install adjustable reflector panels using hanger wire to direct more sunlight into the chamber.
- Add newspaper or other insulating materials between layers to prevent heat loss.
Remember to position your cooker in direct sunlight and pre-heat it for an hour before use.
Stir liquids and rotate solid foods regularly for even cooking results.
Portable Umbrella Reflector Design
A repurposed umbrella can transform into a powerful solar cooking device when lined with reflective materials and shaped into a parabolic dish.
The simple setup can reach up to 200 degrees Fahrenheit during optimal sunlight conditions.
You'll need an umbrella, reflective material like aluminum foil or mylar, spray glue, and foam board for stability.
Start by cutting support shapes from the foam board and attach them to create a sturdy base.
Cover the umbrella's frame with your reflective material, carefully shaping it into a parabolic surface.
Add a stable platform at the focal point to hold your cooking vessel.
For effective cooking, place your device in direct sunlight and adjust it every 15-30 minutes.
Always use a black pot to maximize heat absorption.
Remember to wear UV protective glasses and handle hot items with pot holders.
When you're not using it, store your cooker safely or face it away from direct sunlight.
Aluminum Foil Box System
You'll want to start by layering aluminum foil smoothly across the box's reflector flap, ensuring each piece overlaps slightly for maximum sun-catching coverage.
For ideal heat reflection, angle your foil-covered flap at 45 degrees and position the box so sunlight bounces directly into the cooking chamber.
The assembly comes together quickly when you first secure the foil with tape at the corners, then work your way toward the center while keeping the surface as wrinkle-free as possible.
Optimal Foil Layering Steps
Creating an efficient sun-powered kitchen starts with proper foil layering in your box system.
You'll need to prepare your pizza box by marking and cutting a three-sided flap about an inch from the edges, ensuring it can fold back as a reflector.
- Line the flap's inside with aluminum foil (shiny side up), smoothing out any wrinkles and securing edges with glue or clear tape.
- Cover the box's interior bottom with foil, then add a black paper layer on top.
- Add crumpled newspaper around the cooking area for insulation.
- Seal the opening with plastic wrap, securing it firmly to the box's edges.
For best results, make sure you're keeping all foil surfaces wrinkle-free and check the plastic wrap seal regularly to maintain ideal cooking temperatures.
Heat Reflection Design Tips
While designing your solar oven's reflection system, proper positioning of aluminum foil surfaces plays an essential role in maximizing heat capture.
Create a reflector by covering a cardboard piece that matches your box lid's size with smooth aluminum foil. You'll need to hinge this reflector to your cooking box, allowing for easy angle adjustments.
Position your reflector at a 60-degree angle to the sun and secure it with string or a simple prop system. As the sun moves, you'll want to adjust the reflector to maintain ideal heat reflection into the oven's window.
Keep the foil surface clean and wrinkle-free for best results. Don't forget to integrate black construction paper underneath the reflector flap – it'll absorb any stray sunlight and enhance your oven's heating efficiency.
Box Assembly Made Simple
Building a solar oven starts with assembling the right materials and following a straightforward box setup. You'll transform a simple cardboard box into an efficient cooking device using aluminum foil, plastic wrap, and basic household items.
Start with these essential assembly steps:
- Cut three sides of a square on the box lid, leaving one side attached to create a reflective flap that you'll cover with aluminum foil.
- Line the inside of your box with aluminum foil or black construction paper to maximize heat absorption.
- Create an airtight seal by stretching plastic wrap across the box opening, securing it firmly with tape.
- For better insulation, stuff newspaper between the walls if you're using a double-box design.
Position your assembled oven in direct sunlight, adjusting the reflective flap to capture maximum rays.
Mini Parabolic Dish Cooker
When selecting materials for a mini parabolic dish cooker, you'll need to choose between corrugated cardboard for a basic setup or MDF for enhanced durability. Heavy-duty aluminum foil will serve as your reflective surface, essential for concentrating sunlight onto a single focal point.
To build the cooker, cut your base material into precisely marked ribs that form a parabolic curve. You'll want to position the focal point between 18" to 36" from the dish's surface for ideal heat concentration.
Create a simple pine stand with adjustable holes to track the sun's movement throughout the day. This setup can reach temperatures high enough for frying, boiling, and browning food.
Remember to exercise caution around the focal point, as it gets extremely hot during operation.
Glass Jar Solar Still
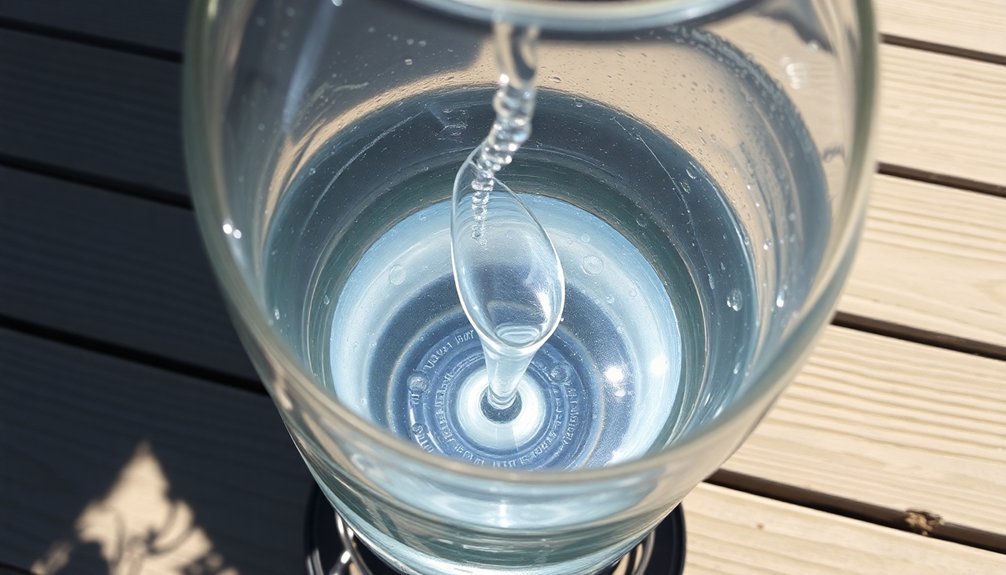
You'll find that creating a glass jar solar still requires just a few common household items: two glass containers of different sizes, plastic wrap, and rocks.
To build this water purification system, you'll need to nest a smaller jar inside a larger bowl filled with contaminated water, then seal the top with plastic wrap and place a weight in the center.
The sunlight will do the rest of the work, causing the water to evaporate and condense as pure droplets that collect in your inner container.
Water Purification Made Simple
Nature's water purification cycle provides the perfect blueprint for a simple yet effective DIY solar still. You'll need just a few basic materials: a glass jar, clear plastic wrap, and a small weight to create your own water purification system.
To maximize your solar still's efficiency:
- Use a dark-colored or black-bottomed container to increase heat absorption.
- Create an airtight seal with the plastic wrap to trap evaporating water.
- Place a small weight in the center of the plastic to direct water droplets.
- Position your still in direct sunlight for several hours.
Your solar still separates contaminants through evaporation, as salts and minerals stay behind while pure water vapor rises and condenses on the plastic wrap.
Remember to keep all materials clean and avoid using water with unknown toxins.
Essential Materials And Setup
Building a glass jar solar still requires five essential materials to create an effective water purification system.
You'll need a large, shallow container like a glass baking pan to hold the water, a clear glass or plastic cover to trap heat and allow sunlight through, and a box made from 3/4" BC-grade plywood painted black inside for heat absorption.
You'll also need PEX tubing or stainless steel for collecting the distilled water, plus caulk and painter's tape to seal the edges.
To set up your still, construct the box with double-layered plywood for insulation, position your water container inside, and angle the clear cover so water droplets roll down easily.
Remember to level the box, secure all edges with caulk, and let it set overnight before use.
Emergency Camp Solar Kitchen
When disaster strikes, a well-planned emergency camp solar kitchen can mean the difference between comfort and crisis. Your setup should combine solar panels, batteries, and inverters to power essential cooking equipment while maintaining safety and efficiency.
For a reliable emergency cooking station, you'll need:
- A 100-watt solar panel connected to a 20-amp MPPT charge controller and 12-volt LiFePo4 batteries for consistent power.
- The InstaFire Inferno Pro Outdoor Biomass Stove for renewable fuel cooking, plus a solar oven for energy-free meal preparation.
- An Alexapure Pro Water Filtration System and 4-week emergency food supply stored in waterproof containers.
- A Wireless Solar PowerBank Charger with LED lighting and S.O.S. signal capabilities for safety.
Remember to pack your Stainless Steel Mess Cooking Kit and durable utensils for complete meal preparation capabilities.
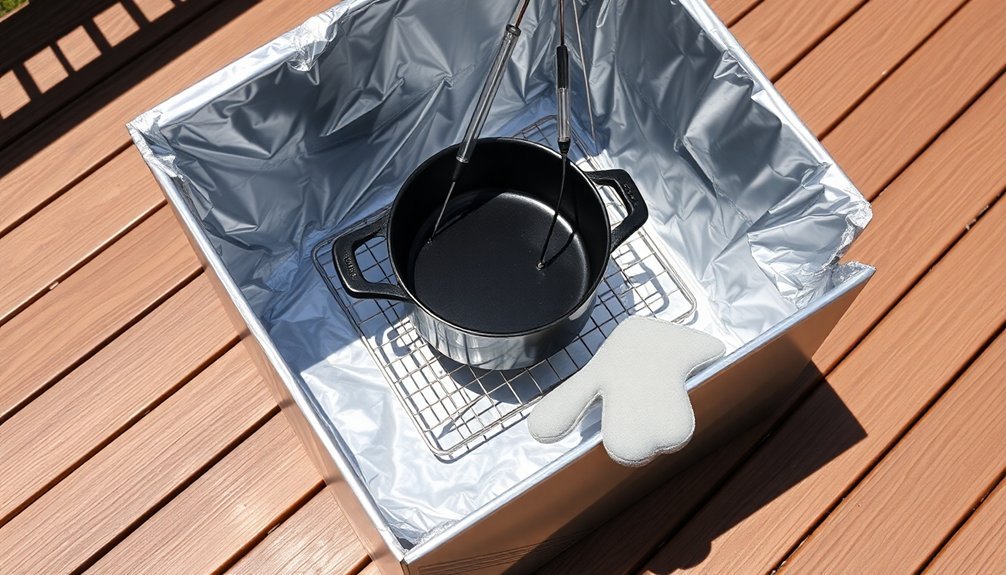
Nested Box Heat Collector
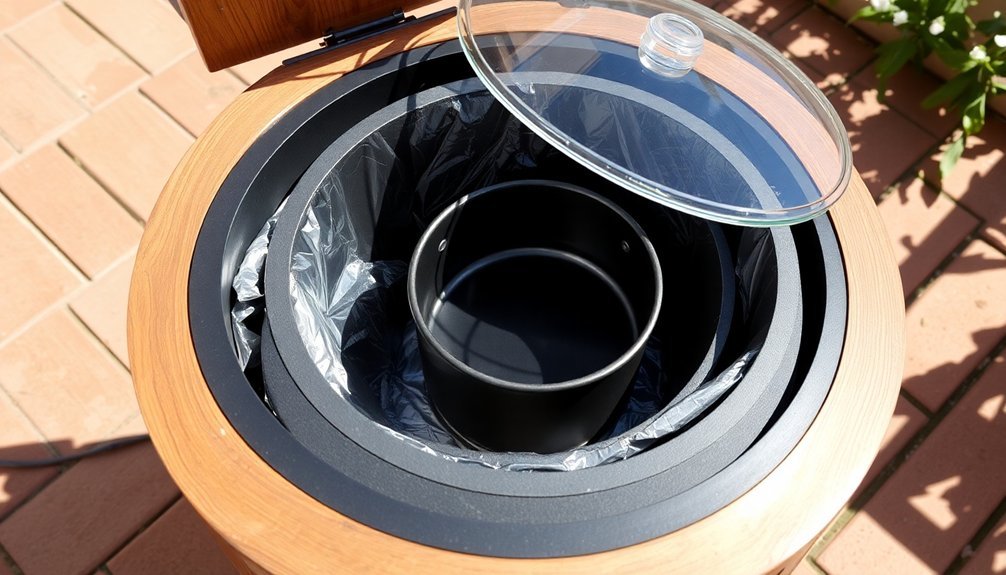
A nested box heat collector revolutionizes solar cooking through its efficient dual-box design.
You'll need two boxes: an inner one with a 38 cm × 38 cm opening and an outer box that's slightly larger, leaving 1.5 cm of airspace between them. Paint the inner box black to maximize heat absorption.
To build it, trace and cut the inner box's outline on the outer box, then install a black-painted shelf that acts as a heat sink.
Add a glass or plastic window on top to trap heat, and position reflector panels around the exterior to direct more sunlight inside.
You'll achieve temperatures of 300º-350ºF, perfect for stewing, roasting, and baking. The setup lets you cook for 3-5 hours without constant monitoring, making it ideal for sustainable outdoor cooking.
Windshield Shade Cooking Station
Three common household items – a car windshield shade, dark cookware, and a cooking bag – form the basis of this ingenious solar cooking station.
You'll shape the reflective shade into a funnel, secure it with duct tape, and position it in a cardboard box with a wire rack across the top.
This simple setup can reach temperatures up to 350°F and works like a slow cooker.
Here's what makes it so practical:
- You can build it for under $7 using readily available materials
- It's completely collapsible for easy storage and transport
- You won't heat up your kitchen during summer months
- You'll have a reliable cooking method during power outages
Just remember to adjust the reflector periodically to follow the sun, and use a cooking bag to trap heat effectively around your pot.
Frequently Asked Questions
Can Solar Ovens Work Effectively at High Altitudes?
Yes, your solar oven can actually work more efficiently at high altitudes. You'll benefit from less atmospheric interference and clearer skies, allowing more direct solar radiation to reach your cooking surface for better performance.
How Do Extreme Humidity Levels Affect Solar Cooking Performance?
High humidity will greatly reduce your solar oven's performance. You'll face slower cooking times, unwanted condensation on the glass lid, and reduced heat retention. For best results, you'll want to cook during drier conditions.
Is It Safe to Leave Food Cooking Unattended in Solar Ovens?
You shouldn't leave food unattended in solar ovens. You'll need to monitor temperatures, adjust the oven's angle every 1-2 hours, and check food regularly to prevent spoilage and guarantee safe cooking temperatures.
Will Food Cooked in Solar Ovens Retain Its Nutritional Value?
You'll get mixed nutrient retention in solar-cooked foods. While proteins and minerals stay well-preserved, you'll lose more vitamin C due to longer cooking times. Overall, you'll still maintain good nutritional value in most dishes.
Can Solar Ovens Be Used to Sterilize Water for Drinking?
Yes, you can use solar ovens to sterilize drinking water. They'll heat water to pasteurization temperatures (159°F/71°C) within 2-6 hours on sunny days, making it safe to drink by killing harmful pathogens.
In Summary
You'll find these ten DIY solar kitchen setups easy to build and maintain, even as a beginner. Whether you've chosen the simple pizza box oven or the more advanced windshield shade station, you're now equipped to harness the sun's power for cooking. Don't forget to experiment with different designs and materials as your confidence grows. You're ready to start your solar cooking journey while saving energy and money.


Leave a Reply