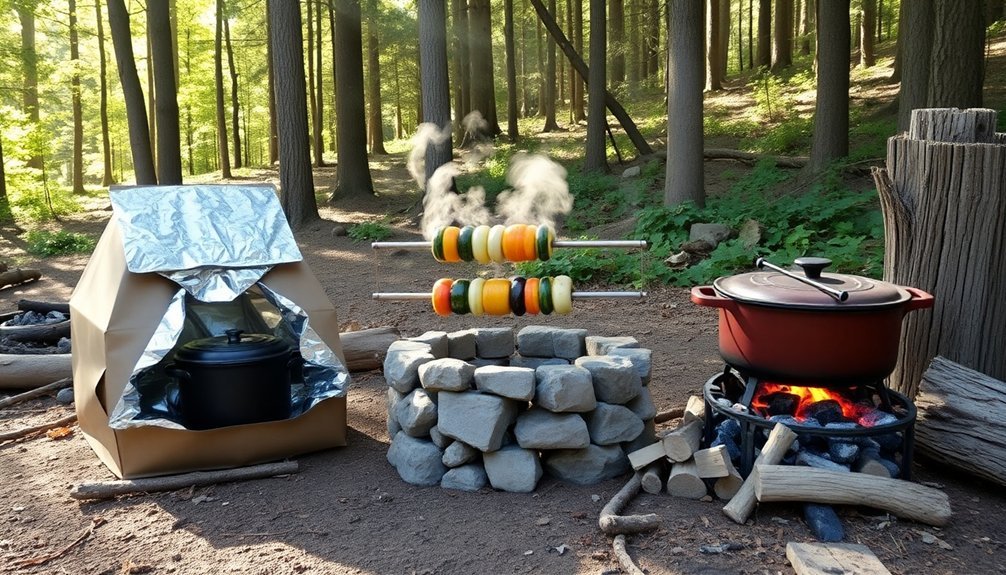
Start by building a simple solar oven using cardboard boxes, aluminum foil, and plastic wrap – it'll reach 200°F on sunny days. You can maximize heat retention by using insulated containers with hay or blankets for slow-cooking soups and stews. Create aluminum foil reflectors from cereal boxes to boost cooking power, and position your cooker between 11 AM and 3 PM for best results. Set regular mealtimes, maintain safe food temperatures, and keep backup cooking methods like portable stoves handy. Don't forget essential tools and safety gear, and preserve warmth during cloudy days with proper insulation. These basics will jumpstart your journey toward off-grid cooking mastery.
Build a Simple Solar Oven

When the power goes out, a homemade solar oven can be your best friend for cooking meals without electricity. You'll need cardboard boxes, aluminum foil, clear plastic wrap, black construction paper, and basic adhesives to build one.
Start by cutting a flap in your box's lid and lining it with foil. Create an insulated chamber by nesting a smaller box inside a larger one, filling gaps with crumpled newspaper.
Line the inner box's bottom with black construction paper to absorb heat, then seal the top with plastic wrap to create a window. On a sunny day, your solar oven can reach 200 degrees Fahrenheit.
Prop the foil-lined lid at an angle to direct sunlight into your oven. You can use a wire hanger or stick to maintain the proper position.
For best results, adjust the angle throughout the day to maximize sun exposure.
Maximize Natural Heat Retention
Once you've learned to harness natural heat retention, you'll discover an efficient way to cook without electricity.
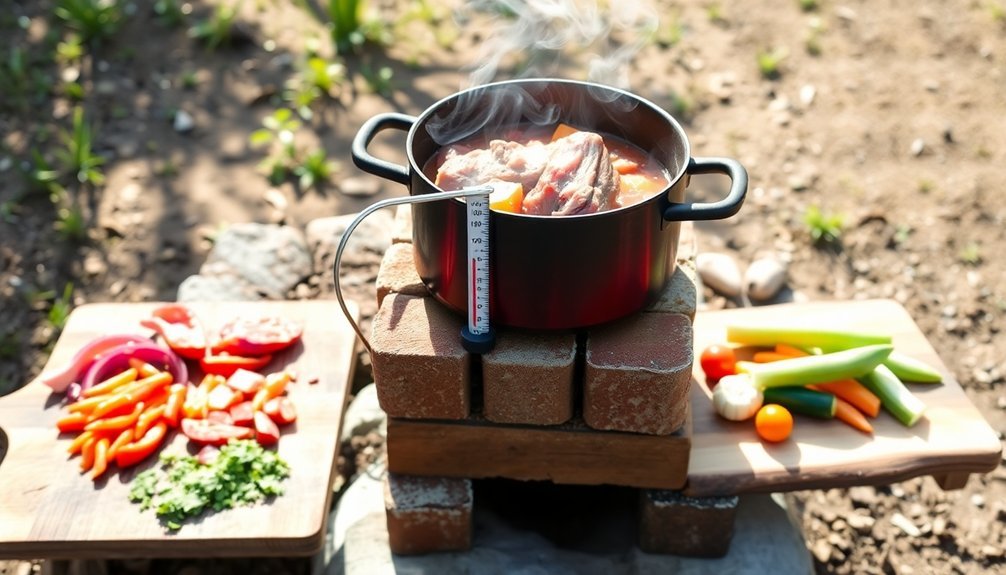
Start by bringing your food to a complete boil in a high-quality stainless steel vessel filled to 80% capacity. Transfer it immediately to an insulated container with a tight-fitting lid.
You'll need at least 4 inches of insulation surrounding your cooking pot. Use materials like hay, wool, or blankets to maintain temperatures between 160°F and 190°F for up to 10 hours. Soups and stews are particularly well-suited for this cooking method.
For best results, preheat your container with boiling water before adding food. This method works great for steel-cut oats, quinoa, pasta, and cracked wheat.
This fuel-efficient approach won't scorch your food or require constant monitoring. Plus, you'll use less water since there's minimal evaporation.
Use Aluminum Foil Reflectors

Another powerful method for electricity-free cooking involves aluminum foil reflectors. You'll want to cover cereal boxes or other sturdy shapes with the shiny side of aluminum foil, keeping it as smooth as possible for maximum reflection. Secure the foil with tape and position your reflectors to direct sunlight into your cooking area.
You can create an efficient solar cooking setup by combining these reflectors with heat traps like turkey bags or glass lids. Online communities frequently share their successful solar cooking designs to help others improve their setups.
While aluminum foil isn't as durable as some alternatives, it's easily replaceable and remarkably effective – capable of bringing water to a boil twice as fast as other materials.
Remember to adjust your reflectors throughout the day to follow the sun's movement, and consider using water bottles as weights to maintain proper positioning.
Position Your Solar Cooker
Position your solar cooker between 11:00 AM and 3:00 PM, tracking the sun's path every 20-30 minutes for maximum heat absorption.
You'll need a clear, level space with unobstructed sunlight, away from trees or buildings that could cast shadows throughout the day.
Make sure there's enough room around your reflectors to catch and redirect sunlight, and use stones or bricks to stabilize the cooker on windy days.
Track Sun's Daily Path
To maximize your solar cooker's efficiency, tracking the sun's daily movement is essential. Position your cooker at an angle that matches your latitude, and make adjustments every 20-30 minutes to maintain ideal sun exposure.
For best results, cook between 11:00 AM and 3:00 PM when the sun's intensity peaks, though you'll need to start earlier during winter months.
- Orient the shorter front panel eastward for lunch or westward for dinner preparation.
- Keep the shadow under the front flap less than half its width.
- Stabilize the cooker with stones or bricks on windy days.
- Create an air gap under your pot using a wire rack for better heat retention.
Consult solar insolation maps to plan your cooking schedule according to seasonal changes and available sunlight hours.
Maximize Direct Sunlight Exposure
Successful solar cooking depends on maximizing direct sunlight exposure throughout the cooking process.
Position your solar cooker between 11:00 AM and 3:00 PM when the sun's intensity peaks, or start earlier around 10:00 AM during winter months.
Place your cooker on a dry, level surface away from any shadows or obstacles. Use stones or bricks for stability on windy days.
Point the face and panels directly at the sun, orienting the shorter front panel eastward for noon meals or westward for evening cooking.
You'll need to adjust the cooker every 20-30 minutes to maintain ideal exposure.
For best results, use dark cookware and create an air gap under your pot.
Keep reflector surfaces clean and consider adding thermal mass materials like bricks around pots to maintain steady temperatures.
Clear Space Around Reflectors
Four key elements define proper reflector positioning for your solar cooker.
You'll need to maintain clean surfaces, adjust angles regularly, and guarantee stability to maximize your cooking efficiency. Remember that proper positioning makes all the difference in achieving peak temperatures.
- Clean your reflectors daily to remove dirt and debris that can reduce efficiency – polished aluminum or mirrored surfaces work best.
- Adjust reflector angles every hour, rotating them 10 degrees to track the sun's movement.
- Create stable support using bricks or stones on windy days, and add wind barriers when needed.
- Position the cooker to avoid shadows, keeping reflectors within 30 degrees of the sun's position.
For box-style cookers, focus on adjusting the reflectors rather than moving the entire unit.
Always maintain an air gap under your pot using a wire rack for better heat circulation.
Time Your Cooking Schedule

When your home lacks electricity, maintaining a structured cooking schedule becomes essential for managing resources and preserving family routines.
You'll need to plan regular mealtimes that accommodate your available cooking methods and fuel supplies. Consider preparing breakfast when natural light is available, and schedule dinner before sunset to maximize daylight hours.
Map out your daily meals to include no-cook options like sandwiches for lunch, saving your fuel resources for hot dinners.
Don't forget to factor in food safety – you'll want to cook only what you can consume in one sitting to avoid storing leftovers. If you must keep leftovers, use coolers with ice and consume within 24 hours.
Remember to adapt your schedule based on seasonal changes and weather conditions that might affect your cooking methods.
Choose Quick-Cooking Ingredients
Building on your organized cooking schedule, selecting ingredients that cook quickly will help you conserve fuel and time during power outages. Focus on items that require minimal heat and cooking duration to prepare safe, satisfying meals.
- Stock up on quick-cooking grains like couscous, bulgur, and instant rice – they'll be ready in minutes with just hot water.
- Keep canned proteins handy, including tuna, beans, and pre-cooked meats that need little to no heating.
- Choose fast-cooking vegetables such as sugar snap peas, cherry tomatoes, and frozen vegetable medleys that you can prepare quickly.
- Store just-add-water meals, instant noodles, and dehydrated food mixes for emergencies when you need the fastest possible meal preparation.
These ingredients will maximize your fuel efficiency while ensuring you can prepare nourishing meals during extended power outages.
Maintain Safe Food Temperatures
Safe food temperatures remain critical even during power outages, as harmful bacteria can multiply rapidly in the temperature danger zone between 41°F and 135°F.
You'll need to be extra vigilant about food safety when you don't have electricity to power your refrigerator or stove.
Keep your refrigerator and freezer doors closed as much as possible to maintain cold temperatures. A full freezer will stay frozen for about 48 hours, while a refrigerator can maintain safe temperatures for about 4 hours.
Use a food thermometer to check temperatures regularly. If food rises above 41°F for more than 2 hours, you'll need to discard it.
For hot foods, serve them immediately after cooking, and don't try to keep them warm without proper equipment.
When in doubt, throw it out to prevent foodborne illness.
Create Emergency Backup Methods
You'll want to build a collection of diverse cooking tools, including portable butane stoves, solar ovens, and traditional BBQ equipment, so you're prepared for any power outage scenario.
Learning to use multiple heat sources, from propane and charcoal to solar power and buddy burners, guarantees you can adapt to whatever fuel is available during an emergency.
Master these various cooking methods through regular practice, testing each option before you actually need it in a crisis.
Diversify Your Cooking Tools
When preparing for power outages, having multiple cooking options can mean the difference between hot meals and cold canned food.
You'll want to combine portable stoves, outdoor methods, solar solutions, and indoor-safe tools to guarantee you're ready for any situation.
- Start with a reliable camping stove that uses propane or butane as your primary backup, then add a solar oven for fuel-free cooking on sunny days.
- Master outdoor cooking with a rocket stove or fire pit setup, which can use readily available twigs and wood.
- Include indoor-safe options like canned heat or buddy burners for times when you can't cook outside.
- Keep a lightweight backpacker stove or Jetboil in your emergency kit for quick-heating needs.
This diverse approach guarantees you'll always have a way to prepare hot meals, regardless of conditions.
Master Multiple Heat Sources
Building resilience against power outages requires mastering multiple heat sources for cooking. You'll need to develop skills with various methods, from open flames to alternative fuel sources, ensuring you're never left unable to prepare meals.
| Heat Source | Key Benefits |
|---|---|
| Open Flame | Works with multiple fuels and readily available materials |
| Solar Ovens | Free energy source, perfect for slow cooking |
| Propane/Butane | Portable, efficient, easy temperature control |
| Canned Heat | Safe for indoor use, requires minimal ventilation |
Practice using these different cooking methods before you need them. Start with simple campfire cooking using cast-iron cookware, then progress to solar ovens on sunny days. Don't forget to master portable stoves and emergency options like buddy burners or hay box ovens. Keep essential tools handy, including long-handled utensils and heat-resistant gloves, to safely manage each cooking method.
Store Essential Cooking Tools

Three categories of essential cooking tools form the backbone of a no-electricity kitchen: appliances, utensils, and safety equipment.
You'll need a mix of portable stoves, manual tools, and safety gear to maintain food preparation capabilities during power outages.
- Stock up on reliable cooking appliances like a butane-fueled portable stove, solar cooker, and cast iron Dutch oven for versatile cooking methods.
- Gather vital manual tools including a can opener, sharp knife with cutting board, and multi-purpose utensils.
- Install a gravity-fed water filtration system and keep a fire extinguisher nearby for safety.
- Don't forget essential supplies like cooking oils, spices, and handwashing materials.
Store these items in an easily accessible location, and make sure everyone in your household knows how to use them properly.
Preserve Heat During Cloudy Days
Since sunlight may not always be available during power outages, you'll need effective strategies to preserve heat, especially on overcast days. Isolate yourself in a small, sealed room where you can better maintain warmth. Cover windows and doors with plastic sheeting and duct tape, placing rolled towels at the bottom to block drafts.
Create a cozy space by setting up a tent or makeshift fort within the room, then line it with mylar thermal blankets.
Layer your clothing with moisture-wicking fabrics, thermal underwear, and windproof outer layers. Don't forget to protect your head, ears, and fingers with appropriate gear.
If you have access to safe indoor heating sources like candle warmers or fondue pots, use them strategically in your confined space. Remember to avoid dangerous fuel-burning devices that could produce carbon monoxide.
Frequently Asked Questions
How Do You Prevent Animals From Being Attracted to Outdoor Cooking?
You'll keep animals away by cleaning your grill thoroughly, using tight-fitting covers, storing food in sealed containers, applying natural repellents like peppermint oil, and removing all food scraps from your cooking area immediately.
Can You Use River Rocks for Cooking Without Them Exploding?
Don't use river rocks for cooking – they're unsafe and likely to explode. They retain moisture and can burst when heated. You'll want to gather rocks from high, dry locations instead.
What Makeshift Materials Can Substitute for Cooking Utensils in Emergencies?
You can use sticks as skewers, carved wood as spoons, aluminum foil as plates or pans, smooth rocks as cutting boards, and clamshells as scoops. Clean thoroughly before using any makeshift utensils.
How Long Can Food Stay Fresh Without Refrigeration When Cooking Outdoors?
You'll need to eat perishable foods within 4 hours at room temperature. Your dried goods last 1-2 years, while fruits like apples keep 3 weeks. Store nuts and peanut butter safely for months.
Which Wild Plants Are Safe to Use as Fuel for Cooking?
You can safely use dry hardwoods like oak and maple, plus small twigs and branches from the ground. Just verify they're not moldy or treated. Avoid burning toxic plants or painted wood when cooking.
In Summary
You'll find that no-electricity cooking isn't just for emergencies – it's a valuable skill that can serve you well in many situations. By mastering these solar cooking techniques and keeping essential tools ready, you're prepared for power outages and outdoor adventures alike. Remember to practice these methods before you actually need them, and you'll cook confidently when traditional power sources aren't available.


Leave a Reply