
Get the most from your solar cooking by following seven key seasonal strategies. You'll want to adjust your oven's position every 20-30 minutes to track the sun, with ideal cooking between 11 AM and 3 PM in most seasons. Modify temperatures based on the season – up to 350°F in summer, down to 140°F in fall. Consider humidity and cloud cover when planning cook times, and choose recipes that match seasonal conditions, like hearty stews in winter and quick-cooking vegetables in summer. Keep your equipment clean and properly stored between uses, and always check weather forecasts before cooking. These fundamentals will help you master the art of cooking with the sun.
Positioning Your Solar Oven
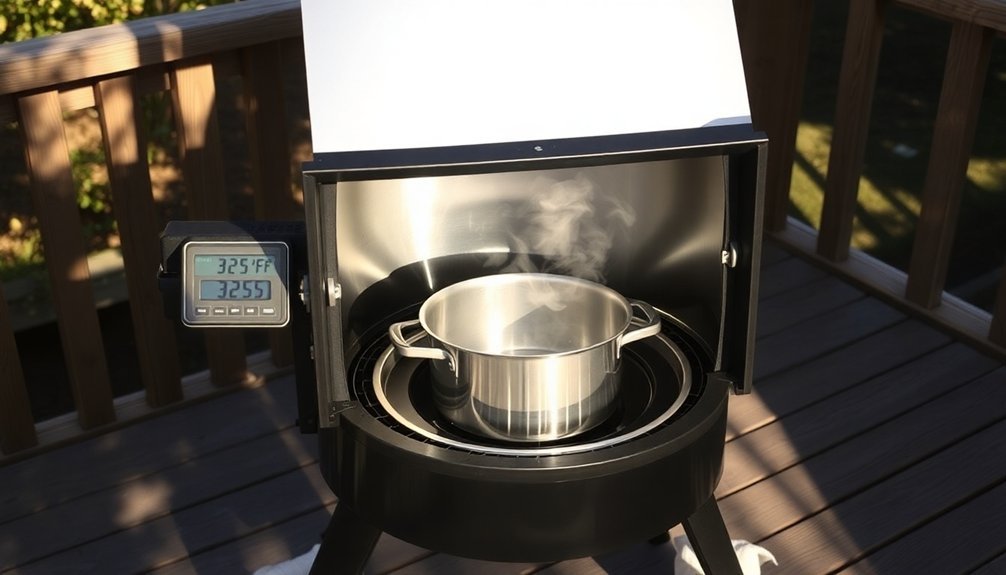
When it comes to positioning your solar oven, timing and alignment are essential for ideal cooking results. Place your cooker between 11:00 AM and 3:00 PM when sunlight is strongest, but during winter months, you'll want to start around 10:00 AM.
You'll need to adjust the position every 20-30 minutes to follow the sun's path. For optimal performance, orient your solar cooker at an angle equal to latitude. Make sure you're setting up on dry, level ground and point the shorter front panel east for noon meals or west for evening cooking.
To check proper alignment, look at your cooker's shadow – it should fall directly behind the unit. For precise positioning, you can use a protractor to measure reflector angles.
If it's windy, stabilize your oven with stones or bricks and seek a sheltered spot for protection.
Seasonal Temperature Adjustments
Since outdoor temperatures fluctuate throughout the year, you'll need to adapt your solar cooking techniques for each season. Understanding temperature variations and peak cooking hours will help you achieve better results with your solar cooker.
| Season | Key Adjustments |
|---|---|
| Summer | Cook between 10 AM-2 PM, temps up to 350°F, minimal repositioning needed |
| Winter | Use thermal mass, frequent angle adjustments, preheat oven, add insulation |
| Spring | Peak hours 11 AM-3 PM, temps to 300°F, ideal in 18-25°C weather |
| Fall | Cook at 140-160°F, extend cooking time, best for slow-cooking methods |
| General | Higher temps work best for baking, lower for simmering |
You'll achieve excellent results in spring and summer when UV levels are strongest. During fall and winter, consider using boosters and additional insulation to maintain cooking temperatures. Properly designed solar ovens can maintain warmth for hours after sunset, allowing for flexible meal planning throughout the day.
Weather Impact on Cooking Times
Weather conditions play an essential role in determining your solar cooking success and timing. When you're planning a sun-powered meal, you'll need to account for various environmental factors that can affect your cooking duration.
- High humidity will speed up your cooking process since moisture stays on your food's surface, maintaining higher temperatures.
- Cold winds and rain will greatly cool your solar cooker's exterior, forcing you to extend cooking times.
- Cloud cover between 11:00 am and 3:00 pm (peak solar hours) will reduce your cooker's efficiency and require timing adjustments.
- Winter's shorter days limit your cooking window, so you'll need to start earlier and maintain warming stages.
Consider using a water pan to regulate humidity levels inside your cooker, and always track the sun's position to maximize exposure during limited daylight hours. The boiling point drops approximately 2°F for every 1,000 feet of elevation gain, which affects cooking times at higher altitudes.
Best Recipes By Season
As the seasons change throughout the year, your solar cooking menu can adapt to feature the most abundant and suitable ingredients for each period. You'll find perfect recipes that match both seasonal produce and solar cooking conditions. Since solar cooking achieves even heat distribution, your seasonal dishes will cook uniformly and bring out the best flavors.
| Season | Best Solar Cooking Options |
|---|---|
| Spring | Try asparagus-potato dishes and stuffed bell peppers, or experiment with a fresh herbed quiche |
| Summer | Focus on lighter fare like grilled squash and cauliflower with chickpeas, or prepare a revitalizing cucumber salad |
| Autumn | Embrace pumpkin risotto and roasted butternut squash, or treat yourself to curry beef with seasonal vegetables |
| Winter | Warm up with hearty stews and braised roasts, or bake comforting treats like rolls and cinnamon cookies |
Choose recipes that maximize your solar cooker's potential during each season's unique sunlight patterns.
Sun Tracking Through Seasons
Understanding sun patterns is key to mastering solar cooking year-round. You'll need to adjust your cooker's position more frequently during winter months when the sun moves quickly across the sky. The seasonal angle changes also require different positioning strategies to enhance sunlight exposure.
- Summer offers the longest cooking window (10 AM – 4 PM), with the sun directly overhead.
- Winter narrows your prime cooking time (11:30 AM – 2:30 PM), but snow reflection can boost efficiency.
- Fall and spring provide moderate windows (11 AM – 3 PM) as the sun shifts southward.
- Extended cooking times are possible from 8:30 AM to 6:30 PM with efficient cookers.
Keep your solar cooker oriented for peak sun exposure, and don't forget that tubular ovens excel on cloudy days thanks to their superior heat retention.
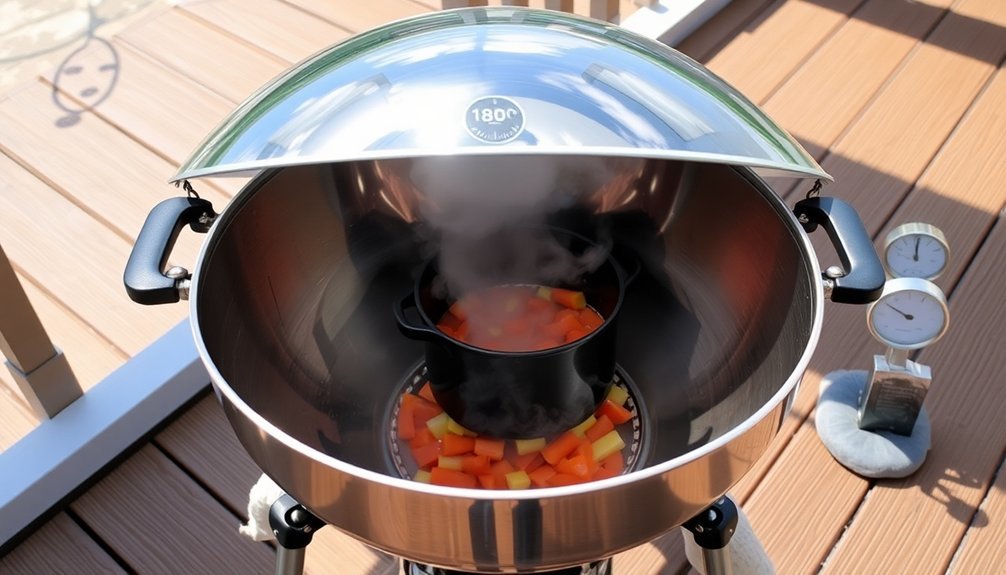
Moisture Control Year Round
Managing moisture levels in your solar cooker proves essential for maintaining ideal cooking temperatures throughout the year.
You'll need to regularly check for condensation on your glass lid and quickly wipe away any moisture that blocks sunlight entry.
To control steam buildup, you can reduce liquid in your recipes by ¼ to ½ cup when possible.
For additional moisture management, try placing a clean tea towel over your pot or using a cooking bag to absorb excess steam.
If you're still struggling with condensation, consider leaving one latch loose or using a small stick to create a minimal gap for venting.
Equipment Care Each Season
You'll need to give your solar cooker extra attention during seasonal changes to maintain its performance.
In spring, clean all reflective surfaces thoroughly to remove winter's buildup of dirt and grime, ensuring maximum sunlight absorption for efficient cooking.
When winter approaches, protect your equipment by storing it in a dry indoor location and covering it with moisture-resistant materials to prevent rust and degradation.
Spring Cleaning Solar Surfaces
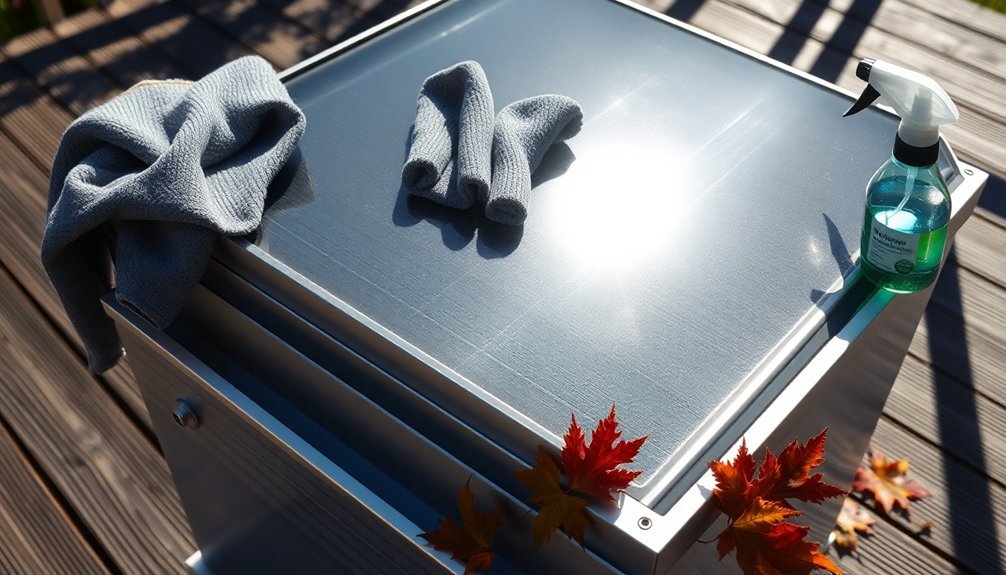
To maintain peak efficiency of your solar cooking equipment, regular cleaning and maintenance are essential throughout the year, especially during spring when natural debris accumulates.
You'll need basic supplies like a soft cloth, mild soap, and deionized water to prevent mineral buildup on your surfaces.
For safe and effective cleaning of your solar equipment:
- Use a gentle, non-abrasive sponge with warm, soapy water to remove dirt and grime
- Avoid harsh chemicals and high-pressure washing that could damage surfaces
- Apply isopropyl alcohol with a soft cloth for stubborn spots
- Rinse thoroughly with deionized water and dry with a squeegee
Remember to inspect your equipment during cleaning for any damage or wear that might need attention.
Regular maintenance in spring and fall helps guarantee peak performance of your solar cooking setup.
Winter Storage Protection
Proper winter storage of your solar cooking equipment prevents costly damage and extends its lifespan. Start by covering your solar panels with dark-colored tarps or plywood, ensuring they're securely fastened against wind and snow.
Don't forget to label your wires and disconnect panels from the controller.
Your batteries need special attention during winter months. Store them in a warm, dry indoor location, preferably on wooden pallets. Make sure they're fully charged before storage and check them monthly for maintenance charging.
You'll want to keep them insulated if they're not rated for freezing temperatures.
Keep your solar cooking equipment clean and dry before storing. Use dehumidifiers to control moisture levels and store items in a climate-controlled space when possible.
Remember to inspect everything regularly for damage or pest issues, and address problems promptly.
Frequently Asked Questions
Can Solar Ovens Be Used to Sterilize Medical Equipment?
Yes, you can sterilize medical equipment using solar ovens. They'll reach temperatures above 180°C, meeting CDC sterilization standards. You'll need direct sunlight and chemical indicators to confirm proper sterilization has occurred.
How Do Different Altitudes Affect Solar Cooking Temperatures and Times?
You'll cook faster at higher altitudes since there's less atmosphere blocking sunlight. Your solar cooker will reach higher temperatures and reduce cooking times due to more intense, direct solar radiation.
What Safety Precautions Should I Take When Cooking Meat in Winter?
You'll need to use a thermometer to guarantee proper cooking temperatures, store meat below 40°F, prevent cross-contamination, and never thaw meat at room temperature. Always cook poultry to 165°F and beef to 160°F.
Does Food Cooked in Solar Ovens Retain More Nutrients?
Yes, you'll get more nutrients from solar-cooked food. Your meals will retain higher levels of protein, vitamins, and minerals due to the gentle, low-temperature cooking process that doesn't destroy essential nutrients.
Can I Use Aluminum Foil Instead of Dark-Colored Pans?
You can use aluminum foil, but it's not as effective as dark-colored pans. While foil reflects sunlight, it doesn't absorb heat well. For best results, use foil for reflection and dark pans for cooking.
In Summary
You'll find solar cooking rewarding throughout the year when you adapt to nature's rhythms. Keep adjusting your oven's position with the seasons, monitor your cooking times based on weather conditions, and maintain your equipment carefully. Don't let cloudy days or winter temperatures discourage you – with these seasonal strategies, you'll create delicious sun-powered meals no matter what the calendar says. Start experimenting today!


Leave a Reply