
After sun-cooking your food, you'll need to cool it quickly to prevent bacterial growth. Start by dividing the food into smaller portions and placing them in shallow, stainless steel containers. Use an ice bath and stir regularly to speed up the cooling process, ensuring the temperature drops from 140°F to 70°F within 2 hours, then to 40°F within 4 hours. Store your cooled food in airtight, food-grade containers and keep them in the refrigerator below 40°F. Monitor for any signs of spoilage like unusual odors or textures, and always use clean utensils to prevent cross-contamination. The journey to perfectly preserved sun-cooked meals doesn't end here.
Rapid Cooling Techniques
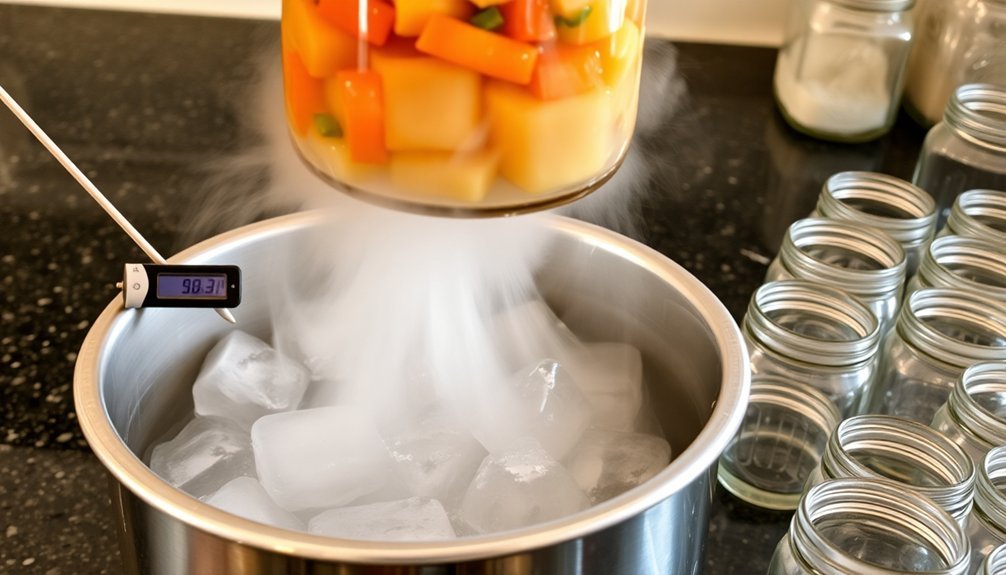
When it comes to food safety, properly cooling hot foods is essential to prevent bacterial growth. You'll need to quickly reduce temperatures using proven methods that prevent your food from lingering in the danger zone between 41-140°F.
Start by dividing your food into smaller portions and spreading them in shallow, stainless steel pans.
Don't stack containers, as this traps heat. For faster cooling, place your food containers in an ice bath and stir regularly. If you're working with soups or sauces, you can add ice directly as an ingredient to speed up the process.
For maximum efficiency, combine multiple cooling methods. Consider using specialized equipment like blast chillers or freeze sticks.
Safe Storage Container Selection
When choosing food storage containers, you'll need to decide between airtight options for dry goods and ventilated containers for produce that needs to breathe.
Your containers should be made from food-grade materials like BPA-free plastic, glass, or stainless steel to prevent chemical leaching and contamination.
Pick containers that stack efficiently and match your portion sizes to maximize space while keeping food fresh and accessible.
Airtight Vs Ventilated Containers
Choosing between airtight and ventilated containers can considerably impact your food's freshness and safety.
For dry goods like pasta, flour, and cereals, you'll want airtight containers with snap-lock lids or silicone seals to prevent oxidation and maintain quality for months. These containers also work well for leftovers and can be stacked to maximize storage space.
However, for fruits and vegetables, you'll need ventilated containers that control humidity and allow proper air circulation. These containers prevent excess moisture buildup while maintaining the right environment for natural ripening.
They're also essential for raw meats that require airflow to prevent bacterial growth. Remember that ventilated containers aren't suitable for dry goods or long-term storage of prepared meals, while airtight ones may not work well for storing fresh produce.
Material Safety Guidelines
Safe food storage begins with selecting the right container materials for your specific needs. Choose food-grade plastic containers or opt for microwave-safe glass and ceramic alternatives to prevent chemical transfer into your food.
Don't reuse single-use containers, as they're not designed for repeated heating and cooling cycles.
When handling your containers, make sure they're kept at moderate temperatures between 50°F and 70°F, away from direct sunlight and heat sources.
You'll want to check that they're specifically labeled for your intended use, whether it's freezer storage or microwave reheating.
Always wash your containers thoroughly with mild soap and warm water, and inspect them regularly for damage.
If you notice cracks, warping, or persistent odors, it's time to replace them.
Size and Stacking Options
Smart container selection begins with understanding size options and stacking capabilities for your kitchen storage needs. Choose from various sizes ranging from 1 to 7 cups, matching containers to your specific food storage requirements.
You'll want smaller containers for snacks and leftovers, while larger ones work best for bulk storage.
Make the most of your kitchen space by selecting containers that nest or stack efficiently. You can organize them in divided drawers or baskets, keeping lids separate from containers to prevent clutter.
Store your most-used containers in easily accessible locations, like near the fridge or in lower drawers. For less frequent items, utilize higher shelves or upper cabinets.
When you're planning to transport food, opt for portable solutions like silicone bags for convenience.
Temperature Monitoring Best Practices
You'll need different thermometer types for various temperature checks: digital probes for internal food readings, infrared for surface temperatures, and basic units for cold storage areas.
To avoid the time-temperature danger zone between 40°F and 140°F, monitor your foods frequently and maintain proper hot-holding above 140°F and cold storage below 40°F. Following proper hygiene practices during temperature monitoring helps prevent cross-contamination and ensures food safety.
When cooling hot foods, follow the two-stage cooling process: cool from 140°F to 70°F within two hours, then from 70°F to 40°F within the next four hours.
Thermometer Types and Uses
Four essential types of food thermometers help guarantee proper temperature monitoring in both home and commercial kitchens.
Lollipop thermometers offer an affordable solution for checking liquids and semi-solid foods with their simple LCD display and metal shaft.
If you're looking for professional-grade equipment, dual IR and probe thermometers provide both surface and core temperature readings in one device.
For tech-savvy users, Bluetooth and wireless thermometers deliver quick readings in just one second and should be certified for accuracy every two to three years to maintain reliable performance.
Time-Temperature Danger Zones
Proper thermometer use goes hand in hand with understanding the temperature danger zone – the range between 41°F and 135°F where bacteria multiply rapidly.
You'll need to monitor food temperatures every two hours to guarantee they don't remain in this danger zone for more than 4 hours total.
Keep cold foods at or below 40°F and hot foods above 140°F. If you're storing hot food, don't let it sit out for more than 2 hours, or just 1 hour if outdoor temperatures exceed 90°F.
When reheating previously cooked items, bring them to at least 165°F for 15 seconds.
Always document your temperature readings in a log, including the time, food item, and your initials. This record-keeping isn't just good practice – it's essential for health inspections and maintaining food safety compliance.
Cooling Rate Requirements
When cooling hot foods, following precise temperature monitoring protocols is critical for food safety.
You'll need to cool food from 135°F to 70°F within 2 hours using ice-filled cooling paddles and regular stirring.
Monitor temperatures every 3-5 minutes during initial cooling, using a clean, sanitized probe thermometer. If food doesn't reach 70°F within 2 hours, reheat it to 165°F for 15 seconds and restart the process.
As you track temperatures, check every 15-30 minutes between 130°F and 80°F, then every 30-60 minutes below 80°F.
Once food reaches 70°F, monitor every 20 minutes until it hits 41°F. Always insert your thermometer probe into the food's center and wait for the reading to stabilize before removing it.
Cross-Contamination Prevention Methods
Cross-contamination poses a serious risk to food safety, but implementing proper prevention methods can protect your stored foods from harmful bacteria and contaminants.
Always store raw meats, poultry, and seafood below ready-to-eat foods in your refrigerator, following the specific order: whole fish at the top, followed by beef and pork cuts, ground meats, and poultry at the bottom.
Keep your raw and ready-to-eat foods separate during all stages of food handling. Don't use the same utensils for different foods, and guarantee you're using clean, sanitized containers with proper labels.
When storing food, wrap or cover it properly, and place it in designated areas away from cleaning supplies and waste.
Remember to wash your hands thoroughly before handling food and use appropriate utensils instead of bare hands for ready-to-eat items.
Signs of Food Spoilage

Knowing how to spot spoiled food is just as important as preventing contamination. You'll want to use your senses to detect when food has gone bad. Look for any slimy films on meats or vegetables, visible mold growth, or unusual discoloration. If you notice foam, bubbles, or unnatural textures, it's time to discard the food.
Trust your nose – if you detect funky, rancid, or sour odors, particularly in dairy or meat products, don't risk consuming them.
For packaged foods, check for bulging lids, improper seals, or dried food on jar tops. When handling items, if they feel slimy or unusually soft, that's a clear warning sign.
Also, watch for freezer burn on frozen foods and any physical damage that could have allowed bacteria to enter.
Proper Food Dehydration Steps
You'll need to guarantee proper air circulation by placing food items evenly on dehydrator trays or drying racks with enough space between pieces.
Keep humidity levels below 60% and use screens or netting to protect your food from contaminants while drying.
The ideal temperature of 140°F in an oven or dehydrator ensures proper moisture removal without cooking the food.
Test for complete dehydration by checking that fruits and vegetables are leathery but pliable, with no moisture pockets when cut open.
Maintain Proper Air Flow
Three critical factors drive successful food dehydration: controlled heat, dry air, and proper air circulation.
To maintain proper air flow, you'll need to arrange your food carefully on dehydrator trays in a single layer. Don't overcrowd the trays, as this can block air movement and create uneven drying. Make sure there's enough space between food pieces for air to circulate freely.
Check and rotate your trays regularly since lower trays often dry faster than upper ones. You'll want to prevent case hardening – a tough outer layer that forms when food dries too quickly.
Using recirculated exhaust air can help moderate the drying rate. Keep an eye on moisture levels by checking if food tears cleanly without beading. If you notice any oil surfacing, especially with meats, pat it dry to maintain effective air circulation.
Watch Humidity Levels
Since successful food dehydration depends heavily on moisture removal, maintaining low humidity levels is essential throughout the drying process.
You'll need humidity below 20% for effective drying, which is why areas like Arizona and the Sacramento Valley are ideal for sun-drying methods. In humid regions like Minnesota, you'll want to use controlled methods like food dehydrators.
Keep these critical humidity factors in mind:
- High humidity prevents moisture from escaping food, leading to potential mold growth and spoilage.
- Cool night air can reintroduce moisture through condensation, extending drying time.
- Storage areas must remain dry, as humid conditions will cause dried foods to absorb moisture.
If you're drying outdoors in humid conditions, protect your food by covering it at night and using a dehydrator during particularly humid periods.
Test For Complete Drying
Testing food for complete dehydration marks a critical step in preserving your harvest safely.
You'll need to check your food several times a day by poking it to determine its dryness level. When foods are properly dried, they'll develop a leathery texture. For meats, pat away any oil that surfaces during the drying process.
If you're sun-drying, move your items to a shaded area with good air circulation once they're about two-thirds dry. Before storing, make sure your foods are completely dehydrated to prevent spoilage.
Test different pieces from your batch since thickness variations can affect drying times. Once you're confident everything's thoroughly dried, transfer your foods to airtight containers.
Don't forget to label and date each container, then store them in a cool, dry place to maximize shelf life.
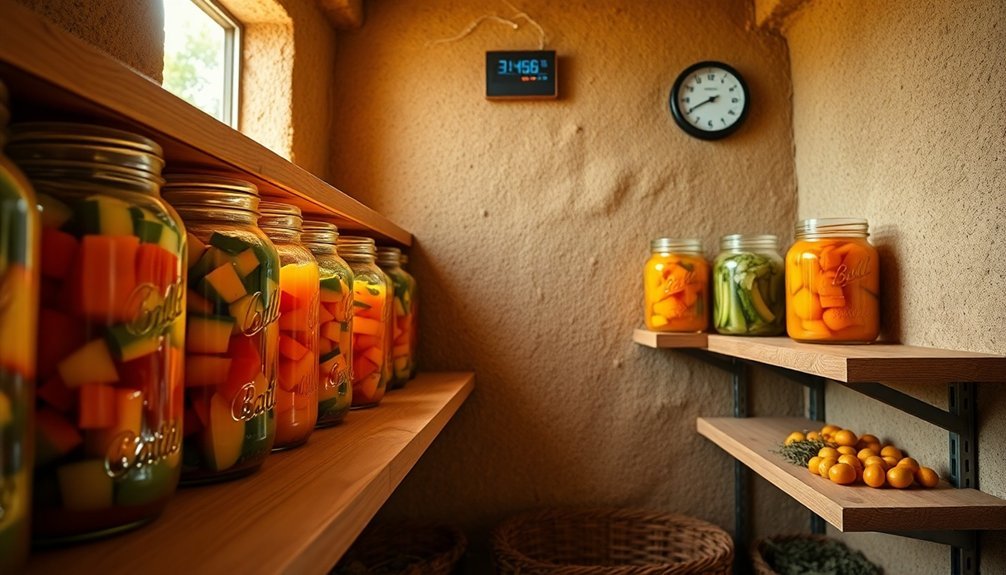
Storing Dehydrated Solar Foods

When storing dehydrated solar foods, proper containers and conditions are essential for maintaining quality and shelf life.
You'll need glass jars, tin cans, or plastic containers with tight-fitting lids that are both moisture-proof and airtight. Fill these containers completely to minimize air exposure, but don't crush your dried foods.
Store your preserved goods in a cool, dark, and dry location, away from heat sources and direct sunlight.
Here's what you'll need to monitor:
- Temperature consistency to preserve nutritional value
- Humidity levels to prevent moisture absorption
- Signs of pest infestation or container damage
Check your stored foods regularly and use desiccants if needed.
With proper storage, your dehydrated foods can last for months or years. Remember to label containers with storage dates and use older items first.
Solar Cooker Cleaning Guidelines
Proper maintenance of your solar cooker starts with regular cleaning of its key components.
You'll need to clean the reflective surface with a soft, damp cloth, avoiding harsh chemicals that could scratch it. For stubborn spots, use mild soap and water, then rinse thoroughly.
After each use, clean your cooking chamber with warm, soapy water and a non-abrasive sponge.
Don't forget to check seals and gaskets for food particles. When storing your cooker, keep it in a dry, cool place and use a weatherproof cover during winter months.
Perform seasonal inspections to check for cracks, damage, or wear in both the reflective surface and cooking chamber.
Remember to test your oven's performance regularly with a thermometer, and always protect it from moisture and harsh weather when not in use.
Environmental Storage Considerations
Beyond maintaining your solar cooker, understanding environmental factors is key to preserving your stored foods.
You'll need to control temperature, keeping it between 50°F and 60°F, while ensuring humidity stays below 60% to prevent spoilage. For maximum shelf life, implement proper airflow and use vacuum sealing with oxygen absorbers.
To maximize your food's longevity, follow these essential steps:
- Store dry foods in cool, dark spaces and avoid exposing canned goods to freezing temperatures that can compromise seams.
- Position storage racks with adequate spacing to promote air circulation and prevent moisture buildup.
- Use vacuum sealer bags specifically designed for food storage, and don't forget to label them with contents and date.
Reheating Previously Sun-Cooked Meals
Reheating sun-cooked meals safely requires careful attention to temperature control and timing.
You'll need to preheat your solar oven to at least 140°F, though 200°F is ideal for maintaining safe temperatures. Use a food thermometer to verify that your food reaches an internal temperature of 165°F.
Plan your reheating between 11:00 am and 3:00 pm when sunlight is strongest. Small items like eggs may take under an hour, while vegetables and cut meats need 2 to 2.5 hours.
Don't reheat food that's been at room temperature for over 3-4 hours. As you reheat, reposition your cooker to follow the sun, and stir liquids or rotate solid foods every 10-15 minutes for even heating.
Keep the food above 145°F until you're ready to serve.
Frequently Asked Questions
Can I Store Sun-Cooked Meals in Biodegradable Containers for Long-Term Storage?
You shouldn't store sun-cooked meals in biodegradable containers long-term. They're designed for short-term use and can break down over time, potentially compromising your food's safety and quality. Choose non-biodegradable containers instead.
How Long Can Preserved Sun-Cooked Food Remain Viable During Power Outages?
You'll need to treat sun-cooked food like any other perishable food during outages. Keep it at 40°F or below for up to 4 hours in your refrigerator, or transfer it to an ice-filled cooler.
What's the Maximum Altitude Where Solar Food Preservation Remains Effective?
While there's no confirmed maximum altitude limit, you'll find solar food preservation most effective at higher elevations due to lower humidity and better sun exposure. Your results may vary based on local conditions.
Does Moon Reflection Affect the Quality of Overnight Food Storage?
Moon reflections don't affect your stored food's quality. You should focus on proper storage containers, temperature control, and protection from moisture. The moon's light isn't strong enough to impact food preservation.
Can Electromagnetic Fields From Nearby Electronics Impact Preserved Solar-Cooked Food?
You don't need to worry about electromagnetic fields from electronics affecting your preserved solar-cooked food. There's no scientific evidence showing that ambient electromagnetic fields impact food quality during storage.
In Summary
You'll find that proper storage of sun-cooked food isn't complicated when you follow these essential guidelines. Cool your meals quickly, choose appropriate containers, monitor temperatures carefully, and stay vigilant about cleanliness. By implementing these storage practices and watching for spoilage signs, you're ensuring your solar-cooked meals remain safe and delicious. Remember to clean your solar cooker thoroughly and store food in suitable environmental conditions.


Leave a Reply