
Position your solar oven between 11 AM and 3 PM for maximum sunlight exposure, and adjust it every 30 minutes to track the sun's movement. Use dark-colored cookware to absorb heat more efficiently, and double-stack your cooking vessels to prepare multiple dishes simultaneously. Pre-heat your oven for 20-30 minutes to reach ideal temperatures, and guarantee a proper lid seal to retain heat and moisture. Protect against wind with strategic placement, and maximize cooking efficiency with polished aluminum reflectors. Wrap containers in heat-retention bags or blankets to maintain temperature, and group similar-temperature foods together. These proven techniques are just the beginning of mastering outdoor heating methods.
Position Your Solar Oven Effectively
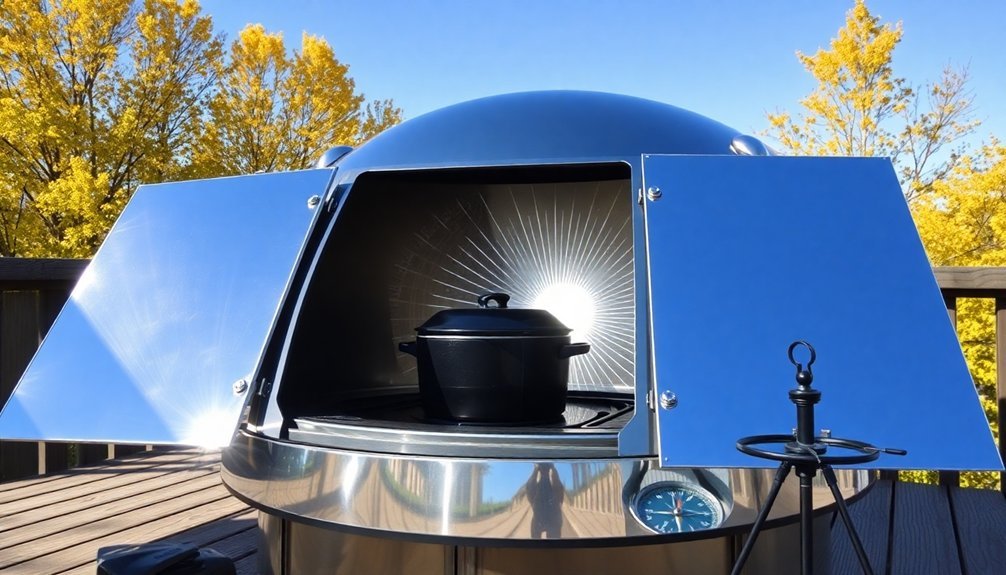
When positioning a solar oven outdoors, timing and placement make all the difference in cooking success. Set up your cooker between 11:00 AM and 3:00 PM when the sun's intensity peaks, or start an hour earlier during winter months.
You'll need to adjust its position every 20-30 minutes to track the sun's movement. Face your oven directly into the sunlight and check for proper alignment by ensuring the shadow falls directly behind the cooker. Using polished aluminum reflectors will significantly boost your cooking efficiency.
For maximum exposure, angle the device equal to your latitude and consult solar insolation maps to determine ideal cooking times in your location. Choose a sheltered spot to shield against wind, and use stones or bricks to stabilize the sides.
Don't forget to create an air gap under your pot using a wire rack for better heat retention.
Dark Cookware Absorbs More Heat
Although all cookware can absorb heat, dark-colored pots and pans excel at capturing and retaining thermal energy outdoors.
When you're cooking in the sun, you'll find that darker cookware absorbs and distributes heat more quickly than lighter-colored alternatives, making it ideal for outdoor meal preparation.
To maximize your dark cookware's effectiveness, you'll want to monitor cooking times carefully since food can cook faster than expected.
Similar to how dark clothing absorbs heat in sunlight, dark cookware provides superior heat absorption for outdoor cooking.
You don't need to compensate for the increased heat absorption when cooking outdoors – it's actually beneficial.
If you're using a solar oven, dark cookware will help you achieve better results as it efficiently captures and maintains the sun's energy.
For best results, choose black or very dark-colored pots and pans, which will greatly reduce your outdoor cooking time.
Double Stack Your Cooking Vessels
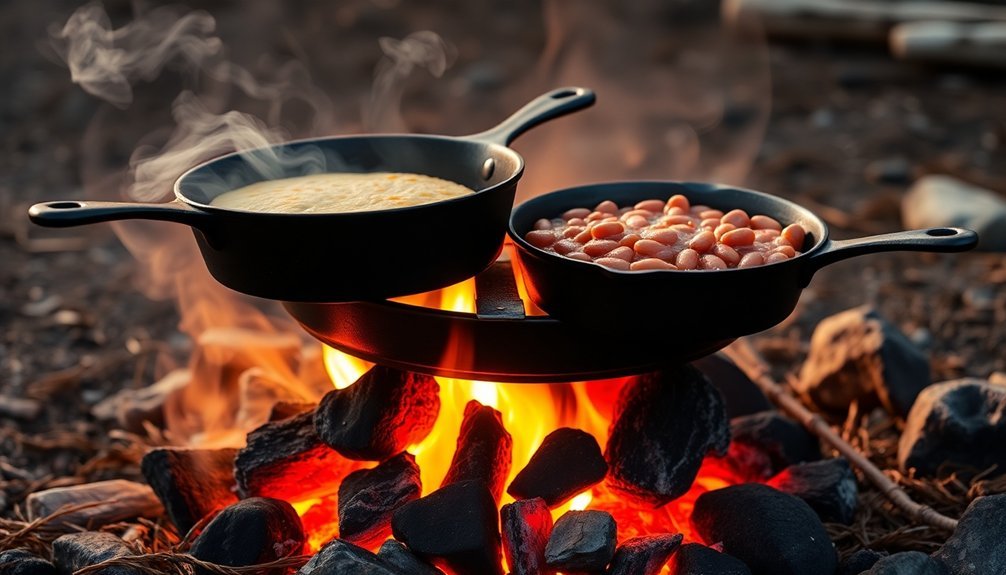
Double-stacking your cooking vessels creates a practical space-saving solution for outdoor meal preparation. You'll maximize efficiency by placing smaller pots or pans on top of larger ones, using the heat from your fire or stove to cook multiple dishes simultaneously.
Look for cooksets with nesting capabilities and interlocking pieces designed specifically for this purpose. The hard-anodized aluminum construction ensures excellent heat transfer between stacked pots.
To implement double-stacking effectively, choose a cookset with Click-Safe handles and LidKeep features that'll keep your vessels secure while stacked. Use the bottom vessel for dishes requiring more heat, like boiling water or stewing meat, while the top vessel works well for gentler cooking methods like steaming vegetables.
This technique not only saves fuel but also helps you prepare complete meals faster. Remember to handle stacked cookware carefully, using heat-resistant gloves when needed.
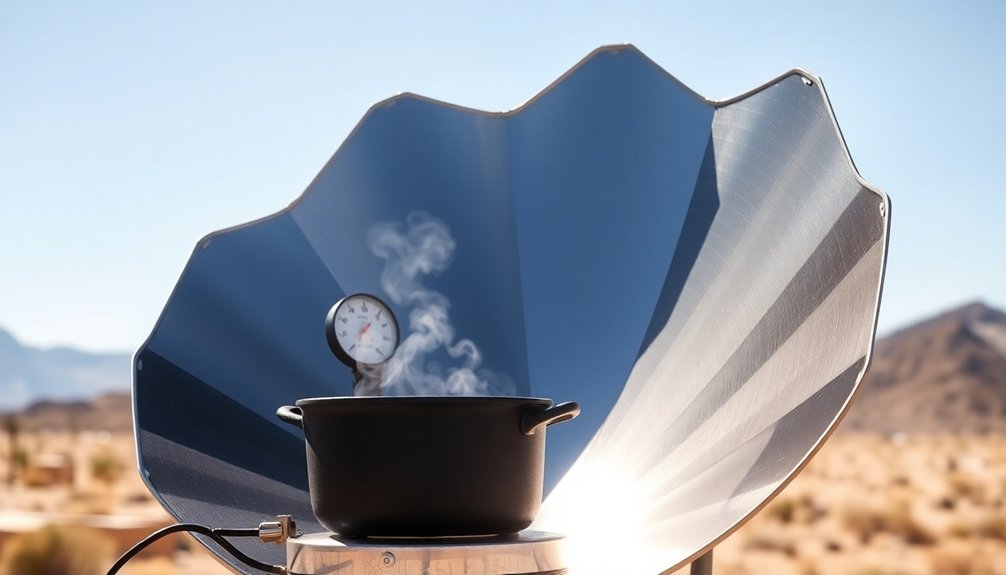
Pre-Heat The Solar Oven
Position your solar oven directly facing the sun and adjust the reflector flaps to capture maximum sunlight exposure.
You'll want to preheat the oven for 20-30 minutes before cooking, which can reach temperatures up to 300°F on clear days. Use the dual-purpose leveling rack to maximize airflow around your cookware while also increasing the usable cooking area.
Keep an eye on the internal temperature using an oven thermometer and reposition the oven every 30 minutes to maintain ideal heat levels.
Maximize Sun's Heat Exposure
To achieve ideal cooking temperatures in your solar oven, preheating for 20-30 minutes is essential. On a clear day, you'll reach around 300°F if you properly align your oven with the sun. Keep the glass door tightly sealed and use a thermometer to monitor the internal temperature.
For maximum heat absorption, adjust the reflective flap to direct sunlight into the oven and realign it every 30 minutes. You'll get better results if you verify even heat distribution before cooking, especially for baking bread and roasting meats.
The preheated oven will cook your food faster and more consistently than starting with a cold one. For cleaning and steaming preparation, preheat with soapy water. This practice not only sanitizes your oven but also gets it ready for your next culinary creation.
Position For Best Results
Building upon proper sun exposure techniques, finding the right spot for your solar oven makes a significant difference in cooking performance. Position your oven directly facing the sun with minimal shadow and track its movement every 30 minutes, more frequently during winter months. Choose a sheltered location to protect against cooling winds while guaranteeing maximum sunlight exposure.
| Action | Purpose |
|---|---|
| Preheat 20 mins | Reach 300°F safely |
| Face direct sun | Minimize shadows |
| Track movement | Maintain heat level |
| Find shelter | Block cooling winds |
| Match sun angle | Optimize exposure |
Remember to preheat your oven for about 20 minutes before cooking, especially when baking. You'll want to keep the glass door securely latched during this process. While seasonal changes affect tracking frequency, maintaining proper positioning throughout cooking guarantees consistent results.
Monitor Internal Temperature Reading
Getting accurate temperature readings is essential for successful solar cooking. You'll need reliable tools like thermocouples, data loggers, or infrared thermometers with laser pointers to monitor your solar oven's internal temperature.
Make certain to use buffered probe sensors for more precise readings than air temperature alone. Track temperature changes at different points in your oven to guarantee even cooking and identify hot spots.
You'll want to set up real-time monitoring through mobile apps that can alert you when temperatures drop below your target range. Don't forget to factor in environmental conditions like wind and cloud cover, which can affect heating performance.
Maintain Optimal Lid Seal
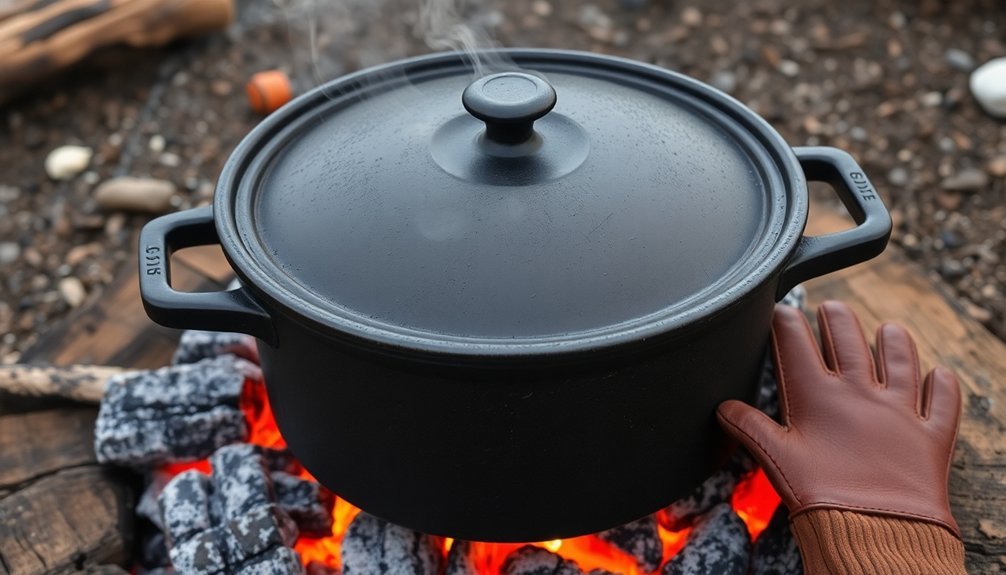
When cooking outdoors, maintaining a proper lid seal stands as one of the most essential elements for achieving consistent results.
You'll retain heat and moisture while preventing smoke and steam from escaping, which directly impacts your food's quality.
To improve your lid's seal, apply valve lapping compound to both the lid and pot surfaces, then rotate the lid to guarantee even distribution.
Check for any rough spots and repeat until you achieve a smooth, shiny finish.
Don't forget to test the seal by pressing opposite sides of the lid for any rocking motion.
Remember to follow your manufacturer's guidelines, as some grills are designed to breathe.
For example, Rec Tec grills shouldn't be fully sealed, while Big Green Eggs require proper gasket and steel band adjustments for peak performance.
Use Heat-Retention Cooking Bags
You'll find heat-retention cooking bags invaluable for keeping your food hot during outdoor activities, as they can maintain cooking temperatures for up to 8-10 hours.
Wrap your pre-heated pot in these specialized bags filled with insulating materials like wool, hay, or polystyrene to maximize heat retention time.
When properly sealed, these bags can help you save 30-80% of your normal cooking fuel while ensuring your meals stay warm throughout your outdoor adventure.
Insulating Food While Outdoors
Staying warm in the wilderness requires proper insulation not just for your body, but also for your food. You'll get the best results using FDA-approved heat-retention cooking bags combined with a Cook-In-Cozy™. These 5.0 mil thick bags maintain ideal temperature while allowing you to safely rehydrate meals and reduce fuel consumption.
| Time | With Insulation | Without Insulation |
|---|---|---|
| 0 min | 212°F | 212°F |
| 5 min | 195°F | 165°F |
| 10 min | 180°F | 140°F |
| 15 min | 170°F | 120°F |
| 20 min | 160°F | 105°F |
To maximize heat retention, air-dry your bags before storing them, and don't submerge them in boiling water – just pour the hot water in. You'll find these bags particularly effective for freeze-dried meals, soups, and oatmeal, keeping your food warm even in cold conditions.
Maximize Heat Storage Time
To maximize heat retention while cooking outdoors, heat-retention cooking bags offer an efficient solution that can keep food warm for up to 12 hours.
Simply bring your food to a boil, simmer it briefly, and transfer it to the insulated bag. You'll save 30-80% of the energy you'd typically use for cooking.
These portable bags don't need batteries, electricity, or additional fuel, making them perfect for camping and outdoor activities.
They'll preserve your food's moisture, nutrients, and flavors while preventing burning or scorching. You'll also need less liquid than traditional cooking methods, and the slow, gentle process will tenderize meat while keeping vegetables firm.
When you're planning outdoor meals, you can prepare food in advance and trust that it'll stay warm without supervision, saving you time and energy.
Track The Sun's Movement
Since the sun continuously moves across the sky, tracking its movement is essential for effective outdoor cooking with solar energy. You'll need to adjust your solar cooker every 20-60 minutes unless you implement an automated tracking system.
Consider installing a motorized solar tracking platform that uses opposing solar panels to detect sunlight differences. These systems automatically adjust your cooker's position using servo mechanisms and a DPDT toggle switch, ensuring ideal sun exposure throughout the day. They'll stop automatically when the cooker faces the sun directly.
Make sure your reflective panels, made from materials like aluminum or chromium, are properly angled to focus sunlight onto your cooking area.
With clear lids to retain heat and automated tracking, you'll maximize cooking efficiency while minimizing the need for manual adjustments.
Insulate Against Heat Loss
Once you've optimized your solar cooking setup, proper insulation becomes your next major focus for maintaining food temperature outdoors.
Wrap your food containers tightly with aluminum foil to reflect heat back, then add layers of wool blankets or towels. For maximum heat retention, pre-heat your containers with boiling water and use thermal lids that lock in warmth effectively.
- Stack hot containers close together and fill empty spaces with towels to minimize heat loss
- Combine multiple insulation methods – wrap preheated bricks in cloth for sustained heat
- Layer your hottest items at the bottom of insulated carriers or coolers
- Use thermal blankets specifically designed for heat retention around food containers
- Create a sealed environment by eliminating gaps where heat can escape through careful packing
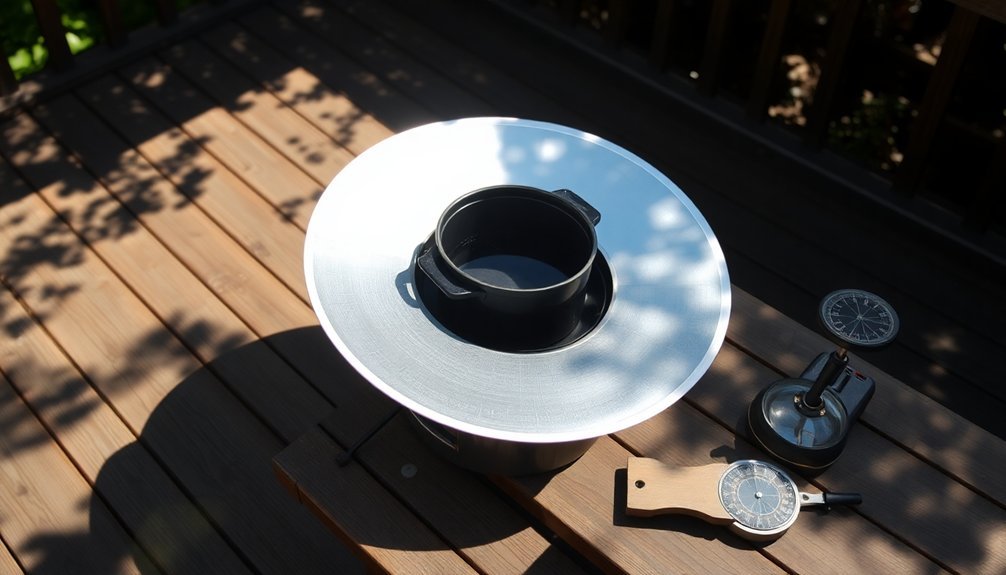
Maximize Reflector Panel Performance
Three key elements determine the success of your reflector panel setup: material selection, design, and alignment.
Choose high-efficiency materials like clear-glass mirrors or aluminum foil tape, which can achieve up to 75% optical efficiency. Avoid easily degradable materials like aluminized polycarbonate film.
Opt for an elliptical reflector design, such as the Scheffler-Reflector, to collect sunlight from a larger area.
You'll need to adjust the alignment throughout the day and seasons to maintain ideal performance. Keep your reflector surface clean, as dirt greatly reduces efficiency.
For best results, integrate your reflector into a versatile cooking setup that allows for alternative heating methods.
Track your system's performance by monitoring cooking times – a well-designed 8m² reflector should boil 22 liters of water in one hour.
Time Your Cooking Schedule
When planning outdoor cooking, effective time management can make the difference between a seamless meal and a chaotic experience.
You'll need to prioritize your dishes and group similar tasks to maintain an efficient workflow. Consider which items require longer cooking times and plan your sequence accordingly, making sure to account for resting periods that meats and other dishes might need.
- Start with foods that need high heat, like grilling steaks or vegetables, while your heat source is at its peak.
- Group prep work together to minimize back-and-forth movement in your outdoor cooking space.
- Allocate specific time slots for each dish, factoring in both cooking and resting times.
- Use combination cooking methods strategically to maximize your heat source.
- Keep similar-temperature items cooking simultaneously to maintain consistent heat levels.
Frequently Asked Questions
Can I Use a Solar Oven During Winter Months?
Yes, you can use a solar oven during winter months with bright sunshine. You'll need to adjust angles more frequently, protect from wind, and expect slightly longer cooking times, but it's completely doable.
How Do I Protect My Solar Cooker From Strong Winds?
You'll need to secure your solar cooker with bricks or blocks on each side, use bungee cords for anchoring, and keep it low to the ground. Consider adding guy lines or placing it in a sheltered location.
What Types of Food Cook Best in Outdoor Solar Ovens?
You'll get great results with slow-cooked dishes like stews and casseroles. Small baked goods, zucchini lasagna, and roasted vegetables work well too. Foods that benefit from gentle, consistent heat are ideal for solar ovens.
Is It Safe to Leave Solar Ovens Unattended While Cooking?
You shouldn't leave solar ovens unattended due to safety risks. You'll need to monitor food temperatures, adjust the oven's position, watch for wildlife, and prevent potential fire hazards during cooking.
How Do Cloudy Conditions Affect Solar Cooking Temperatures and Times?
When it's cloudy, you'll experience considerably lower cooking temperatures and longer cooking times. Your solar oven won't work as efficiently since clouds block and scatter sunlight, reducing the UV radiation reaching your cooker.
In Summary
You'll find solar cooking rewarding once you've mastered these essential techniques. Whether you're camping, facing a power outage, or simply enjoying eco-friendly cooking, these tips will help you get the most from your solar oven. Remember to position your oven correctly, use the right cookware, and stay attentive to weather conditions. With practice, you'll be cooking delicious meals using nothing but the sun's power.


Leave a Reply