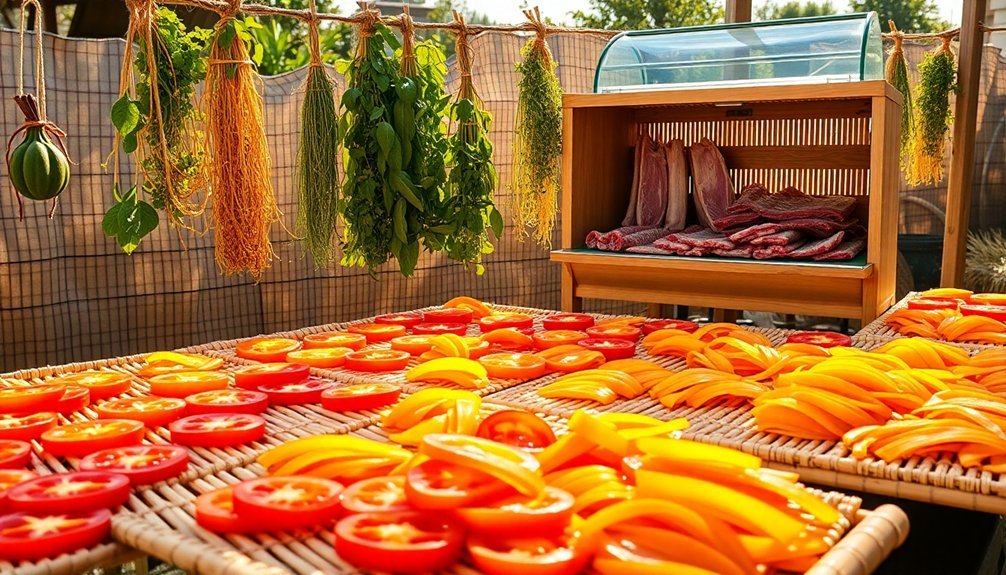
You can preserve food naturally without electricity using several time-tested methods. Sun drying works best for fruits like apples and apricots in temperatures above 98°F with clear skies. Indoor air drying lets you hang herbs and peppers in well-ventilated spaces using proper airflow techniques. Fire drying on elevated racks offers another effective option, with smoking adding flavor while preventing bacterial growth. A simple solar dehydrator made from lumber and clear plastic harnesses the sun's power, while traditional room drying near windows with good air circulation preserves herbs and produce. These ancient preservation techniques hold countless secrets waiting to be discovered.
Traditional Sun Exposure Methods

You'll need to bring your food inside at night to prevent moisture from condensing on it.
While fruits like apples, plums, apricots, and peaches are ideal for sun drying, vegetables aren't recommended due to their low sugar and acid content.
The ideal conditions for drying require temperatures above 98° F along with bright sunshine and clear skies.
Remember to pretreat fruits with ascorbic acid to prevent darkening during the drying process.
Optimizing Air Flow Systems
Air flow management plays an essential role in natural food drying success. You'll need to maintain low humidity levels and guarantee consistent air circulation to prevent moisture from accumulating on your food's surface. Good ventilation helps achieve uniform drying while preventing unwanted steaming of your products. Similar to high-pressure airflow systems used in industrial drying, proper air movement is crucial for effective moisture removal.
For indoor drying, you can string up herbs, hot peppers, and mushrooms or tie them in bundles. You'll want to place these in a well-ventilated attic, room, or screened-in porch. To protect your food from dust and pollutants, you can enclose them in paper bags while maintaining adequate airflow.
When setting up your drying area, you'll need to focus on natural ventilation techniques. Choose a shaded spot that's protected from direct sunlight but still receives continuous air flow.
You can optimize your drying conditions by monitoring temperature and humidity levels regularly. To guarantee proper air distribution, consider the height of your space and placement of your drying racks. You'll want to position your food where natural air currents are strongest, but avoid areas with high humidity that could promote mold growth.
Solar Dehydrator Construction

Building a solar dehydrator takes natural food drying to the next level, offering more control than basic air-drying methods.
You'll need lumber for the frame, black metal sheeting for heat absorption, and clear plastic or acrylic glazing to create a greenhouse effect. Basic woodworking skills are needed to construct a sturdy unit. The construction process focuses on creating two main components: a solar collector box that heats the air and a drying chamber where your food sits on trays.
To maximize your dehydrator's efficiency, you'll want to:
- Angle the solar collector precisely toward the sun, using black-painted absorber plates to capture maximum heat.
- Install hardware cloth trays in the drying chamber, ensuring they're food-safe and allow proper air circulation.
- Create an effective chimney system that draws moisture away from your food while maintaining consistent airflow.
Remember to seal all joints with silicone caulk and weatherstripping to prevent heat loss.
You can enhance mobility by adding wheels to larger units. The key to success lies in proper ventilation – as warm air rises through your food trays, it'll carry moisture out through the vents, leaving you with perfectly dried produce.
Indoor Room Drying Techniques
When you're drying food indoors, proper air circulation becomes your most critical factor, so position your drying area near windows or use fans to keep air moving consistently through the space.
You'll want to hang bundles of herbs and hot peppers from overhead racks or strings, making certain to leave enough space between bundles for air to flow freely around them.
Creating small, loose bundles rather than large, tight ones will help guarantee even drying throughout and prevent moisture from getting trapped in the center.
Ventilation and Air Flow
Proper ventilation stands as the cornerstone of successful indoor food drying. You'll want to guarantee your drying space has low humidity and good air circulation to prevent mold growth and speed up the process. When moisture-laden air gets trapped around your food, it greatly slows down drying, so you'll need to keep that air moving.
To create ideal drying conditions, you can set up your drying station in well-ventilated areas like attics, screened porches, or rooms with good airflow. You'll enhance the process by using fans or blowers to keep air circulating around your food.
Don't forget to protect your drying items with screens or cheesecloth to keep out dust and pests while maintaining airflow.
- String herbs and peppers from overhead racks, allowing air to circulate freely around each piece.
- Place drying trays near windows or vents where natural air currents flow through your space.
- Set up multiple levels using double screens, creating both shelving and protective covering while maintaining ventilation.
For added protection, you can place your food in paper bags with openings that shield against dust and loose insulation while still allowing proper airflow. This method works particularly well for partially dried fruits that need to complete their drying process indoors.
Bundling Herbs for Success
Air drying herbs indoors builds upon the principles of good ventilation while adding specific techniques for preserving delicate plant materials.
To start, you'll want to harvest your herbs just before their buds open, picking them in the early morning hours when they're at their freshest. After cleaning them under cool running water and removing any imperfect leaves, shake off excess moisture.
Create small, compact bundles of your herbs, securing them with twine or rubber bands – but don't tie them too tightly, as this can lead to mold. You'll find that less tender herbs like rosemary, sage, and thyme work best for air drying, though you can also dry tender herbs like basil and mint with extra care.
Hang these bundles upside down in a warm, dimly lit room with good air circulation, away from your sink and stove.
To protect your drying herbs, cover them with paper bags that you've punched with holes. This creates a protective barrier against dust while allowing proper airflow. Secure the bags with rubber bands, making sure to check your herbs periodically.
They're ready when the leaves crumble easily and stems snap when bent – typically after about two weeks.
Fire Based Preservation

You'll find that fire-based drying methods bring both warmth and natural smoke compounds that can enhance your food's preservation and flavor profile.
When using traditional fire drying techniques, you should position your food items on elevated racks or hanging systems that maintain a safe distance from direct flames while capturing the rising heat.
Your careful attention to maintaining proper spacing between the heat source and food will prevent burning while allowing the steady warmth to draw out moisture effectively.
Smoke Enhances Food Preservation
Throughout history, smoke has served as a powerful tool for preserving food while adding complex flavors. When you combine smoking with other preservation methods like salt-curing or brining, you'll create a powerful barrier against spoilage.
Smoke's antimicrobial and antioxidant properties help prevent bacterial growth while protecting fats from turning rancid, especially in oily fish.
You'll find that different smoking methods serve distinct purposes. Cold smoking (20-30°C) doesn't cook the food but preserves it, while hot smoking both cooks and preserves.
Before smoking, you'll need to verify your food develops a pellicle – a dry, tacky surface that helps smoke adhere better.
- Picture meat hanging in a smokehouse, with thin wisps of smoke slowly curling around it.
- Envision fish fillets suspended above smoldering wood chips, gradually taking on a golden-brown color.
- Imagine wheels of cheese developing a smoky rind as they rest on wooden racks.
You can extend your food's shelf life considerably by combining smoking with other preservation techniques.
When properly smoked and stored in a cool, dark place, many foods can last for weeks or even months without refrigeration.
Traditional Fire Drying Methods
In regions with limited sunlight, traditional fire drying emerged as a reliable preservation method complementing natural drying techniques. You'll find that still houses were specifically built to create controlled environments where fire heat could effectively dry various foods when natural conditions weren't favorable.
When you're drying foods using traditional fire methods, you'll need to place your cut items on racks or trays, protecting them with screens to keep pests away. The fire's heat works alongside any available sunlight to draw out moisture, resulting in foods with concentrated flavors and chewier textures.
You can enhance your preservation efforts by combining fire drying with salt curing, especially for meats and seafood. This combination effectively draws out moisture while preventing harmful bacteria growth, ensuring your food stays preserved longer.
If you're looking to maintain consistent drying conditions year-round, you'll want to construct a specialized drying structure. These controlled environments let you regulate the fire's heat while protecting your foods from environmental elements.
You'll find this method particularly useful when you need to preserve foods regardless of weather conditions.
Safe Distance From Heat
When drying food over a fire, maintaining the correct distance between your food and heat source becomes essential for successful preservation. You'll want to create distinct temperature zones by spreading out your embers and hedging them with larger fuel pieces.
Position your food at a height that allows even drying without burning, and remember that you can adjust the distance as needed during the process.
For ideal drying results, you'll need to monitor and manage your heat carefully. Split larger logs into smaller pieces to maintain consistent heat, and keep the fire burning steadily to guarantee a continuous supply of embers.
When the wind picks up, maintain a lower burn to prevent unexpected flare-ups that could damage your food.
- Place your food items on elevated racks or skewers about 12-18 inches above the embers, allowing smoke and heat to circulate freely.
- Create a "hot zone" directly above the embers and a "cooler zone" on the outer edges for more delicate items.
- Position your drying racks so you can easily rotate them or adjust their height as needed throughout the preservation process.
Using Black Tarps Effectively
Black tarps serve as a powerful tool for both weed control and soil preparation in natural food drying systems. When you're setting up your drying area, you'll want to use impermeable black tarps to create a clean, weed-free space that maintains ideal soil health. By laying these tarps over your designated drying area, you're effectively blocking sunlight and preventing unwanted weed growth.
You can enhance the tarp's effectiveness by properly managing crop residue underneath. If you're dealing with leftover plant material, chop it finely and add water or organic amendments before laying the tarp. This approach promotes decomposition and increases soil microbial activity.
You'll find this method particularly useful if you're following organic practices, as it eliminates the need for herbicides. The tarps will help preserve your soil's structure and moisture content while reducing compaction.
While they won't add nutrients like cover crops do, they'll maintain your prepared soil for several weeks. You can combine this technique with other soil management methods for the best results, making it an efficient alternative to intensive tillage in your food drying setup.
Herb Drying Techniques

Successful herb drying relies on choosing the right method for your specific plants and environment. Air drying works best for hearty herbs like rosemary and thyme, while tender herbs like basil may need more controlled methods.
You'll want to harvest your herbs in the morning after the dew evaporates, then wash and pat them dry before processing.
For air drying, you'll need to bundle small stems together and hang them in a well-ventilated space away from direct sunlight. You'll know they're ready when they crumble easily.
If you're using an oven, keep the temperature at or below 140°F and arrange herbs in a single layer for even drying.
To create a successful herb-drying setup, imagine:
- Bundles of fragrant herbs suspended from rafters, gently swaying in the breeze
- Neat rows of herbs laid out on clean mesh screens, allowing air to circulate freely
- Small batches carefully arranged on parchment paper in your oven, releasing their aromatic oils
Store your dried herbs in glass containers with tight-fitting lids, and don't forget to label them with names and dates.
When stored properly, they'll maintain their flavor for up to a year.
Frequently Asked Questions
How Long Can Naturally Dried Foods Be Safely Stored?
You'll find your dried foods can last several months to years when you store them in airtight containers. Keep them in cool, dry places and check regularly for signs of spoilage or moisture.
Can Food Be Naturally Dried During Rainy or Humid Seasons?
You'll face significant challenges drying food during rainy or humid seasons. While it's possible, you're better off using solar dehydrators for protection or choosing quick-drying items like herbs to minimize spoilage risks.
Which Foods Should Never Be Dried Using Natural Methods?
You shouldn't naturally dry meats, fish, dairy products, or fatty foods as they're prone to spoilage and contamination. High-protein foods and uncured meats also require controlled environments for safe drying.
Do Natural Drying Methods Preserve the Same Nutrients as Electric Dehydrators?
You'll find natural drying methods preserve many nutrients but not as consistently as electric dehydrators. You'll lose more vitamin C and beta-carotene, though you'll still retain good fiber and mineral content.
What Signs Indicate Food Has Gone Bad During the Drying Process?
You'll know your food has gone bad during drying if you spot mold, discoloration, or a slimy texture. Watch for funky odors, unusual textures, and make certain food isn't sticky or showing signs of rot.
In Summary
You've got several effective ways to preserve food without relying on electricity. Whether you're using traditional sun-drying methods, building a solar dehydrator, or setting up indoor drying racks, these natural techniques will help you save your harvest. Don't forget that proper airflow and temperature control are essential for success. With these time-tested methods, you'll be able to store food safely year-round.


Leave a Reply