The three most effective sun angles for summer food come from strategic timing and positioning. You'll get ideal results from mid-morning eastern rays, which provide balanced intensity without scorching your crops. For indoor growing, position your plants to catch indirect afternoon sunlight about 3-4 feet from east-facing windows, using sheer curtains to filter intense heat. The golden hour slant, occurring 20-30 minutes before sunset, offers perfect conditions for both growing and photographing food at a 45-degree angle. These proven angles maximize growth while minimizing water loss, but there's much more to explore about enhancing your summer food production.
Mid-Morning Eastern Rays

Why do experienced gardeners value mid-morning eastern rays? The sun's position during these hours provides an ideal balance of intensity and angle for summer food crops.
You'll find the sun climbing steadily in the eastern to southeastern sky, delivering increasingly direct rays that warm the soil without scorching your plants.
These rays strike your garden at angles that maximize energy distribution while minimizing water evaporation – an essential factor for summer growing. This effect occurs because lower sun angles spread energy across larger surface areas, preventing intense heat buildup.
During mid-morning, you're getting more concentrated sunlight than at dawn, but it's gentler than the intense noon rays. This sweet spot helps drive photosynthesis efficiently, especially if you've oriented your rows to capture the most light.
For best results, you'll want to position taller plants where they won't shade shorter ones during these critical morning hours.
Indirect Afternoon Sunlight Position
The indirect afternoon sunlight creates an ideal environment for protecting summer crops from intense heat while maintaining healthy growth. You'll want to position your plants where they'll receive filtered light through sheer curtains or natural shade barriers during the late afternoon hours. Position near windows to capture optimal natural lighting and create appealing food photographs.
| Location | Light Quality | Best For |
|---|---|---|
| East-facing window | Soft diffused | Leafy greens |
| Balcony with shade | Consistent gentle | Herbs & flowers |
| North-facing porch | Cool indirect | Delicate sprouts |
To optimize light exposure, place your plants about 3-4 feet from windows and adjust their position as the season progresses. Consider using white surfaces or reflectors to bounce light onto shadowed areas. If you're growing outdoors, create shade using canopies or umbrellas to protect sensitive plants from harsh rays while maintaining adequate light levels.
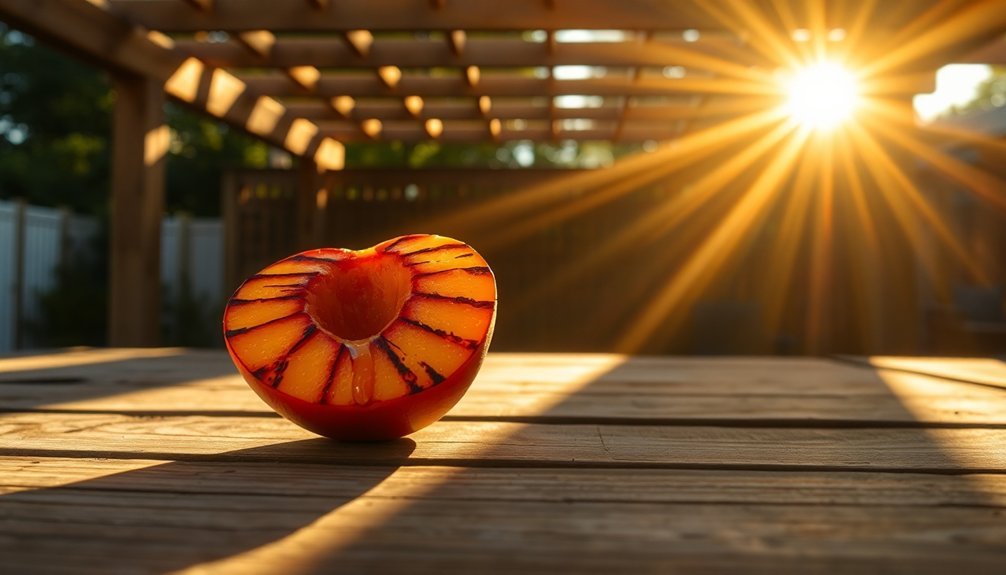
Golden Hour Slant Method

Building on the concept of indirect light management, golden hour presents a unique opportunity for food photographers and gardeners alike.
You'll find this magical period just before sunset offers warm, golden hues that can transform your food photography. The optimal duration varies by location, with 20-30 minutes available near the equator.
To master the golden hour slant method, position your food so the low-angle sunlight hits it from a 45-degree angle.
You'll want to set your camera's white balance to "cloudy" to enhance those warm, appetizing tones.
Using a wide aperture will create a beautiful bokeh effect around your dishes while maintaining sharp focus on key elements.
Don't forget to experiment with backlighting and side lighting – these techniques can highlight steam, create dramatic shadows, or emphasize the texture of your food.
Time's limited during golden hour, so prepare your setup in advance.
Frequently Asked Questions
How Do I Prevent Food From Melting During Summer Outdoor Photoshoots?
Pre-freeze items, keep them in coolers until needed, shoot in shaded areas, and work quickly. You'll want to use ice packs, set up your shots beforehand, and consider early morning shoots.
Can I Use Artificial Lights to Replicate Specific Sun Angles?
Yes, you can use LED lights with parabolic reflectors like satellite dishes to replicate specific sun angles. By positioning the light source at the focal point, you'll create parallel rays that mimic natural sunlight.
What's the Best Camera Filter Setting for Harsh Summer Sunlight?
You'll want to use a neutral density (ND) filter to reduce harsh sunlight. Combine it with a polarizing filter to cut glare and enhance colors. Set your camera's white balance to "daylight" mode.
Should I Adjust White Balance Differently for Indoor Versus Outdoor Shots?
Yes, you'll need different white balance settings: use tungsten or custom settings indoors to correct artificial lighting's color casts, while outdoors, stick to daylight mode or cloudy settings to capture natural colors accurately.
How Do Seasonal Changes Affect Optimal Shooting Times Throughout Summer Months?
You'll find ideal shooting times shift as summer progresses. Early summer offers longer dawn/dusk periods, while late summer has shorter golden hours. Track sunrise and sunset changes to adjust your schedule accordingly.
In Summary
You'll get the most appetizing food photos by mastering these three key sun angles during summer shoots. Whether you're capturing the bright, crisp shadows of eastern morning light, working with softer indirect afternoon rays, or embracing the warm golden hour glow, each angle offers unique benefits. Try alternating between these positions to discover which sun angle best highlights your specific dishes and style.


Leave a Reply