
Your solar oven recipes take longer because they rely on gradual heat from the sun rather than instant electrical or gas power. Unlike conventional ovens that maintain steady temperatures, solar ovens are affected by weather, seasonal changes, and time of day. You'll notice cooking times can extend 1.5 to 3 times longer on cloudy days, while wind and humidity further impact temperature control. The size of your food portions, pot selection, and reflector positioning also play significant roles in cooking duration. By understanding these factors and making smart adjustments, you can optimize your solar cooking experience for better results.
Understanding Solar Cooking Temperatures

While traditional ovens offer precise temperature control, solar ovens rely on the sun's energy to achieve cooking temperatures ranging from 160°F to 800°F, depending on the design.
You'll find that box-type ovens reach 160°F to 400°F, panel cookers hit 200°F to 300°F, and parabolic models can soar to 800°F.
To maintain these temperatures, you'll need quality insulation like cotton balls or newspapers, and reflective surfaces such as aluminum foil to concentrate sunlight. Cooking performance is best when you have full, direct sunlight throughout the day.
It's essential to seal all gaps and use dark-colored cookware for better heat absorption.
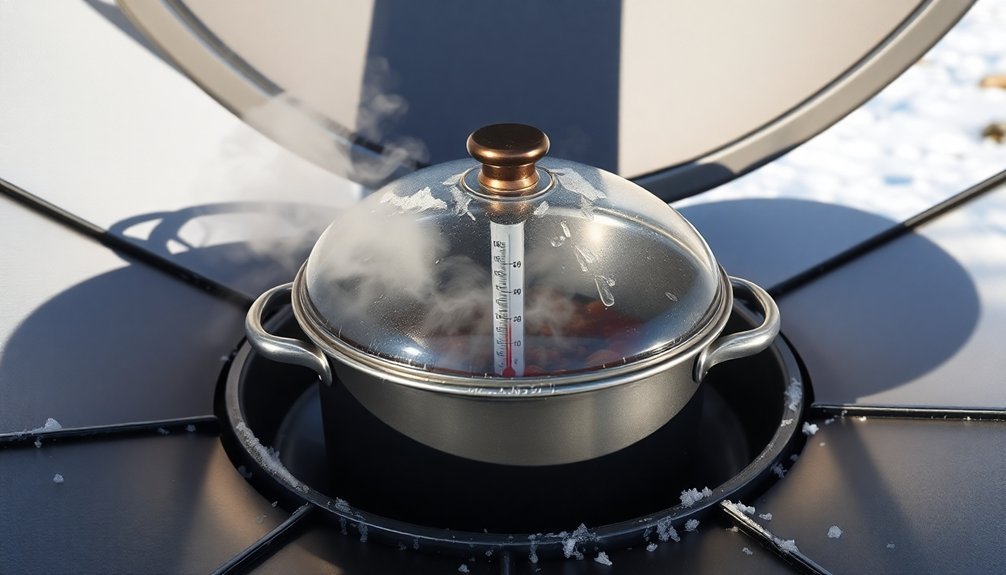
You should track internal temperatures with a thermometer and remember that food safety requires at least 180°F.
For best results, preheat your solar oven for an hour and adjust its position every 30 minutes during peak hours between 11:00 am and 3:00 pm.
Weather's Impact on Cooking Time
When cooking with your solar oven, you'll notice that cloud cover greatly extends cooking times, making it important to start early on partially cloudy days.
Setting up near a wind-protected spot helps maintain consistent cooking temperatures throughout the day.
Wind presents another challenge, as it can quickly steal heat from your oven, so you'll want to find a sheltered spot and monitor temperatures more closely.
High humidity can make temperature control tricky since moisture in the air affects how well heat builds up in your oven.
Cloud Cover Slows Cooking
Although solar ovens are efficient cooking tools on sunny days, cloud cover can dramatically slow down your cooking process. When clouds block the sun, your oven's temperature can drop by up to 15°C, requiring 15-20 minutes to recover once skies clear.
You'll need to extend cooking times by 1.5 to 3 times longer than on clear days. You can minimize these effects by using thermal mass like bricks or tiles to stabilize the temperature. Cooking time doubles compared to conventional ovens even in optimal conditions.
Keep your oven well-insulated and properly sealed to retain heat during cloudy periods. It's crucial to monitor both the sky conditions and internal temperature, adjusting your oven's position when the sun becomes visible.
Use a thermometer to check food temperatures and plan for extended cooking times. Remember that a recipe normally taking two hours might require 2.5 hours or more under cloudy conditions.
Wind Reduces Heat Retention
Similar to cloud cover, wind poses a significant challenge for solar oven cooking by reducing heat retention.
Even moderate wind speeds of 3 m/s can drop your oven's temperature by 8°C, requiring about 12 minutes to recover. When wind interferes with your cooking, you'll need to adjust your timing and strategy.
To maintain ideal cooking temperatures in windy conditions:
- Position your oven in a sheltered spot to minimize direct wind exposure
- Use models with enhanced insulation to reduce heat loss by up to 30%
- Add thermal mass to stabilize internal temperatures
- Monitor weather conditions and plan cooking during less windy periods
You'll need to extend cooking times when it's windy, but proper wind protection and strategic placement will help maintain consistent temperatures for successful solar cooking.
Humidity Affects Temperature Control
Beyond wind, humidity levels play a major role in solar oven performance. When you're cooking on humid days, you'll notice considerably longer cooking times because moisture prevents efficient evaporation from your food.
High humidity also reduces the oven's internal temperature and can cause condensation on the glass lid, blocking vital sunlight.
You'll get the best results during summer months when humidity is lower and temperatures are higher. If you're cooking between 11:00 AM and 3:00 PM, you'll maximize your success rate.
To combat humidity's effects, preheat your oven before use and choose cookware that retains heat well, like cast iron pans. Remember to position your oven carefully to prevent condensation buildup and adjust its angle throughout cooking to maintain ideal sunlight exposure.
Seasonal Changes Matter
When you're planning to cook with a solar oven, understanding seasonal changes can make or break your success.
During fall and winter months, you'll face shorter days and lower sun angles, which greatly impact your cooking times. The most effective cooking window shrinks to just 11:00 AM to 3:00 PM during these seasons.
To adapt to seasonal changes, consider these key strategies:
- Start preheating your solar oven earlier in the day, around 10:00 AM.
- Use well-insulated cookers that can maintain heat in cold temperatures.
- Plan multi-day cooking sessions when needed to complete longer recipes.
- Utilize thermal storage methods or heat-retained baskets to continue cooking when sunlight dims.
Food Quantity and Size
The relationship between food quantity and cooking time is essential for successful solar cooking. You'll find that larger portions require considerably more time due to increased thermal mass, as more food naturally absorbs more heat.
If you're cooking multiple items, expect extended cooking times.
Your solar oven's size directly impacts its cooking power and capacity. While larger ovens can handle more food without major delays, smaller ones are limited to modest portions.
You can choose between using multiple small ovens or one large oven for bigger quantities.
When planning your meals, consider these timeframes: small items like eggs cook in under an hour, while larger foods like whole chickens need 3-3.5 hours.
For substantial meals like stews or large cuts of meat, plan for 4-7 hours of cooking time.
Pot Selection Makes a Difference

Selecting the right pot for your solar oven can dramatically impact your cooking success. The pot's material, color, and design all affect how quickly and efficiently your food will cook.
When you're choosing a cooking vessel, focus on features that maximize heat absorption and retention.
Here's what you'll want in your solar cooking pot:
- Dark-colored or matte finish to absorb more solar energy
- Thick-walled metal construction (like cast iron or stainless steel) for better heat retention
- Tight-fitting lid that's clear or reflective to trap heat and allow sunlight through
- Shallow, broad-based design for faster heating and even distribution
You'll get the best results with a pot that combines these characteristics.
Remember that thicker pots maintain temperature longer, while smaller ones heat up faster.
Water Content Slows Cooking
Understanding your food's water content is essential for successful solar cooking, as moisture greatly impacts cooking times and results. Foods with high water content will take considerably longer to cook because water requires more energy to heat up compared to dry ingredients.
You'll find that water-rich foods like meats, vegetables, and legumes need nearly double the cooking time of conventional ovens. This is because water must reach its boiling point of 100°C (212°F), which is a slower process in solar ovens. While these foods retain more nutrients, you'll need to plan accordingly.
Environmental factors can further extend cooking times. If you're cooking on humid, cool, or cloudy days, expect even longer durations.
For best results, adjust your recipes by minimizing added water and ensuring ideal sun exposure between 11:00 am and 3:00 pm.
Proper Oven Placement

Successful solar cooking begins with strategic oven placement, as the position of your cooker directly impacts its performance and efficiency.
You'll need to find a spot that maximizes sun exposure while protecting your oven from environmental factors that can hinder cooking times.
- Choose a location with full sun exposure between 10 AM and 2 PM, when solar intensity peaks, and adjust your oven's angle throughout the day to track the sun.
- Select a wind-protected area to prevent heat loss and keep your oven stable – wind can greatly extend cooking times.
- Set up on a dry, level surface free from obstacles that could cast shadows or cause tipping.
- Account for seasonal changes and your geographic location, as these factors affect sunlight intensity and ideal cooking hours.
Insulation and Heat Retention
You'll need effective insulation materials like rockwool, polystyrene sheets, or crumpled newspaper surrounding your solar oven's cooking cavity to prevent heat loss.
Double-paned glass panels with proper air spacing will trap thermal energy, while dark-colored cookware and heat-retention materials like bricks or ceramic tiles help maintain cooking temperatures.
Adding reflective surfaces such as aluminum foil panels strategically around your oven will maximize sunlight capture and boost overall thermal performance.
Heat Loss Prevention Methods
Effective insulation and heat retention are essential elements of a well-functioning solar oven, working together to maintain consistent cooking temperatures.
You'll need proper insulation materials like rockwool, cellulose, or even crumpled newspapers surrounding your cooking cavity. Double-glazed covers can cut heat loss in half, while keeping your oven's temperature stable.
To maximize your solar oven's heat retention, implement these vital prevention methods:
- Seal all joints with high-temperature silicone and create airtight connections
- Install moisture barriers to prevent steam from escaping or entering the walls
- Use reflective barriers like aluminum foil to minimize radiative heat transfer
- Position thermal mass strategically for uniform heat distribution
Remember to optimize your solar collection area relative to heat loss area for achieving higher cooking temperatures.
Trapping Thermal Energy Inside
Building upon these heat loss prevention methods, understanding how to trap thermal energy inside your solar oven can dramatically improve its performance.
You'll need to focus on two key elements: proper insulation and thermal mass materials.
Your insulation should have high R-values (R50 for sides and bottom, R3 for windows) and utilize multi-layer configurations to minimize heat escape. Using materials like rock wool and ensuring sealed joints will help maintain temperatures above 150°C for 4-6 hours.
Additionally, you'll want to incorporate thermal mass materials like tiles or bricks, which can reduce temperature fluctuations by up to 40%. These materials store heat during peak sunlight and release it gradually, allowing you to cook even when solar conditions aren't ideal.
With proper insulation and thermal mass, you can cook rice in 90 minutes and cake in 120 minutes.
Reflector Position and Efficiency

When positioning your solar oven's reflectors, maintaining the ideal angle of 70 degrees will secure maximum heat capture and efficiency.
You'll notice temperatures can soar above 90°C when you've properly aligned your reflectors, greatly reducing cooking times. Using reflective materials like aluminum foil or mirrors can boost efficiency from 96% to 99%.
- Double your reflective area to maximize solar energy capture
- Check that reflectors direct sunlight straight to the cooking surface
- Use high-quality reflective materials to guarantee peak performance
- Adjust reflector angles throughout cooking to maintain heat levels
Your solar oven's performance depends heavily on how well you position and maintain your reflectors.
With proper placement, you'll trap more heat, cook faster, and achieve better results with your solar recipes.
Time of Day Considerations
Successful solar cooking relies heavily on understanding how the sun's position affects your oven's performance throughout the day. You'll get the best results during peak sun hours, typically between late morning and early afternoon when the sun is highest in the sky.
| Time Period | Sun Position | Cooking Efficiency |
|---|---|---|
| Early Morning | Low angle | Poor – longer cooking times |
| Late Morning | Rising angle | Good – heating up phase |
| Mid-Day | Highest angle | ideal – peak performance |
| Late Afternoon | Declining angle | Fair – decreasing heat |
Your cooking times will vary considerably between seasons. Winter brings shorter days and a lower sun angle, which means you'll need to extend your cooking times. You'll also want to think about that morning and late afternoon cooking may not reach ideal temperatures, so plan accordingly by starting your meals during peak sunlight hours.
Recipe Conversion Basics

When you're converting traditional recipes for solar oven use, you'll need to double or triple standard cooking times due to the lower operating temperatures of 250-300°F.
You'll want to maintain consistent heat by refocusing your solar oven throughout the day and using dark-colored cookware for best heat absorption.
For recipes requiring liquid ingredients, reduce the amount by about 1/3 since solar ovens retain moisture better than conventional ovens.
Adjusting Traditional Cooking Times
Making the switch to solar cooking requires understanding how traditional recipe times need adjustment. You'll find that solar ovens function more like slow cookers, typically taking 1½ to 3 times longer than conventional methods. Weather conditions play a significant role, as cloud cover can double your cooking duration.
To optimize your solar cooking experience:
- Preheat your oven for at least 30 minutes before cooking.
- Rotate the oven every 20-30 minutes to follow the sun.
- Use thin, shallow pans to speed up cooking times.
- Monitor food temperature with a thermometer instead of relying on timers.
Crock-pot recipes work exceptionally well in solar ovens, and foods that cook in their own juices are ideal choices.
Remember that adding thermal mass like rocks or bricks can help maintain consistent temperatures throughout the cooking process.
Temperature and Heat Control
Proper temperature control lies at the heart of successful solar cooking conversion. You'll need to monitor your solar oven's temperature carefully, aiming for 150-225°F for most dishes. Using a thermometer or thermocouple will help you track these readings accurately.
To maintain consistent heat, preheat your oven for 20-30 minutes and use dark-colored cookware with lids. Position your oven directly facing the sun and adjust the reflective panels every 30-45 minutes to maximize sunlight exposure.
You can enhance efficiency by adding multiple layers of insulation, such as crumpled newspaper or fiberglass, around the cooking cavity. For best results, consider installing automated tracking with servo motors and photoresistors to maintain ideal sun alignment throughout the cooking process.
Liquid Measurement Modifications
Accurate liquid measurements play an essential role in adapting traditional recipes for solar cooking. When converting recipes for solar ovens, you'll need to adjust liquid quantities to prevent excessive moisture loss during longer cooking times.
Using precise measuring tools helps maintain the right balance of ingredients and guarantees successful results.
For ideal solar oven cooking, follow these liquid measurement modifications:
- Increase liquid content by 1/4 cup (2 fluid ounces) for every hour of extended cooking time
- Use transparent measuring cups to verify exact amounts at eye level
- Double-check measurements using metric conversions (1 cup = 237ml) for greater precision
- Add liquids in small increments, measuring with spoons for amounts under 2 fluid ounces
These adjustments will help compensate for evaporation and maintain proper moisture levels throughout the solar cooking process.
Location and Climate Effects
When cooking with a solar oven, your location and climate play essential roles in determining success. If you're closer to the Equator, you'll benefit from more intense sunlight and longer daylight hours, reducing cooking times considerably.
However, if you live in northern regions, you'll need to adjust for seasonal changes and shorter daylight periods. Your specific environment matters too. Urban settings might limit direct sunlight due to buildings, while rural areas offer better exposure.
Higher altitudes can provide clearer skies and stronger solar intensity. Weather conditions will affect your results – cloudy days increase cooking times, and wind can decrease your oven's temperature.
During winter months, expect longer cooking times due to weaker sunlight and colder temperatures. You'll also need to account for humidity levels, as they can impact your oven's heat retention.
Frequently Asked Questions
Can Solar Ovens Be Used to Sterilize Medical Equipment?
Yes, you can use solar ovens to sterilize medical equipment effectively. They'll reach temperatures above 180°C and generate steam at 128°C, meeting CDC sterilization guidelines. They're especially useful in resource-limited, sunny regions.
How Long Can Food Stay Warm in a Solar Oven After Cooking?
You'll find your food staying warm for 1-3 hours after cooking in a well-insulated solar oven. It's best to keep the oven closed and maintain sunlight exposure for ideal heat retention.
Is Food Cooked in Solar Ovens as Nutritious as Conventionally Cooked Food?
Yes, you'll actually get more nutrients from solar-cooked food than conventional methods. The gentle, low-temperature cooking preserves vitamins and minerals better, while preventing the nutrient loss that happens with high-heat cooking methods.
Can Solar Ovens Be Used Indoors With Artificial Light Sources?
No, you can't effectively use solar ovens indoors with artificial light sources. They're designed specifically for natural sunlight, and indoor lighting lacks the intensity and spectrum needed to generate sufficient cooking temperatures.
Do Solar Ovens Work Effectively at High Altitudes Above Sea Level?
Your solar oven will work at high altitudes, but you'll experience longer cooking times. While you'll get more direct sunlight, the lower atmospheric pressure reduces water's boiling point, affecting overall cooking efficiency.
In Summary
Solar oven recipes take longer because you're working with lower, more variable temperatures than conventional ovens. To get better results, you'll need to adjust your cooking times based on weather, season, and location. By positioning your reflectors correctly, using appropriate pots, and timing your cooking during peak sunlight hours, you can optimize your solar cooking experience. Remember that patience is key—the eco-friendly results are worth the wait.


Leave a Reply