You can easily make delicious dried fruits without using any electricity. Start with sun-dried apple cinnamon strips by slicing apples thinly and drying them in direct sunlight. Create energy-packed berry balls using dried mixed berries and coconut. Mix up a healthy trail mix with dried fruits and raw nuts. Try making solar mango leather by spreading pureed mango on trays to dry naturally. Other simple options include pineapple rings, grape raisins, orange slices, and peach fruit roll-ups. Each recipe requires just basic ingredients and natural sunlight. Discover how these preservation techniques can transform your favorite fruits into portable, long-lasting snacks.
Sun-Dried Apple Cinnamon Strips
Food lovers looking for a healthy snack will appreciate these sun-dried apple cinnamon strips. To create these delicious treats, you'll need mature, firm apples that you'll peel, core, and slice into thin rings about 1/8 to 1/4 inch thick. Honeycrisp or Pink Lady varieties work exceptionally well for their natural sweetness and concentrated flavor.
Before drying, dip your slices in lemon juice or ascorbic acid to prevent browning, then sprinkle them with cinnamon for that extra burst of flavor.
Arrange your seasoned apple slices in a single layer on drying trays, making sure they don't overlap. Place the trays in direct sunlight in a warm, dry location. You'll need to cover the trays at night to protect your fruit from moisture and pests.
Throughout the drying process, rotate the trays periodically and flip the slices to guarantee even drying.
Check your apple strips regularly until they reach a soft, pliable, and leathery texture. Once dried, let them cool completely before storing.
Transfer your sun-dried apple strips to airtight containers and keep them in a cool, dry place. For best results, allow your dried fruit to condition for 4 to 10 days before final storage packaging.
Mixed Berry Energy Balls
After mastering sun-dried apple strips, you'll want to explore another no-electricity treat that's perfect for active lifestyles. These mixed berry energy balls combine frozen berries, desiccated coconut, oats, and dates into a nutritious, ready-to-eat snack that doesn't require any electrical appliances to prepare.
Start with partially thawed mixed berries and combine them with 3/4 cup each of desiccated coconut and traditional oats. Add two dates for sweetness and a tablespoon of chia seeds for extra nutrition. You'll need to mix these ingredients thoroughly using either a manual food processor or your hands until well combined. Being nut-free snacks, these energy balls are an excellent option for school lunches where allergen restrictions apply.
Key tips for perfect energy balls:
- Keep the mixture's consistency balanced by adding small amounts of coconut oil, honey, or water if it's too dry
- Form tablespoon-sized balls with your hands, rolling them evenly
- Coat the balls in extra coconut for added texture
- Store in the freezer for maximum freshness, or refrigerate for up to two weeks
You can customize these energy balls by substituting different dried fruits or using gluten-free oats. They're perfect for hiking, workouts, or as a healthy dessert alternative when you're craving something sweet.
Dried Fruit Trail Mix
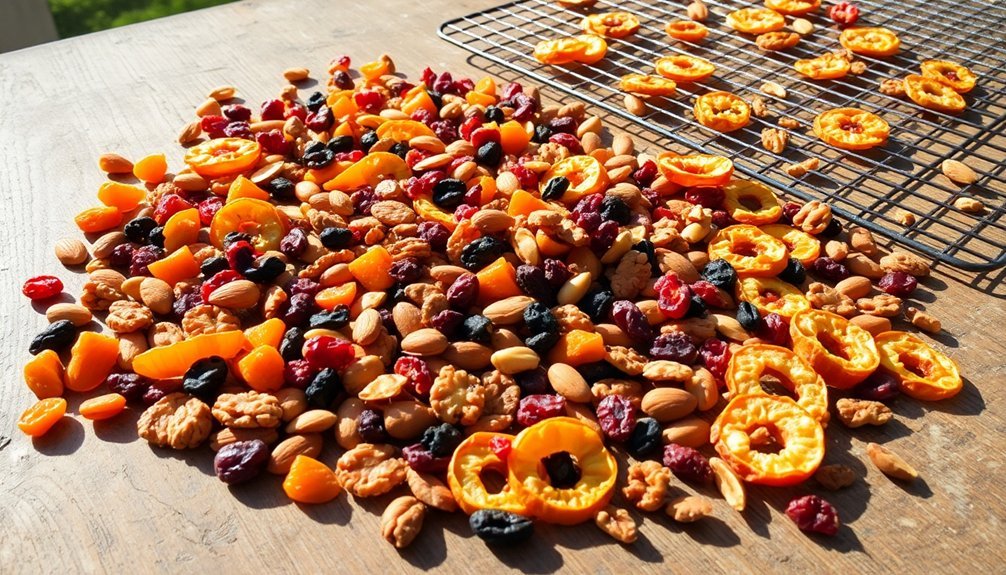
Three essential components form the foundation of a perfect dried fruit trail mix: raw nuts, fresh seeds, and unsweetened dried fruits.
Start with a base of raw, unsalted almonds, pecans, cashews, walnuts, and hazelnuts. Add raw sunflower seeds, pumpkin seeds, and melon seeds for extra crunch and nutrition.
Select unsweetened, unsulphured dried fruits like cherries, raisins, cranberries, strawberries, and figs to provide natural sweetness and chewy texture.
You can customize your mix by adding dark chocolate, granola, pretzels, popped popcorn, or cocoa nibs. For enhanced flavor, sprinkle in sea salt, cinnamon, or a pinch of nutmeg.
You'll need just 5 minutes to combine all ingredients in a large bowl. Store your trail mix in ziplock bags or mason jars to maintain freshness. Making your own mix ensures you get higher quality ingredients compared to store-bought versions.
Since there's no cooking required, you can prepare this nutritious snack without electricity. The mix offers healthy fats and proteins from nuts and seeds, plus fiber and antioxidants from dried fruits.
Remember to choose raw ingredients without added sugars or preservatives for the healthiest option.
Solar Mango Leather
Making delicious mango leather requires only the sun's natural energy and a few simple tools. Start by selecting ripe mangos, peeling them, and blending the flesh until you've created a smooth puree. If needed, you can add a touch of cane sugar to enhance sweetness.
To prepare for drying, line a baking tray with parchment paper or a silicone sheet. Spread your mango puree evenly, maintaining a 1-2mm thickness, with slightly thicker edges to prevent overdrying. Place your tray in a sunny spot or solar dryer on a reflective surface to maximize heat absorption.
Key steps for successful drying include:
- Covering trays with cheesecloth to protect from insects and birds
- Bringing trays inside during nighttime to avoid moisture
- Checking periodically until the surface doesn't crease when touched
- Maintaining consistent drying conditions for 6-7 hours
Once your leather is ready, cut it into convenient strips using scissors or a pizza cutter. Store your finished product between sheets of greaseproof paper in an airtight container.
You'll have a healthy, portable snack that's perfect for hiking, camping, or everyday enjoyment, lasting about a week when properly stored.
Fruit and Nut Granola
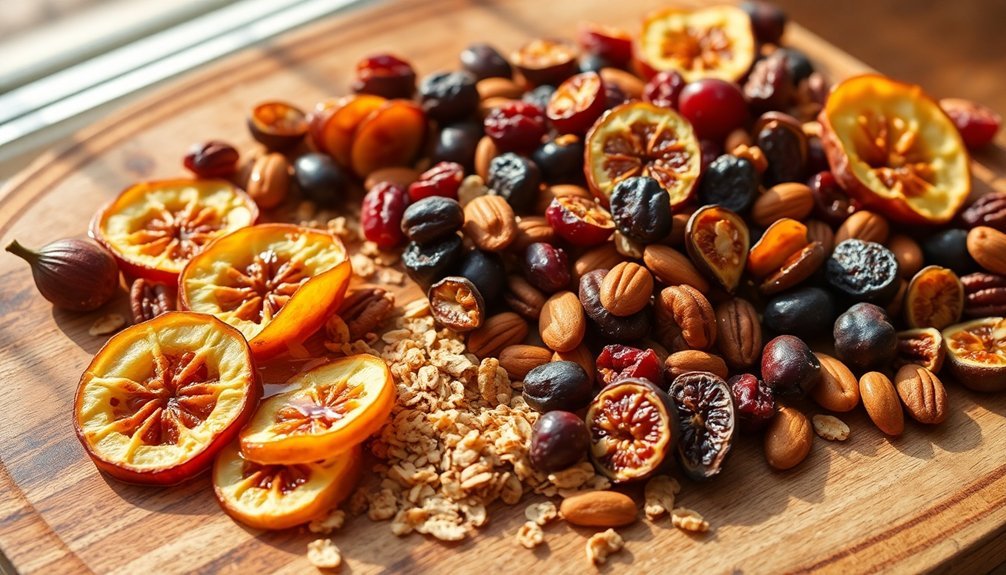
With just a handful of raw ingredients, you can create a delicious no-cook granola that doesn't require electricity or heating.
Start by pulsing fresh apples or pears in your food processor until they reach a chunky consistency. Then, pulse your choice of raw nuts like almonds, walnuts, or hazelnuts, along with seeds such as pumpkin, sunflower, or hemp seeds until you achieve your desired texture.
Combine your processed fruits and nuts in a bowl, then mix in dried fruits like raisins, apricots, or cranberries. Add shredded coconut and a sprinkle of ground cinnamon for extra flavor.
You'll find this mixture is highly customizable – feel free to include any combination of nuts, seeds, and dried fruits you prefer. If you'd like, you can add protein powder or vanilla extract for additional nutrition and flavor.
Store your no-cook granola in an airtight container in the refrigerator. When you're ready to eat, serve it as is or pair it with milk, yogurt, or kefir.
You can enjoy this electricity-free granola for breakfast or as a nutritious snack throughout the day.
Banana Chips Three Ways
Crispy banana chips offer a delightful alternative to store-bought snacks, and you can prepare them using three distinct methods: oven-baking, dehydrating, or air frying. Each technique produces slightly different results while maintaining the sweet, concentrated banana flavor you're looking for in this healthy snack.
For the simplest approach, oven-baking requires only bananas and basic kitchen equipment. You'll need to slice the fruit into 1/4-inch rounds and bake them at decreasing temperatures.
The dehydrator method takes longer but yields consistently crispy results that'll store for months. If you're using an air fryer, you'll get the fastest results, though you'll need to add lemon juice and oil to prevent browning.
Key considerations for all three methods include:
- Selecting firm bananas without too many brown spots
- Maintaining consistent slice thickness (1/4 inch) for even drying
- Allowing chips to cool completely before storage
- Using airtight containers to maintain crispness
Regardless of your chosen method, you'll want to verify the chips are completely dry before storing them. The oven method lasts about a week, while dehydrated chips can stay fresh for several months when properly stored.
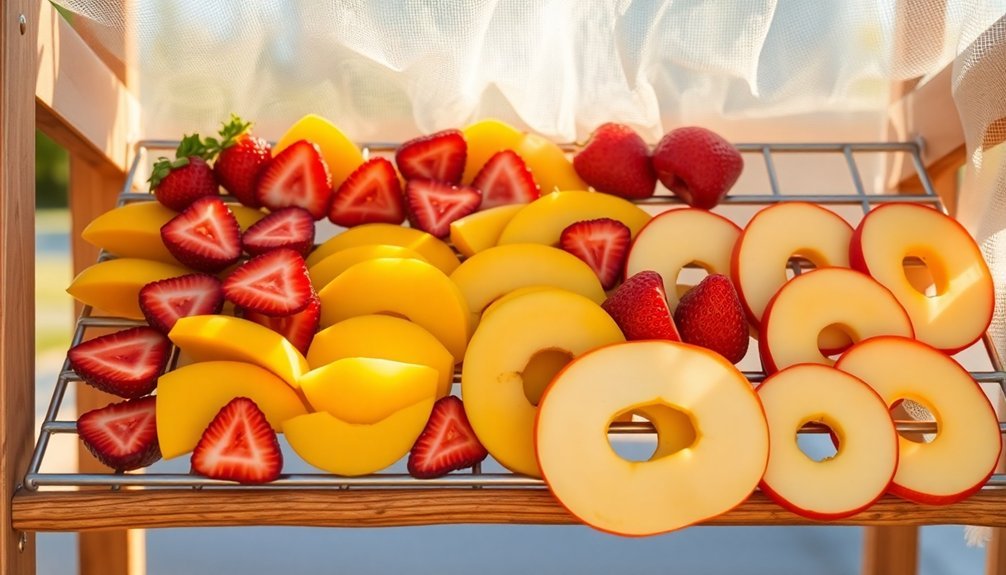
Dried Pineapple Rings
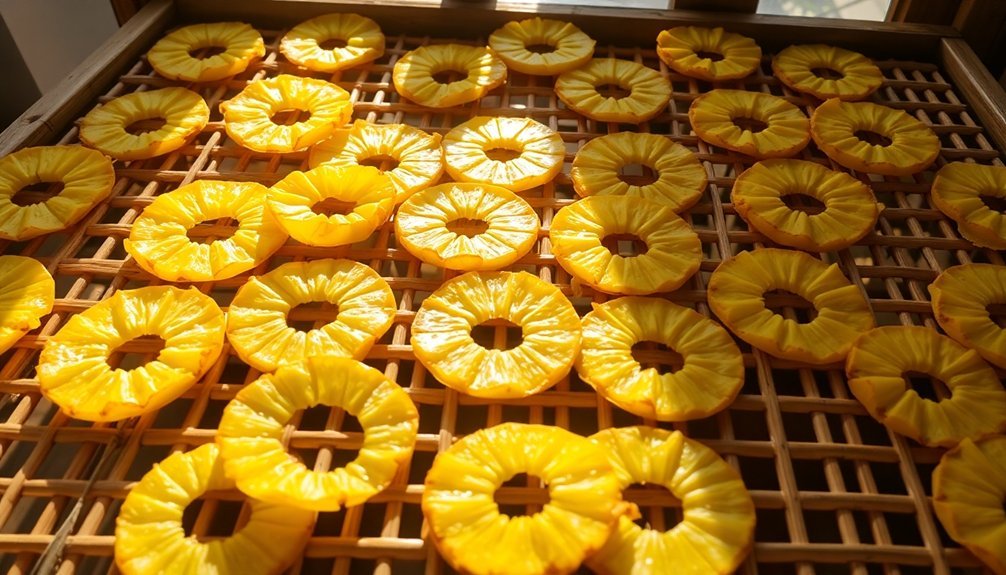
Sweet and tangy dried pineapple rings transform fresh fruit into a shelf-stable treat that rivals candy. You'll want to start with a ripe, fragrant pineapple and cut it into uniform ¼-inch slices for even drying.
After removing the top, bottom, and sides with a serrated knife, use a paring knife to dig out any remaining eyes. Don't forget to remove the tough core from each slice.
To dry your pineapple rings without electricity, you'll need to use your oven at its lowest setting, around 175-200°F. Place the rings in a single layer on a parchment-lined baking sheet or a wire rack with a drip pan underneath.
You'll need to dry them for 6-8 hours, flipping the rings every couple of hours until they reach your desired consistency.
Once dried, store your pineapple rings in an airtight container away from moisture and sunlight. They'll keep for several months when stored properly in a cool, dry place.
You can enjoy them as a healthy snack on their own, add them to trail mix, or use them to enhance salads and desserts.
Grape and Cherry Raisins
When making raisins at home, you'll want to start with firm, ripe grapes like Thompson Seedless or fresh cherries that are free from blemishes and mold.
You can transform these fruits into dried treats by arranging them in a single layer on a wire cooling rack and letting them dry in direct sunlight for 3-4 days, turning them twice daily for even drying.
Once your raisins reach the desired texture, store them in airtight containers and shake them daily to prevent clumping and maintain freshness for months.
Selecting Fresh Quality Grapes
The grape-selection process plays an essential role in creating delicious homemade raisins. You'll want to start by examining the color of your grapes – they should display even coloring without any black or brown spots. Green grapes need a green-yellow hue, red grapes should be mainly red, and black grapes require a deep, full color.
Don't worry about the powdery-white residue called "bloom" – it's natural on ripe grapes.
When you're checking the grapes' quality, look for these essential characteristics:
- Firm, plump fruit that pulls away easily from the stem
- Green, pliable stems that aren't dried out or brown
- Even coloring without signs of decay or bruising
- No signs of mold, wetness, or shriveling
You'll know you've found fresh grapes when they're firm to the touch and have bright, green stems. Avoid any clusters with brittle stems, as the grapes will likely fall off during the drying process.
The firmness indicates high juice content, which is vital for producing flavorful raisins. If you're buying from a farmers' market, make sure the grapes aren't waxed, as this can affect the drying process.
Natural Sun-Drying Process
Making sun-dried raisins starts with proper preparation of both your drying area and fruit.
You'll need to slope and pack the soil to maximize sun exposure and prevent water pooling. Smooth the surface to create an even base for your drying trays, and harvest your grapes early in the morning while it's still cool.
To begin the drying process, lay your grapes on paper trays or racks in direct sunlight. Angle the trays slightly to guarantee even drying and proper drainage in case of rain.
You'll need to turn and stir the grapes regularly to prevent them from sticking together and to achieve uniform drying. The process typically takes 14-20 days for traditional tray-drying.
If you're concerned about moisture, you can roll up the paper trays similar to cigarette packs, which helps protect the fruit and slows the drying process to prevent sugar caramelization.
Keep your drying area free from shade and monitor the raisins closely throughout the process.
For juicier results, you might consider the dry-on-vine method, which takes 30-40 days but requires less hands-on attention and produces sweeter raisins.
Long-Term Storage Methods
Successful preservation of your sun-dried fruits depends on proper storage techniques. You'll want to focus on keeping your grape and cherry raisins fresh by using airtight containers and protecting them from moisture, heat, and oxygen exposure.
For ideal storage of your dried fruits, you've got several effective methods to choose from:
- Store your raisins in clean, airtight containers with silica gel packets in a cool, dark pantry.
- Place containers in your refrigerator's crisper drawer, where they'll stay fresh for up to two years.
- Add oxygen absorbers to your storage containers to remove moisture and maintain freshness.
- Freeze your dried fruits in loosely packed containers for indefinite storage.
If you're using containers, make sure they're thoroughly cleaned with warm, soapy water before filling them with your dried fruits.
For refrigeration or freezing, confirm your containers are completely sealed to prevent moisture and odors from affecting your raisins. The freezer method is particularly effective as it helps preserve the nutritional content of your dried fruits while preventing spoilage.
Remember to check oxygen absorbers periodically if you're using them, confirming they continue working effectively.
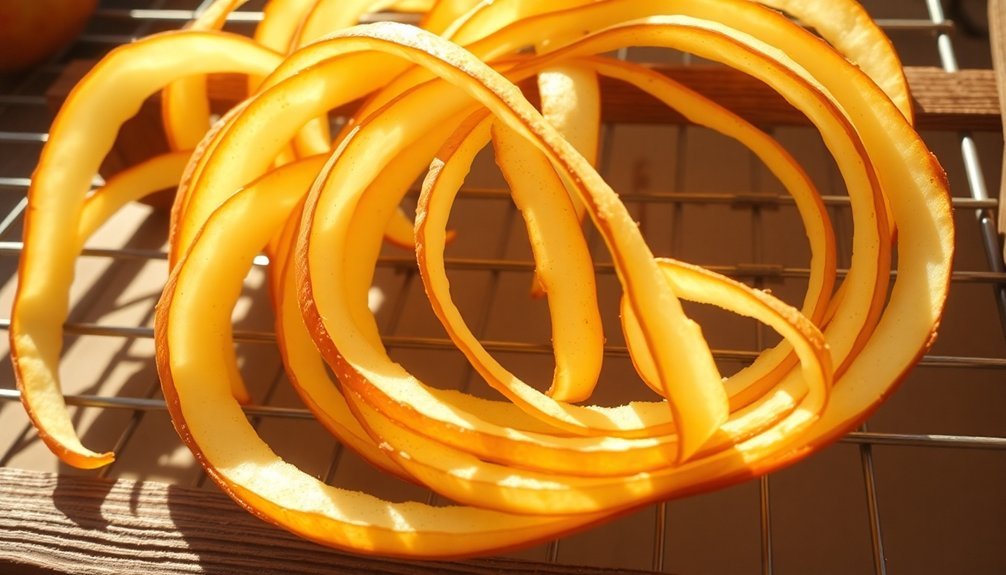
Orange Citrus Slices
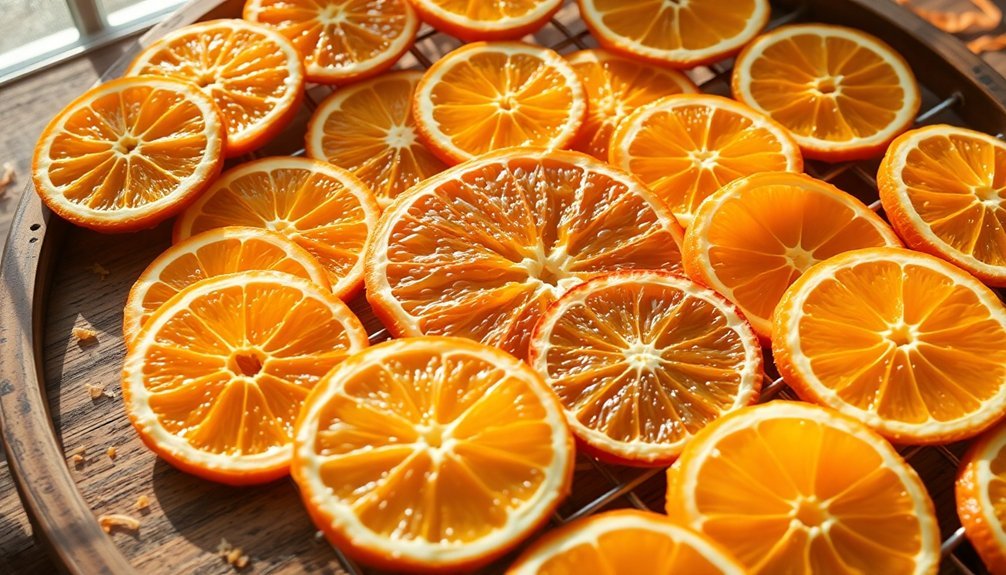
Bursting with vibrant color and natural sweetness, dried orange slices offer a versatile addition to your pantry without requiring electricity.
You'll need to start by washing your oranges thoroughly and slicing them into consistent 1/4-inch rounds using a sharp knife. Pat each slice dry with paper towels to remove excess moisture.
To dry your orange slices naturally, place them on a wire rack in a single layer on your kitchen counter. You'll need to turn the slices daily to guarantee even drying, which can take several days.
For a quicker option, you can suspend the slices on twine in a warm area with good air circulation.
If you'd like to speed up the process without electricity, you can sprinkle confectioner's sugar on both sides of the slices before drying – this helps draw out moisture.
Once dried, test the slices by trying to bend them; properly dried slices won't flex.
Store your finished orange slices in an airtight container, making sure to shake it daily during the conditioning period. This helps distribute any remaining moisture evenly and prevents mold growth.
Peach Fruit Roll-Ups
You'll find making peach fruit roll-ups in a solar dehydrator requires careful preparation, including spreading your pureed peaches thinly on parchment paper and letting them dry for 6-8 hours in direct sunlight.
To maximize natural sweetness, select fully ripened peaches and consider skipping added honey if your fruit is already sweet enough.
When properly dried and stored in an airtight container, your homemade peach roll-ups can last up to a month in the refrigerator, making them an excellent option for preserving seasonal fruit without electricity.
Solar Drying Preparation Steps
Making delicious peach fruit roll-ups through solar drying starts with proper preparation of both the fruit and your drying surface. Begin by selecting ripe but firm peaches, then peel and pit them thoroughly.
You'll need to puree the peaches in a blender until they're completely smooth, adding just a touch of honey or sugar if needed, though well-ripened peaches often don't require additional sweetening.
Your drying setup needs careful attention to guarantee the best results. Line your cookie sheets or trays with parchment paper or cheesecloth, making sure they're clean and completely dry before use.
Spread the peach puree in a thin, even layer by tilting the tray to achieve paper-thin coverage.
For ideal solar drying, you'll want to:
- Choose a location with temperatures between 100-140°F and direct sunlight
- Position trays for maximum sun exposure and good air circulation
- Cover the fruit leather with protective screening to keep out insects
- Stack multiple trays if needed, making sure each gets adequate sunlight
These preparation steps are vital for creating high-quality fruit leather that'll dry evenly and maintain its flavor.
Natural Sweetness Tips
The natural sweetness of perfectly ripened peaches eliminates the need for added sugars in your fruit roll-ups. You'll only need to add a splash of lemon juice to enhance the flavor and help preserve your treats. When selecting peaches, choose fully ripe ones that yield slightly to gentle pressure for maximum natural sweetness.
Before blending, wash your peaches thoroughly and cut them into 1-inch chunks. You can add a small amount of honey if you'd like extra sweetness, though it's often unnecessary with ripe fruit. Blend the peaches and lemon juice until you've created a smooth puree without any chunks.
To guarantee the best results, spread your puree evenly on a lined baking sheet at ⅛ to ¼-inch thickness. You'll want to tap the sides of the sheet gently to remove air bubbles and create a level surface. This thickness allows for proper drying while maintaining the roll-ups' flexibility.
Your finished roll-ups will provide natural energy from fruit sugars, plus beneficial fiber, vitamins, and antioxidants. Store them in a cool, dry place, and remember to enjoy them in moderation since they're concentrated sources of natural sugars.
Storage and Shelf Life
Proper storage of peach fruit roll-ups dramatically extends their shelf life and maintains their chewy texture. Before storing, let your roll-ups cool for 1-2 hours and cut them into individual portions for easier access. You'll want to wrap each piece in plastic wrap or parchment paper to prevent sticking.
Choose your storage method based on how long you'll need to preserve your fruit leather:
- Room temperature: Store in an airtight container for 2-4 weeks, ensuring the roll-ups are completely dry to prevent mold.
- Refrigerator: Keep wrapped pieces in an airtight container for up to 2 months, rotating older pieces to the front.
- Freezer: Roll up in plastic wrap and place in freezer bags for up to 1 year, thawing as needed.
- Vacuum-sealed: Extends freezer life while preventing freezer burn.
Don't forget to label your containers with the creation date for proper rotation. If you're storing at room temperature, choose a cool, dry spot away from direct sunlight.
You'll get the best flavor and texture when consuming within the first few days, but proper storage techniques will keep your peach roll-ups fresh for months.
Frequently Asked Questions
How Long Do Sun-Dried Fruits Stay Fresh Without Refrigeration?
You'll find your sun-dried fruits stay fresh for 6-12 months in your pantry when stored in airtight containers. Keep them in cool, dark places and guarantee they're properly dried with less than 20% moisture content.
Can I Dry Different Types of Fruits Together on the Same Tray?
You can dry different fruits together if they're similar in size and drying time. Cut them to equal thickness and monitor closely. Apples and bananas work well together, but avoid mixing quick-drying with slow-drying fruits.
What Causes Mold During the Drying Process?
You'll get mold when there's high humidity, poor airflow, trapped moisture, and warm temperatures. If you don't cut your fruits evenly or maintain proper drying conditions, moisture pockets can form, promoting mold growth.
Which Fruits Are Not Recommended for Sun Drying?
You shouldn't sun dry citrus fruits, melons, avocados, pomegranates, or berries with high seed content. These fruits have too much water, seeds, or fat, making them prone to spoilage during drying.
Does Altitude Affect the Drying Time of Fruits?
Yes, altitude will affect your fruit drying time. You'll notice slower drying at higher elevations due to lower temperatures, while different humidity levels and air circulation patterns at various altitudes also impact drying speeds.
In Summary
You'll find these electricity-free drying methods both rewarding and cost-effective. Now that you've mastered these ten simple recipes, you can preserve your favorite fruits year-round using just the sun's natural energy. Don't limit yourself to these suggestions – experiment with different fruit combinations and seasonings to create your own unique dried treats. Remember to store your creations in airtight containers to maintain freshness.


Leave a Reply