
For emergency veggie prep, you'll want to prioritize freeze-dried and dehydrated vegetables for lightweight, long-term storage. Keep your prep area sanitized and use separate cutting boards for different food types. Stock essential tools like sharp knives, peelers, and airtight containers. You can cook using solar ovens (position in direct sunlight between 10 a.m. and 4 p.m.), portable stoves, or buddy burners. Store your prepped vegetables at 40°F or below, and don't leave them at room temperature for over 2 hours. Plan for at least a 3-day supply, aiming for 2,000-2,500 daily calories. There's much more to explore about emergency veggie preparation techniques.
Choosing Your Emergency Vegetables

When it comes to stocking emergency vegetables, you'll need to balance nutrition, shelf life, and practicality.
Start with freeze-dried and dehydrated options, as they're lightweight and last for years. Add canned vegetables for dense nutrition when you're sheltering in place, but avoid them for portable kits due to their weight.
Don't overlook dried beans, lentils, and peas – they pack serious protein and store compactly. Aim for 2,000-2,500 calories per day when planning your vegetable and legume portions.
If you have proper storage space, include root vegetables and winter squash, which can last for months in cool, dry conditions.
Consider your specific needs: Will you need to transport your supplies? Do you have dietary restrictions? Can you access water for rehydration?
Choose vegetables that match your situation and provide essential vitamins, minerals, and fiber while meeting your daily caloric requirements.
Essential Prep Tools
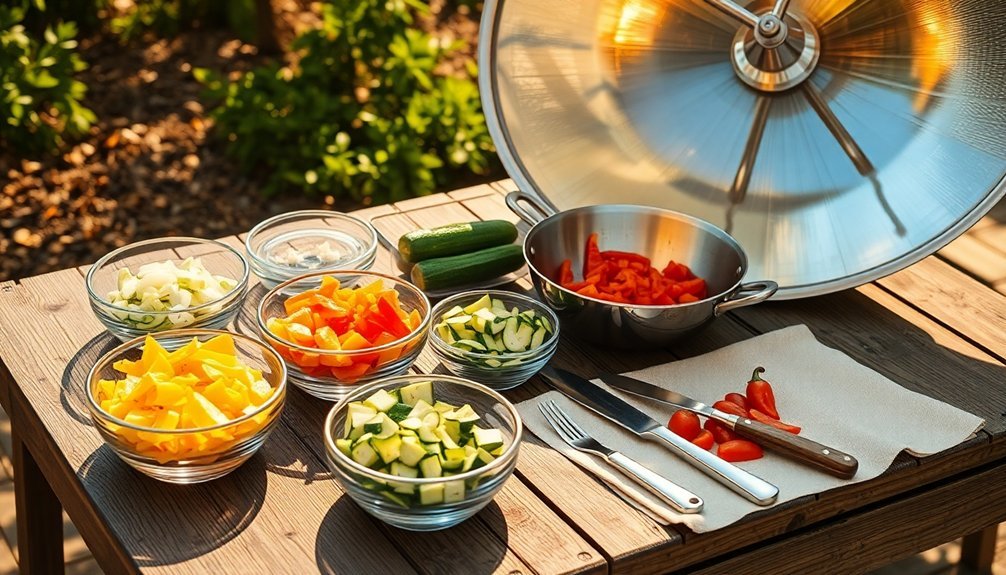
Having the right vegetables for emergencies is only half the battle – you'll need proper tools to prepare them effectively.
Start with a sharp knife and two separate cutting boards: one for veggies and another for any meat prep to maintain food safety.
You'll want a reliable vegetable peeler, grater, and shredder for efficient processing.
Don't forget essential utensils like stainless steel spatulas, ladles, and slotted spoons for serving and draining. All tools should be durable and multi-use to withstand emergency conditions.
A whisk and blender or food processor will help you create spice pastes and mix ingredients thoroughly.
For more specialized prep, keep a mortar and pestle handy for grinding spices, and consider investing in a fermenting crock to preserve vegetables long-term.
Remember to label your prepped items clearly to stay organized during emergencies.
Solar Cooking Equipment Setup
Position your solar cooking equipment in a sunny, level spot where you'll have unobstructed sunlight throughout the cooking process.
You'll need to take into account the sun's path and adjust your reflector every 30 minutes to maintain ideal heat absorption. Carefully adjust the foil-covered flap to maximize sunlight reflection into your cooking area.
Weather conditions like cloud cover and wind can greatly impact your cooking time, so it's best to choose clear, calm days for solar cooking.
Equipment Position Basics
Successful solar cooking starts with proper equipment setup and positioning. You'll need to unfold your solar oven and secure it with support rods, making certain they're properly aligned inside to maintain stability. Position the ventilation flaps at the bottom and guarantee all components are tightly fitted.
For peak cooking, point your oven directly at the sun between 11:00 am and 3:00 pm. Use the oven's shadow as a positioning guide – it should fall directly behind the unit.
Line the bottom with black construction paper and seal the opening with clear plastic wrap to create an effective heat trap. Don't forget to add insulation like crumpled newspapers around the cooking area. Your cooking containers should be dark-colored to maximize heat absorption.
Remember to preheat for an hour and keep the cover zipped throughout the process.
Weather Impact Considerations
While solar ovens are remarkably efficient cooking tools, their performance depends heavily on weather conditions. You'll need to adjust your cooking approach based on the weather to achieve the best results.
For ideal solar cooking success:
- Cook between 10 AM and 4 PM, when sun intensity is strongest, and expect longer cooking times on cloudy days.
- Shield your oven from wind and use thermal mass like rocks or bricks to maintain consistent temperatures in cold weather.
- Position reflective surfaces to maximize sunlight capture, especially during winter months when daylight hours are shorter.
- Track the sun more frequently during cold weather, adjusting your oven's angle to maintain optimal heat absorption.
Double glazing and strong insulation will help maintain steady temperatures regardless of weather conditions, making your solar cooking more reliable year-round.
Vegetable Storage Methods
Maximize your root cellar's effectiveness by storing vegetables in single layers with good airflow, using wooden crates or mesh bags to prevent moisture buildup.
You'll extend your produce's shelf life through dehydration, which works especially well for mushrooms, herbs, and tender vegetables when using a food dehydrator or low-temperature oven.
Keep your dried and fresh vegetables in properly sealed containers, using glass jars with tight lids for dried goods and ventilated plastic containers for fresh items to maintain ideal humidity levels.
Root Cellar Storage Tips
Learning how to properly store root vegetables can extend their shelf life from weeks to months. Your root cellar should maintain temperatures between 32-40°F and humidity levels of 85-95% for ideal preservation.
You'll need to handle your vegetables gently and check them regularly for signs of spoilage.
- Line your storage containers with clean sand or untreated wood shavings, keeping vegetables separated to prevent contact.
- Create proper ventilation using mesh bags, crates, or baskets that allow air circulation.
- Monitor the space for ethylene gas production, which can speed up ripening and lead to faster spoilage.
- Layer your vegetables with straw or leaves if using traditional pit storage methods, and cover with a tarp to protect from excess moisture.
Remember to harvest vegetables before the first hard frost to guarantee the best storage quality.
Dehydration for Long Term
Among the most effective methods for preserving vegetables long-term, dehydration stands out for its simplicity and reliability. You'll need to remove about 90% of moisture using low heat and good air circulation to prevent bacterial growth.
For best results, blanch your vegetables before drying. Cut asparagus, green beans, carrots, broccoli, and beets into small, uniform pieces to guarantee even drying.
You'll know they're ready when they become brittle. Each vegetable requires specific temperatures and times – for instance, dry asparagus at 135°F for 6-8 hours.
Store your dehydrated vegetables in airtight containers or vacuum-sealed bags, and don't forget to add silica gel packs in humid climates.
When you're ready to use them, rehydrate by soaking in hot water for 30 minutes or add directly to soups and stews.
Sealed Container Best Practices
To guarantee your vegetables stay fresh and nutritious, proper sealed container storage makes all the difference. You'll need airtight, moisture-proof containers like glass jars, plastic bags, or metal cans that haven't rusted.
Keep them off concrete floors and in a cool, dark space between 40° and 70°F to prevent mildew and spoilage.
- Label each container with contents and dates, checking expiration regularly
- Store root vegetables in plastic bins with moist sand at 32-40°F
- Keep turnips separate from other produce to prevent odor transfer
- Add insulation materials like straw or hay to maintain consistent temperatures
Don't forget to guarantee proper ventilation in your storage area while maintaining humidity levels. A well-sealed container combined with proper temperature control will greatly extend your vegetables' shelf life.
Solar Cooking Times

Mastering solar cooking times requires understanding the ideal conditions and daily windows for success.
You'll get the best results between 10 a.m. and 4 p.m. when the UV index is 7 or higher. On clear, sunny days, your cooking times will match conventional methods, especially for smaller portions.
For vegetables, expect ratatouille to cook in 45-75 minutes depending on desired texture.
Cauliflower, carrots, and zucchini need about 1 hour 20 minutes. Pre-soaked beans and chickpeas take up to 90 minutes. If you're using a parabolic oven, plan for 2 hours when cooking crunchy vegetables with cheese.
Always check the weather forecast before starting.
You'll need considerably longer cooking times on overcast days, and you might want to switch to alternative cooking methods during stormy weather.
Safe Food Handling
When preparing vegetables safely, proper food handling practices can prevent foodborne illness and cross-contamination.
You'll need to maintain clean hands, tools, and work surfaces throughout your prep process. Always wash your hands with warm, soapy water for at least 20 seconds before handling any food items.
- Keep your cutting boards and utensils separate – use different ones for raw foods versus ready-to-eat vegetables.
- Wash all tools and surfaces thoroughly between different food preparations to avoid cross-contamination.
- Store your prepped vegetables at 40°F or below in the refrigerator to maintain freshness and safety.
- Never let prepared vegetables sit at room temperature for more than two hours – this is when bacteria can multiply rapidly.
Remember to sanitize your workspace before and after veggie prep, and keep your hands away from your face while working.
Alternative Cooking Methods

Alternative cooking methods provide essential backup options if your regular kitchen setup becomes unavailable during emergencies or power outages.
You'll find both indoor and outdoor solutions to prepare your vegetables safely. For outdoor cooking, consider using a camping stove, BBQ, or solar oven. These methods are particularly effective for grilling or roasting vegetables.
For indoor alternatives, you can rely on portable butane stoves or alcohol burners. They're compact and perfect for cooking vegetables when traditional appliances aren't working.
To maximize fuel efficiency, try using a pressure cooker or thermal cooking method – they'll help you cook vegetables thoroughly while conserving resources.
Don't forget about simple emergency options like buddy burners or canned heat sources, which can help you prepare basic vegetable dishes when other methods aren't available.
Emergency Meal Planning Tips
Successful emergency meal planning starts with a systematic assessment of your household's needs.
You'll need to calculate at least three days' worth of supplies, though a two-week stockpile is ideal. Consider your family's dietary restrictions, allergies, and any special requirements for infants, elderly members, or pets.
- Create a diverse menu featuring shelf-stable proteins, grains, and vegetables to maintain proper nutrition and prevent meal fatigue.
- Store your emergency food in waterproof containers near an exit, and don't forget essential non-electric cooking tools.
- Rotate your supplies annually, marking expiration dates on your calendar.
- Pack comfort foods alongside practical items – they'll boost morale during stressful situations.
Remember to include water purification methods and manual can openers in your preparation kit.
Store everything in durable, compact packaging that's easy to transport if needed.
Frequently Asked Questions
How Long Can Dehydrated Vegetables Last in Emergency Storage Conditions?
Your dehydrated vegetables can last 6-12 months at room temperature, 1-3 years in ideal conditions, and up to 25+ years when professionally packaged. You'll get best results using Mylar bags with oxygen absorbers.
Can You Rehydrate Vegetables Using Cold Water in Emergencies?
Yes, you can easily rehydrate vegetables with cold water. Just soak them for 20 minutes to overnight, depending on the type. Leafy greens rehydrate quickly in 15-20 minutes, while tougher veggies need longer.
Which Vegetables Produce Harmful Gases When Stored Together?
You'll need to keep ethylene-producing fruits like apples, bananas, and tomatoes away from sensitive vegetables such as carrots, broccoli, and cucumbers. These producers release gases that can spoil other produce quickly.
What Vegetables Become Toxic When Cooked at Very High Temperatures?
You'll want to watch out for starchy vegetables like potatoes, which can form acrylamide when cooked at high temps. Also avoid charring cruciferous veggies, as they can release potentially harmful compounds.
Can Sprouting Vegetables Provide Additional Nutrition During Extended Emergencies?
Yes, you'll gain significant nutritional benefits from sprouting vegetables during emergencies. They'll provide enhanced protein, vitamins, minerals, and antioxidants while requiring no cooking. Sprouts can boost your survival diet's nutritional value substantially.
In Summary
You've now got the essential knowledge to handle vegetable prep during emergencies. Remember to choose hardy vegetables, keep your tools clean and accessible, and maintain proper food safety even in challenging situations. Whether you're using solar cooking or alternative methods, you can create nutritious meals with minimal resources. Don't wait for an emergency – practice these skills now to build confidence in your preparedness abilities.


Leave a Reply