Seven essential temperature checks will guarantee your sun cooking success. Start by checking your reflector angles at 110-112.5 degrees for peak sunlight capture. Next, verify your preheating temperature reaches 300°F after 20-30 minutes. Position your digital thermometer inside the inner box for accurate readings, and test airflow around the probe. Monitor surface heat distribution to identify hot spots, and locate the ideal cooking zone in the center. Finally, prevent heat loss by minimizing lid openings and maintaining tight seals. Master these simple checks, and you'll unleash the full potential of your solar cooking adventure.
Check Your Sun Angle

How you position your reflectors can make or break your solar cooking success. You'll need to adjust your reflector angles between 110 and 112.5 degrees off perpendicular to maximize sunlight capture. For ideal results, position the top edge of your reflector's reflection so it touches the far side of your cooking area.
When the sun's low, set your top reflector at a steep angle and bottom reflector at a shallow angle. A 60-degree angle from the box face works well for most basic solar ovens. You'll want to refocus your reflectors periodically during longer cooking sessions.
Use a ruler or wooden skewer to precisely control the flap angles, and keep a thermometer handy to monitor temperature changes. Remember that longer reflectors work best with more acute angles, while shorter ones need shallower angles.
Don't forget to readjust throughout the day as the sun moves.
Preheating Time Requirements
Once you've aligned your reflectors properly, preheating your solar oven becomes your next vital step. On a clear day, you'll need about 20-30 minutes to reach cooking temperatures around 300°F.
The dual-purpose leveling rack helps maintain proper airflow during the preheating process.
While you're preheating, it's essential to keep the glass door closed and properly latched to maintain ideal heat buildup.
For successful preheating, follow these essential steps:
- Set up and align your oven to the sun before you start preparing your food.
- Clean the interior with soapy water after the initial heating period, using oven mitts for safety.
- Realign your oven every 30 minutes to maintain maximum sun exposure.
Digital Thermometer Placement

You'll need to place your digital thermometer inside the solar cooker's inner box to accurately track cooking temperatures.
Position the thermometer in a spot with adequate airflow around the probe to ensure correct temperature readings.
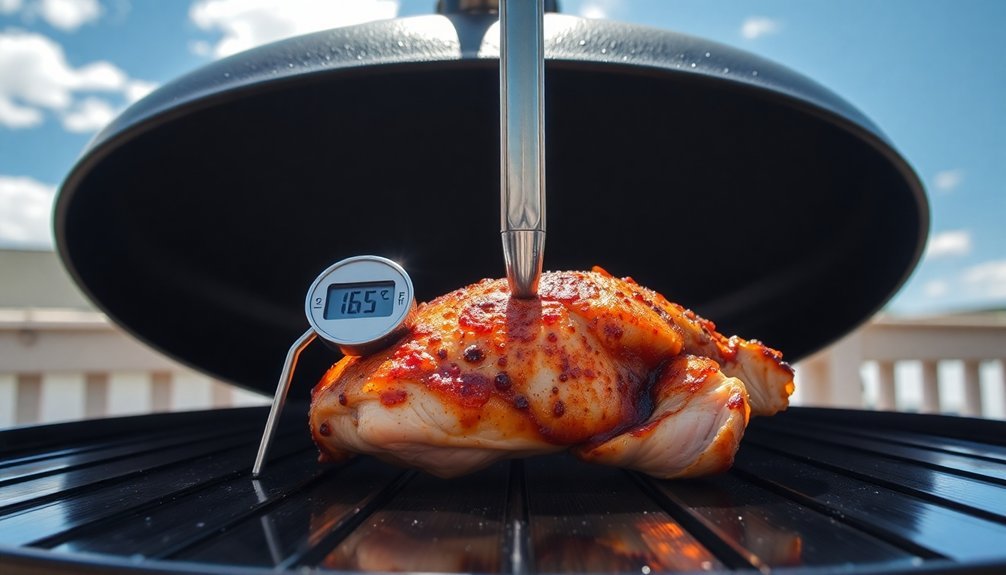
Insert the probe into the thickest part of your food while avoiding bones and fat pockets for the most reliable reading.
When checking temperatures, lift the lid quickly and minimally to prevent heat loss that could extend your cooking time.
Monitor Inner Box Heat
Monitoring the temperature inside a solar cooker is essential for achieving safe and successful cooking results. You'll need to maintain temperatures between 150-225°F to guarantee food cooks properly without burning. Regular checks every 20-30 minutes help you adjust the oven's position and optimize heat gain throughout the cooking process.
To effectively monitor your solar cooker's temperature:
- Position your digital thermometer where it's visible but doesn't block sunlight, using a probe with an external display.
- Keep the oven cover closed as much as possible during temperature checks to prevent heat loss.
- Use pot holders when handling equipment, as the cooker can reach extremely high temperatures.
Remember to keep your reflectors clean and properly positioned to maximize heat gain while cooking outdoors. Consistent monitoring helps prevent undercooked or overcooked meals.
Best Digital Probe Spots
Proper placement of your digital thermometer probe is essential for accurate temperature readings in solar cooking.
You'll want to insert the probe into the thickest part of your food, avoiding any contact with bones, fat, or the cooking container's surfaces. For even-thickness foods, place the probe in the center.
When cooking stews or soups, stir thoroughly before taking readings to verify even heat distribution. In large cuts of meat or roasts, insert deep into the thickest section. With baked goods like solar cakes, position the probe in the middle.
Before using your probe, clean it with hot soapy water. Don't submerge the cable connection, as it isn't waterproof.
Keep the cable straight and free of knots to maintain accuracy, and make certain you've selected your preferred temperature display (Celsius or Fahrenheit).
Avoid Lid Temperature Loss
Strategic thermometer placement can minimize heat loss when checking temperatures in your solar oven.
You'll want to keep the lid closed as much as possible since opening it can drop temperatures by 50°-100°F. When you need to check food, work quickly to maintain the sealed cooking environment.
- Create a small vent hole using a twig or matchstick to prevent steam buildup, which can block sunlight from entering the oven.
- Position your digital probe through a dedicated access point sealed with aluminum tape to avoid frequent lid opening.
- Monitor temperatures without lifting the lid by keeping the thermometer's digital display visible from outside.
Remember to adjust your oven's position every 20 minutes to track the sun, especially during winter months when more frequent adjustments are needed.
Air Flow Temperature Testing
Because air flow can dramatically affect a solar oven's performance, it's essential to conduct thorough temperature testing under various wind conditions.
You'll want to use a thermometer to take regular readings and track how different wind speeds impact your oven's internal temperature.
Place your solar oven in a sheltered spot and use windbreaks when needed. You can improve heat retention by sealing gaps with plastic wrap or tape, while using insulation materials like foam or fiberglass.
Keep a small ventilation gap to prevent moisture buildup, but don't let it compromise your heat retention.
For best results, adjust your reflector flaps to maximize sunlight while minimizing heat loss.
Remember to use darker-colored cooking containers, as they'll absorb more solar radiation and help maintain consistent temperatures despite air flow variations.
Surface Heat Distribution

You'll notice distinct hotspot patterns forming on your solar cooker's surface, with the center typically reaching higher temperatures than the edges.
The heat flow from the edges to the center creates a natural temperature gradient that you can use to your advantage when positioning food items.
Your cooking results will improve when you understand these heating patterns and place larger items in the hotter center zones while using the cooler edges for foods requiring less intense heat.
Hotspot Pattern Analysis
When analyzing surface heat distribution for outdoor sun cooking, understanding hotspot patterns becomes essential for ideal performance.
You'll find that surface temperatures can vary greatly across your cooking area, creating both hotspots and cool spots that affect your cooking results. By identifying these patterns, you'll optimize your cooking setup and achieve better temperature control.
- Track temperature variations using point mapping techniques to locate areas where heat clusters most intensely – these are your prime cooking zones.
- Consider seasonal changes and time of day, as sun intensity directly impacts hotspot formation and cooking effectiveness.
- Check surface properties of your cooking equipment, as materials with different albedo and emissivity levels will create distinct heat distribution patterns.
Remember that atmospheric conditions and surface properties greatly influence how heat distributes across your cooking surface.
Edge-to-Center Heat Flow
Building on our hotspot analysis, understanding edge-to-center heat flow reveals the complete picture of surface heat distribution in sun cooking.
When you're cooking thick foods outdoors, heat moves slowly from the edges toward the center due to high water content. You'll notice that surface temperatures won't exceed 212°F during slow cooking because of evaporative cooling, which creates a temperature gap between the exterior and interior.
This cooling effect actually helps prevent overcooking the surface while the center catches up.
To manage this heat flow effectively, you'll want to guarantee your solar cooker has proper insulation and a tight seal. Use a glass or Plexiglas cover to trap heat like a greenhouse, and consider adding reflectors to direct more sunlight onto your cooking container.
This setup helps maintain consistent temperatures throughout your food.
Ideal Cooking Zone Detection
Finding your solar cooker's ideal cooking zone requires precise temperature monitoring and strategic positioning.
You'll want to position your cooker between 11 AM and 3 PM when the sun's intensity peaks. Focus on maintaining temperatures between 200°F and 300°F for best results, while ensuring food never lingers in the dangerous 40°F to 140°F zone.
- Check your cooking zone's temperature before adding food – it should reach at least 140°F, though 200°F is better for maintaining safe cooking conditions.
- Position your food at the focal point where sunlight concentrates, adjusting every 1-2 hours to track the sun.
- Use reflectors or parabolic wings to boost temperatures, especially when cooking meats that require higher internal temperatures (145°F-165°F for safety).
Temperature Loss Prevention Methods

Now that you've located your ideal cooking zone, keeping that valuable heat inside your solar cooker becomes the next challenge. You'll need to focus on proper insulation and sealing techniques to maintain consistent cooking temperatures.
| Prevention Method | Action | Benefit |
|---|---|---|
| Tight Sealing | Apply clear plastic wrap over openings | Traps heat while letting sunlight in |
| Interior Lining | Use black construction paper | Maximizes heat absorption |
| Container Choice | Select glass or metal cookware | Enhances heat retention |
Line your cooker with foam trays or crumpled paper for insulation, and seal any gaps with tape. Don't forget to minimize lid openings during cooking – each peek lets precious heat escape. You can also boost efficiency by using aluminum foil reflectors to direct more sunlight into your cooking zone.
Frequently Asked Questions
How Does Cloud Cover Affect the Maximum Temperature Reached in a Solar Oven?
Your solar oven's maximum temperature will drop by 50-100°F when clouds block direct sunlight. You'll notice temperatures only reaching 150-200°F in well-insulated ovens, instead of their usual higher performance.
Can Reflective Materials Other Than Aluminum Foil Work Effectively?
Yes, you'll find several materials that work better than aluminum foil. Vinyl car wrap reflects 1.8 times better, while Mylar tape and mirror wall stickers also provide excellent reflectivity for your solar cooking needs.
Does Altitude Impact Cooking Temperature and Time in Solar Ovens?
Yes, altitude considerably impacts your solar cooking. You'll experience higher temperatures and faster cooking times at greater elevations due to increased solar radiation and less atmospheric interference. Your food will cook more efficiently up high.
What Minimum Outdoor Temperature Is Needed for Solar Oven Cooking?
You can use a solar oven when outdoor temperatures are above 40°F (4°C), but you'll get the best results above 60°F (16°C). Remember, it's the sun's intensity, not air temperature, that's most important.
How Often Should Temperature Readings Be Taken During Longer Cooking Sessions?
You'll need to check your food's temperature every 30 minutes to an hour during longer solar cooking sessions. Using a digital probe thermometer, monitor internal temperatures regularly to guarantee safe and thorough cooking.
In Summary
You've now got the essential tools to master temperature control in sun cooking. By monitoring sun angles, preheating times, and strategic thermometer placement, you'll achieve ideal cooking temperatures. Don't forget to test airflow and heat distribution while identifying your cooker's sweet spots. With these temperature checks and proper heat loss prevention, you're ready to harness solar power for your outdoor cooking adventures.


Leave a Reply