
You'll need strategic adaptations to maximize your sun kitchen's efficiency throughout the year. Position your solar stove on level ground with proper sun exposure, adjusting reflector angles between 30-60 degrees based on seasonal sun paths. During winter, place your cooker near south-facing windows and use additional insulation materials like crumpled newspapers. Keep equipment protected with UV-resistant covers and maintain clean reflective surfaces for peak performance. Install thermal-backed window coverings and monitor temperatures with a digital probe thermometer. Your cooking success depends on understanding these seasonal adjustments and implementing the right techniques.
Understanding Solar Cooking Basics
While solar cooking might seem complex at first, the basic principles are straightforward. Your solar oven converts sunlight into heat energy using reflective surfaces that concentrate solar rays onto a cooking chamber.
You'll need four essential components: reflectors (typically aluminum foil or mirrors), a well-insulated cooking chamber, glazing (like plastic wrap) to trap heat, and dark-colored cooking containers. Always remember to follow basic safety precautions when operating your solar oven.
To maximize efficiency, you'll position your oven to face direct sunlight and adjust it as the sun moves. Your food goes into dark, non-reflective containers that absorb heat effectively.
When properly designed, your solar oven can reach temperatures up to 76°C, making it capable of cooking various dishes. The key to success lies in maintaining thermal equilibrium through proper insulation and regular monitoring of temperature and cooking times.
Seasonal Sun Path Analysis
Success with solar cooking depends heavily on understanding the sun's seasonal path across your sky. You'll need to track both the sun's height above the horizon (altitude) and its angle from north (azimuth) to maximize your cooker's efficiency.
Sun path diagrams help you visualize these patterns throughout the year, showing you when and where you'll get the most direct sunlight. Passive solar design strategies are essential for optimizing your cooking setup.
- The sun's path creates an innermost circle during summer solstice (longest day)
- You'll see a middle circle during spring and fall equinoxes
- The outermost circle represents the winter solstice (shortest day)
- At each position, you can calculate shadow lengths to avoid placing your cooker in shaded areas
With this knowledge, you'll be able to adjust your cooker's position and angle for ideal performance in any season.
Essential Equipment for Summer

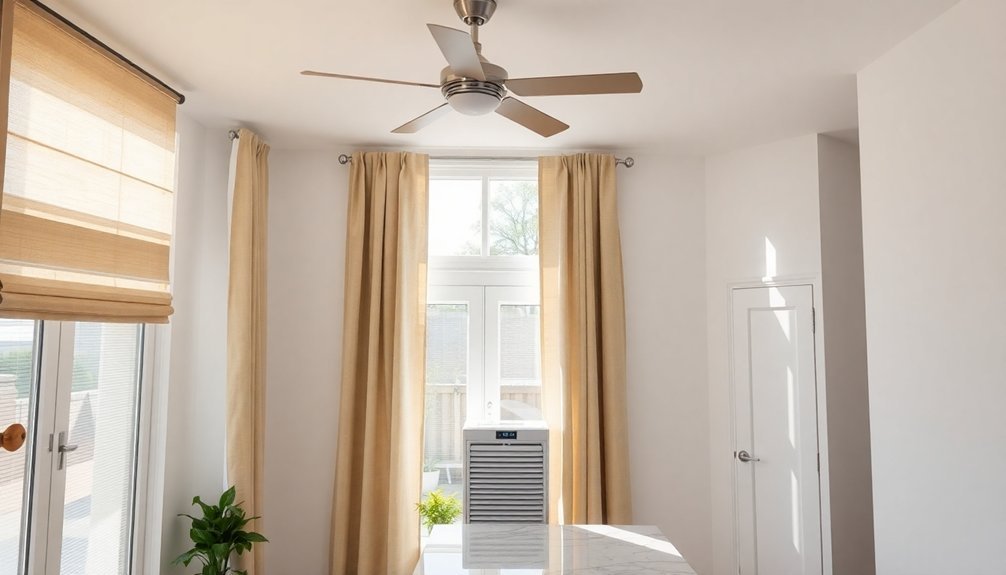
Your sun kitchen's comfort starts with smart ventilation control through strategically placed exhaust fans and adjustable windows.
You'll need UV-filtering window treatments like solar shades or bamboo blinds to manage natural light throughout the day while protecting your kitchen equipment.
Consider high-performance materials for your countertops and cabinets that won't fade or warp under direct sunlight, such as quartz surfaces and marine-grade stainless steel. Invest in a durable, well-ventilated outdoor grill setup that can withstand various weather conditions while providing year-round cooking options.
Temperature Control Through Ventilation
Maintaining comfortable temperatures in a sun kitchen requires a well-planned ventilation system that combines both mechanical and passive cooling strategies. By installing ceiling vents with exhaust fans, you'll create an effective system that removes hot air while drawing in cooler air from outside.
Your ventilation setup should match your cooking equipment's BTU ratings and kitchen volume for ideal performance.
- Position ceiling fans strategically to create a vortex effect, enhancing air circulation and cooling efficiency.
- Install smart range hoods that automatically adjust airflow based on cooking intensity and temperature readings.
- Set up a makeup air system if your ventilation exceeds 900 CFM to maintain proper air pressure.
- Use digital control panels with infrared temperature monitoring to fine-tune your ventilation settings in real-time.
Natural Light Filtering Solutions
When preparing your sun kitchen for summer use, effective light filtering solutions become essential for managing heat and glare while preserving the benefits of natural illumination. You'll want to select shades that offer both functionality and versatility throughout the changing seasons.
| Shade Type | Best Feature | Ideal Placement |
|---|---|---|
| Cellular | Energy efficiency | South-facing windows |
| Roller | Variable opacity | Near dining areas |
| Sheer | Glare reduction | Away from cooking zones |
| Layered/Zebra | Quick adjustment | Wide window banks |
For maximum effectiveness, install your shades away from water sources and heat-generating appliances. Consider motorized options for easy seasonal adjustments, especially for hard-to-reach windows. During summer months, you'll benefit from reflective window films that block excess heat while maintaining visibility. Remember to adjust your shade settings based on the sun's position and intensity throughout the day.
Durable Sun-Resistant Materials
Selecting sun-resistant materials forms the foundation of a functional year-round sun kitchen.
You'll want to focus on materials that can withstand intense UV exposure while maintaining their appearance and durability. For countertops, Lapitec® stands out as an exceptional choice with its non-porous surface and superior UV stability, requiring minimal maintenance compared to granite or quartzite that need regular sealing.
- Install AISI 316 marine-grade stainless steel appliances to resist coastal air and harsh weather
- Choose marine-grade HDPE cabinets for rust-free, easy-to-clean storage
- Build countertops with Lapitec® for maximum durability and heat resistance
- Add protective pergolas or awnings to shield your equipment from direct sunlight
For best performance, complement these materials with climate-specific appliances rated for outdoor use and cover them when not in use.
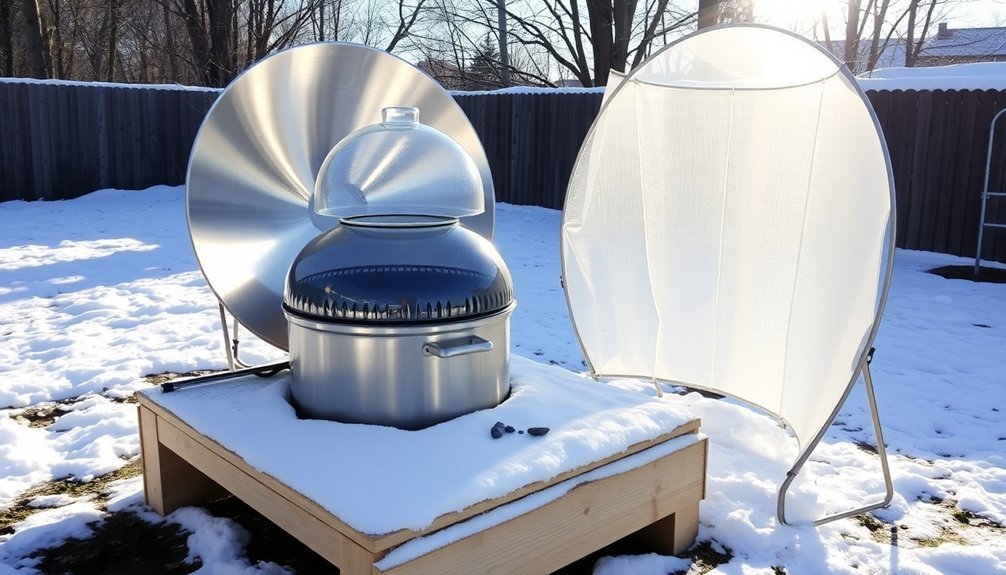
Winter Solar Cooking Setup
You'll need to position your solar cooker's reflective surfaces at steeper angles during winter to capture the low-hanging sun, typically around 60 degrees for ideal exposure.
Make the most of south-facing windows by setting up your cooking station where direct sunlight streams in during peak hours.
To combat winter's chill, wrap your cooking vessels in oven bags and use dark cookware to retain precious heat while your meals simmer.
Position Reflective Cooking Surfaces
The successful positioning of reflective surfaces is critical for winter solar cooking when the sun sits lower in the sky. You'll need to adjust your cooker's angle to capture maximum sunlight during shorter winter days. For peak performance, angle your reflective panels between 30 and 60 degrees, depending on your location and the sun's position.
- Position your cooker on its narrowest side to achieve the most effective angle for capturing direct sunlight.
- Use the cooker's shadow as a guide to align it perfectly with the sun's position.
- Secure the adjusted panels with bricks or wooden blocks to prevent tipping in winter breezes.
- Keep reflective surfaces clean and shiny to maximize sunlight concentration.
Multiple reflective surfaces will help compensate for winter's reduced sunlight intensity, allowing you to maintain efficient cooking despite challenging conditions.
Maximize South Window Light
Since winter's lower sun angle presents unique challenges, strategic placement of your solar cooker near south-facing windows becomes crucial for maintaining cooking efficiency.
Position your cooker to capture maximum sunlight between 11:00 am and 3:00 pm, when the sun's rays are strongest. You'll want to confirm your windows don't have UV inhibitors, as these can reduce cooking effectiveness.
Adjust your cooker's angle to compensate for the season's lower sun position, typically around 60 degrees in winter. Track the sun's movement by repositioning your setup throughout the day, and take advantage of snow reflection to boost solar gain.
If you're using a sun-room, test different spots to find the best cooking location, as these spaces can heat up considerably even on cold days.
Insulate Against Heat Loss
Maintaining consistent temperatures for solar cooking during winter months requires proper insulation throughout your sunroom or cooking space.
You'll need to focus on both structural elements and window treatments to create an efficient environment for winter solar cooking.
- Install insulation material behind drywall and seal any gaps with weather-stripping to prevent cold air infiltration.
- Add thermal-backed window coverings, including cellular blinds and insulated drapes, that you can adjust based on cooking needs.
- Use double or triple-glazed internal doors with proper seals to maintain temperature control between your cooking space and main living area.
- Consider supplemental heating options like portable space heaters or extending your home's HVAC system to maintain consistent cooking temperatures on particularly cold days.
Remember to close window coverings at night to retain the day's captured heat.
Positioning Your Solar Stove

Proper positioning of your solar stove is essential for efficient cooking and ideal performance. Place your cooker in direct sunlight on a level, dry surface, ensuring it's away from potential shadows.
For stable operation, especially on windy days, secure it with large stones or bricks.
When planning meal times, orient your cooker's front panel easterly for noontime meals and westerly for evening dishes. You'll get the best results between 10:00 a.m. and 2:00 p.m. when the sun is strongest.
Start morning cooking by 9:00 a.m. and afternoon cooking by 1:00 p.m. Adjust your reflectors throughout the day to maximize sunlight exposure – raise or lower the front flap to capture the sun's rays effectively.
Remember to position reflectors so they direct light onto your cooking container without blocking the sun.
Weather Protection Solutions
To protect your sun kitchen from nature's elements, you'll need a thorough strategy that combines covers, seals, and permanent structures.
Invest in custom-made covers with UV protection and ventilation flaps to shield your equipment from harsh weather. Apply outdoor-grade sealants to all porous surfaces every 1-2 years, creating a reliable moisture barrier.
Don't forget about proper drainage – guarantee your countertops have a slight angle and install efficient drainage systems to prevent water damage.
- Install a veranda with full screening or glass panels for maximum protection
- Use marine-grade stainless steel components for enhanced durability
- Place outdoor rugs strategically to protect flooring while adding style
- Position drainage solutions to direct water away from your cooking area
These measures will help maintain your sun kitchen's functionality throughout the seasons while preserving its components.
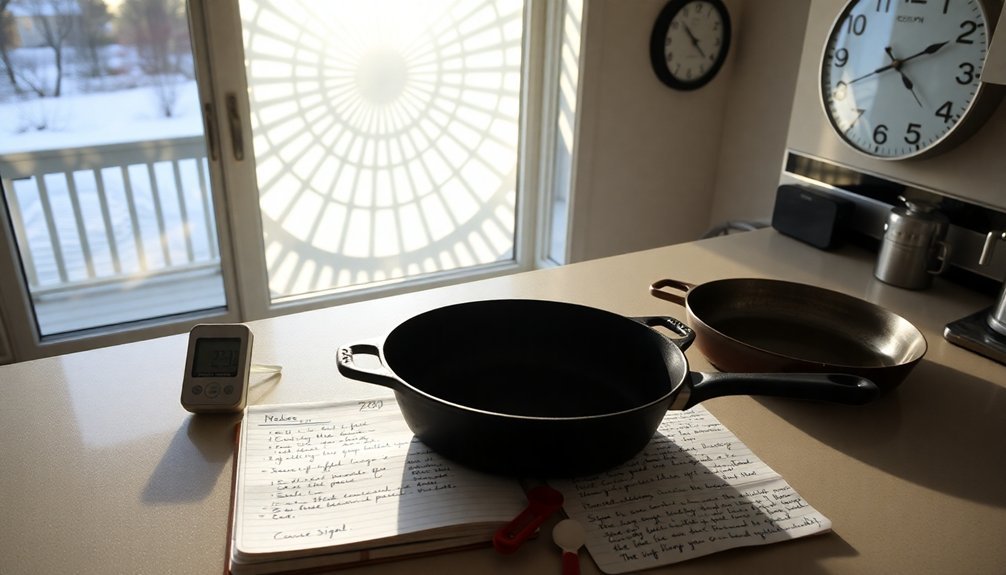
Temperature Control Methods
Beyond protecting your sun kitchen's structure, mastering temperature control guarantees consistent cooking results year-round.
You'll need a reliable digital probe thermometer to monitor internal food temperatures: 145°F for whole cuts, 160°F for ground meats, and 165°F for poultry.
Position your oven in direct sunlight between 11 AM and 3 PM, and adjust it every 1-2 hours to follow the sun's path. Use dark-colored cookware and reflective flaps to maintain temperatures between 200°F and 300°F.
To maximize heat retention, insulate your cooking area with crumpled newspapers or dry leaves, and verify proper air flow with a leveling rack.
Don't forget to separate raw foods and use clean cookware to prevent cross-contamination. Keep a meat temperature chart nearby for quick reference during cooking.
Maximizing Light Collection
You'll want to position your main kitchen windows on the south-facing wall to capture the most natural light throughout the day, while adding smaller east and west windows for balanced morning and evening illumination.
By aligning your windows across from each other, you can create bright corridors of light that maximize the sun's reach into your kitchen workspace.
Installing reflective surfaces like metallic backsplashes and light shelves will help bounce sunlight deeper into your kitchen, ensuring every corner receives ideal natural illumination.
Strategic Window Positioning
When designing a sun kitchen, strategic window positioning serves as the cornerstone of effective natural light collection.
You'll want to place your primary windows facing south to maximize sunlight exposure throughout the day, while east-facing windows can brighten your morning meal prep.
Consider placing task-specific windows near workstations where you need focused illumination.
- Position your sink window to face east or south, ensuring natural light for morning dishes and food prep.
- Install taller windows or window combinations on your main wall to draw light deeper into the space.
- Create a light pathway by aligning windows across from each other, enhancing overall brightness.
- Place windows strategically around countertops and cooking zones, avoiding direct glare on stovetops.
Reflective Surface Integration
Strategic placement of reflective surfaces transforms your sun kitchen into a light-amplifying environment that maximizes natural illumination throughout the day.
You'll get the best results by installing glass cabinet doors and positioning mirrors next to windows, while brass metallic accents add warmth when they catch sunlight.
For artificial lighting, opt for LED fixtures with warm color rendition to maintain an inviting atmosphere.
Install them strategically above work areas and prep stations rather than in uniform rows.
You can create depth by incorporating LED strips behind backsplashes and within cabinets, producing soft, diffused light.
Don't forget to use statement pendant lights in groups of three or five for visual interest.
For high-ceilinged spaces, keep pendant heights lower to maintain practical sightlines and maximize functionality.
Cooking Time Adjustments
Making accurate cooking time adjustments is essential for successful solar cooking, since temperatures can vary considerably throughout the day.
You'll need to calculate percentage differences between your desired and actual cooking temperatures to adjust times accordingly. For example, if your solar oven reaches only 300°F instead of 350°F, you'll need to extend cooking times by about 14%.
- Monitor your food more frequently during the first hour to establish a baseline for your solar oven's performance.
- Add 10-15 minutes to your cooking time for each oven door opening.
- Position dishes with adequate space between them to guarantee even heating.
- Place darker cookware on higher shelves to maximize heat absorption and reduce cooking times.
Remember to check food earlier than the calculated time to avoid overcooking, especially on partly sunny days.
Storage and Maintenance Tips
Proper storage and routine maintenance will keep your sun kitchen operating at peak efficiency throughout the year.
Organize your space with clear storage bins and rotating shelves to maximize visibility and accessibility. Create designated work zones for cooking, cleaning, and prep tasks, keeping frequently used items within easy reach.
You'll need to maintain your equipment regularly. Clean your cookware with appropriate solutions – use salt for cast iron and mild soap for general surfaces.
Don't forget to wipe down cabinet faces twice monthly with a vinegar solution to prevent grease buildup. Keep your stovetop spotless by cleaning it three times weekly with baking soda or ceramic cleaner.
For best performance, steam clean your dishwasher monthly with distilled white vinegar and regularly remove debris from its spinning arms and filter.
Energy-Efficient Kitchen Layout

A well-organized kitchen layout can enhance your sun kitchen's energy efficiency while complementing your storage and maintenance routines. Consider implementing the proven work triangle concept, positioning your sink, stove, and refrigerator in a triangular layout to minimize movement and reduce energy waste.
- Choose an L-shaped or U-shaped layout to maximize natural light exposure while maintaining efficient workflow between your cooking, prep, and cleaning zones.
- Install your island perpendicular to windows to create a natural division between work areas without blocking sunlight.
- Position your cooking zone away from direct sunlight to prevent temperature fluctuations that could affect your appliances' energy consumption.
- Arrange your consumables zone near windows to take advantage of natural light for food inspection and sorting while reducing artificial lighting needs.
Seasonal Recipe Modifications
Successful seasonal cooking in your sun kitchen requires thoughtful recipe modifications to accommodate both available ingredients and varying solar conditions.
You'll need to adjust your recipes based on what's fresh and in season, like using tomatoes, zucchini, and herbs during summer months, while relying more on preserved ingredients during winter.
Start by adapting your cooking methods to match the season. During peak sunlight, focus on dishes that benefit from slow cooking and roasting.
You can modify traditional recipes by substituting ingredients with similar profiles – try feta instead of mozzarella, or swap meat for plant-based options.
Consider water content when cooking vegetables like zucchini, and prepare ingredients in advance when possible.
For hot days when you'd rather not cook, opt for cold preparations that make the most of fresh summer produce.
Safety Precautions Year Round

Safety in your sun kitchen involves unique considerations that extend beyond traditional cooking precautions. When cooking with solar power, you'll need to be especially mindful of heat management and food safety throughout different weather conditions.
- Keep your cooking area clear of flammable materials, and don't let pot holders or loose clothing come near hot surfaces – solar concentration points can reach extreme temperatures just like traditional stovetops.
- Position your cooking equipment securely, ensuring handles don't extend into walkways where you might bump them.
- Monitor food temperatures carefully, using a thermometer to maintain safe hot (above 140°F) and cold (below 40°F) zones.
- Install slip-resistant mats around your solar cooking station and wear appropriate footwear, as spills can be especially dangerous when you're working outdoors.
Frequently Asked Questions
Can Solar Cooking Affect the Nutritional Value of Food Differently Than Conventional Methods?
You'll find solar cooking actually preserves more nutrients than high-heat methods due to its gentle cooking process. However, vitamin C retention can be lower in solar-cooked foods due to longer cooking times.
How Do Atmospheric Pollution Levels Impact the Effectiveness of Solar Cooking?
Heavy air pollution can reduce your solar cooker's efficiency by blocking sunlight. You'll notice slower cooking times and lower temperatures when smog, haze, or particulate matter interferes with direct sunlight reaching your cooker.
What Alternative Heat Storage Materials Work Best for Nighttime Solar Cooking?
You'll get the best nighttime cooking results using paraffin wax PCMs, which store 210 kJ/kg of heat. For a budget option, try black-coated granite, though it won't retain heat as long.
Does Cooking With Sunlight Change the Taste of Traditional Family Recipes?
You'll find solar cooking actually enhances your family recipes' flavors through gentle, slow cooking. Your dishes will taste richer and more natural since there's no smoke or fuel byproducts to alter the original flavors.
Can Solar Ovens Be Safely Used for Canning and Food Preservation?
You shouldn't use solar ovens for canning as they can't reliably reach safe sterilization temperatures. However, you'll find they're great for food dehydration, which requires lower temperatures between 110°F and 150°F.
In Summary
You'll find year-round solar cooking rewarding with proper planning and adaptations. By adjusting your setup seasonally, monitoring sun patterns, and maintaining your equipment, you can harness solar energy in any season. Don't let winter deter you – simply modify recipes and positioning to match available sunlight. Remember to prioritize safety while enjoying this sustainable cooking method that'll benefit both your household and the environment.


Leave a Reply