Start your oven preheating with smart positioning away from drafty areas and use dark-colored, oven-safe vessels to maximize heat absorption. You'll want to place a pizza stone centrally and give it at least 30 minutes to reach uniform temperature. Cast iron cookware should preheat alongside your oven to enhance heat retention. Monitor your kitchen's humidity levels and adjust heating times accordingly. Install a reliable oven thermometer to verify temperatures, and consider using reflective panels to boost heating efficiency. Clean your thermometer with isopropyl alcohol between uses. These foundational tips just scratch the surface of mastering your oven's preheating potential.
Best Shade Positioning Methods

When positioning exterior sunshades, you'll need to analyze three key exposures – Southern, Eastern, and Western – to enhance their effectiveness. Southern exposure is typically the easiest to shade and should be your primary focus.
Use the shadow line method to determine the ideal position for your sunshade's outermost tip. Draw shadow lines at solar noon and find where they intersect to pinpoint ideal placement. For direct Southern exposure, plan for a 52" projection, while Southeast or Southwest angles require about 36.75". You can adjust these measurements using cosine calculations for different angles. Optimal shading occurs during the 10:00 am to noon period when cooling needs are highest.
If you're working with multiple adjacent windows, install continuous sunshades that span the entire width. This approach guarantees complete coverage and enhances shading benefits across all window surfaces.
Heat Retention Through Dark Surfaces
While exterior shading helps block sunlight, understanding how dark surfaces retain heat is key to managing your home's temperature.
Dark surfaces can absorb up to 90% of the sun's heat and retain it longer, making them markedly warmer than lighter surfaces. This property affects your home's energy efficiency and indoor comfort levels. Dark surfaces can effectively emit thermal radiation, making them both excellent absorbers and emitters of heat.
When it comes to heat absorption and retention, remember these important points:
- Dark surfaces can reach temperatures over 150°F in summer
- They'll warm up faster and maintain heat longer than light-colored surfaces
- Proper insulation becomes essential to manage increased indoor temperatures
- You can reduce heat absorption by up to 20% with reflective coatings
- Consider using light-colored materials for better temperature control
Understanding these principles helps you make informed decisions about your home's surfaces and energy efficiency measures.
Reflector Panel Setup

Setting up reflector panels correctly forms the foundation of an efficient solar oven.
You'll want to position your reflectors at a 20-22.5 degree angle from perpendicular to the glass, adjusting slightly based on your reflector's length. For peak performance, use aluminum foil with the shiny side out or glass mirrors, cutting them into trapezoidal shapes to fit your design. The high heat resistance ensures your reflectors won't degrade during prolonged sun exposure.
Secure your reflectors by drilling holes at the corners and using twist ties for stability.
When mounting, verify you can adjust the angles to direct sunlight effectively onto your cooking pot. The reflected light should touch the far side of the glazing when pointed at the sun.
Common angles include 45 degrees for Heaven's Flame ovens and 60 degrees for Global Sun models.
Don't forget to add mirror holders for easy adjustment and stability.
Solar Tracking in Limited Light
To maximize your solar oven's efficiency in low-light conditions, understanding solar tracking becomes essential.
You'll need to combine light sensors and timing controls to maintain ideal panel angles throughout the day. Modern tracking systems can boost your power generation by 20-60% compared to fixed setups, even in challenging weather.
For best results in limited light, consider these tracking options:
- Single-axis systems that follow east-to-west movement
- Dual-axis trackers for complete directional control
- Smart sensors with machine learning capabilities
- GPS-enhanced positioning for precise adjustments
- Hybrid control systems that switch between light and time-based tracking
When dealing with cloudy days, your system can automatically switch to time control mode, using astronomical calculations based on your location.
This guarantees continuous operation and ideal performance, even when direct sunlight is limited.
Optimal Temperature Control

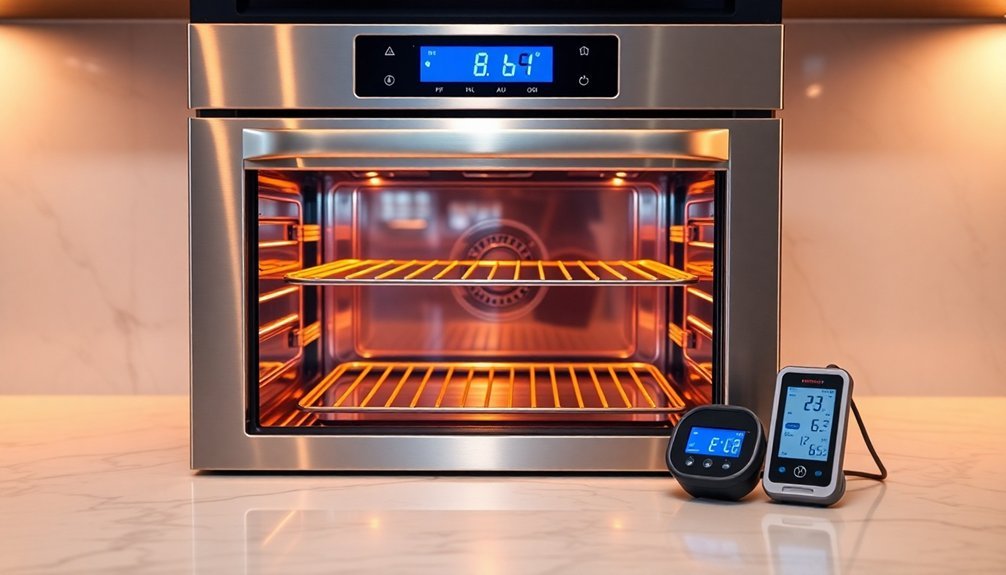
Your digital thermometer's accuracy makes all the difference in achieving precise oven temperatures, so it's crucial to calibrate it regularly and position it correctly in the center of your oven.
Understanding your oven's temperature zones will help you identify hot and cool spots that can affect your cooking results.
You'll get the most consistent results by monitoring these zones with your thermometer and adjusting your baking pan placement accordingly.
Digital Thermometer Best Practices
Getting accurate temperature readings starts with proper digital thermometer practices. Your thermometer must be clean, calibrated, and equipped with working batteries before each use. Always use appropriate probe covers and maintain proper placement techniques for reliable measurements.
Key practices to guarantee accurate readings:
- Clean the thermometer with 70% isopropyl alcohol between uses
- Allow the device to adjust to room temperature before measurements
- Check for proper calibration and servicing regularly
- Keep the infrared sensor clean and scratch-free
- Use manufacturer-approved probe covers
Remember to wash your hands thoroughly before handling the thermometer to prevent cross-contamination.
When taking measurements, keep the device steady and avoid movement that could affect accuracy. For best results, follow the specific guidelines for your thermometer type, whether it's oral, rectal, or infrared.
Temperature Zones Matter Most
While all aspects of oven cooking matter, temperature zones play a critical role in achieving consistent, professional-quality results. You'll find that different areas of your oven maintain varying temperatures, which can considerably impact your cooking outcomes. Understanding these zones helps you make the most of your oven's capabilities.
| Zone Location | Best Used For |
|---|---|
| Upper Rack | Broiling, browning cookies |
| Middle Rack | Most baking, roasting |
| Lower Rack | Pizza, crusty breads |
| Corners | High-heat cooking |
To identify your oven's hot spots, place parchment paper on each rack and heat to 400°F. Brown spots will reveal temperature variations. You can then use these zones strategically – place delicate items in cooler areas and items needing more heat in hotter zones. For multiple items, rotate them between zones halfway through cooking.
Using Thermal Mass Materials
Placing a pizza stone or cast iron skillet in your oven before preheating creates a thermal mass that helps maintain consistent temperatures during cooking.
Cast iron's high volumetric heat capacity means it'll store significant heat energy and release it gradually, reducing temperature fluctuations when you open the oven door.
The dense material of a pizza stone works similarly, acting as a heat sink that stabilizes oven temperature and improves heat distribution throughout your baking process.
Cast Iron Heat Retention
Cast iron's remarkable thermal properties make it an ideal material for maintaining consistent oven temperatures. While it doesn't conduct heat as quickly as aluminum or copper, its high mass and density allow for superior heat retention and even distribution.
You'll find that adding cast iron cookware to your oven helps stabilize temperatures and reduce fluctuations.
- Stores significant thermal energy due to its high heat capacity
- Maintains temperature even after heat source is removed
- Distributes heat evenly, preventing hot spots
- Withstands extreme temperatures up to 2,360°F
- Improves with regular use and proper seasoning
For best results, preheat your cast iron pieces along with the oven. This practice maximizes their heat-retention benefits and creates a more stable cooking environment.
The stored thermal energy will help maintain your target temperature, especially when opening the oven door.
Pizza Stone Placement Benefits
As thermal mass elements transform ordinary ovens into professional-grade baking chambers, pizza stones stand out as essential tools for achieving restaurant-quality results.
You'll want to position your stone centrally in the oven to guarantee even heat distribution and peak cooking performance.
A properly placed pizza stone acts as a thermal battery, absorbing and storing heat during preheating, then releasing it steadily throughout your cooking session. This stability helps maintain consistent temperatures, even when you're opening the door.
For best results, you'll need to preheat your stone for at least 30 minutes, allowing it to reach uniform temperature throughout its mass.
The stone's thickness (ideally 1.5"-3") will determine both heating time and heat retention, so be patient during the warm-up phase to achieve the best possible baking results.
Weather Impact Management

While ovens typically operate indoors, outdoor weather conditions can greatly affect their performance. High humidity during rainy days can slow down preheating time, while extreme cold might require longer warm-up periods. In foggy conditions, condensation can form on cooler surfaces, affecting temperature consistency.
To manage weather impacts on your oven's performance, consider these key factors:
- Monitor humidity levels in your kitchen, as they can affect cooking times.
- Keep your kitchen well-ventilated to prevent moisture buildup.
- Allow extra preheating time during cold weather.
- Position your oven away from drafty windows or doors.
- Use an oven thermometer to verify temperature accuracy in varying conditions.
Being mindful of weather conditions helps you adapt your preheating routine and guarantees consistent baking results, regardless of external temperatures or humidity levels.
Container Selection and Placement
When warming up your oven, it's essential to select baking vessels made of oven-safe materials like metal, glass, or ceramic that can withstand high temperatures without warping or cracking.
You'll want to position your baking pans strategically, keeping them away from heating elements and allowing proper air circulation around each container.
For ideal heat distribution, avoid overcrowding the oven with too many pans, and center your bakeware on the middle rack unless your recipe specifies otherwise.
Choosing Safe Baking Vessels
Selecting the right baking vessels isn't just about size and shape – it's crucial for both food safety and ideal baking results.
You'll want to choose materials that won't release harmful chemicals when heated and can withstand high temperatures safely. Stainless steel, ceramic, glass, and enameled cast iron are excellent choices for toxin-free baking.
For the safest baking experience, look for these features in your vessels:
- 100% food-grade silicone without fillers
- BPA-free materials that won't leach chemicals
- High thermal shock resistance for sudden temperature changes
- Naturally non-stick surfaces like ceramic
- Corrosion-resistant properties, especially in stainless steel options
When using your bakeware, verify it's properly positioned away from heating elements and avoid covering it with metal foil to prevent any safety hazards.
Strategic Pan Positioning
Now that you've got the right bakeware, proper container placement can make or break your baking results.
Position your pans in the center of the oven rack, maintaining enough space between them for proper air circulation. Don't let containers touch the oven walls or each other, as this can create unwanted hot spots.
For best results, you'll want to rotate your containers during cooking and use the convection setting when possible.
Remember to distribute food evenly within your pans and always preheat both the oven and containers. When placing multiple items, avoid overcrowding – this guarantees each dish gets the heat circulation it needs.
Make sure you've positioned everything so you can safely remove hot containers when they're done. If you're using multiple racks, stagger the pans to promote even heat distribution.
Insulation Layer Strategies

Creating effective insulation layers around your home significantly reduces heat transfer and improves energy efficiency.
By strategically placing shrubs and vines near your walls, you'll create a natural insulating air barrier that helps maintain comfortable indoor temperatures. You can enhance this protection by combining multiple shading solutions.
- Install cellular shades that trap air for additional insulation
- Position deciduous trees on south and west sides to block summer heat
- Add exterior solar screens to reduce heat gain by up to 70%
- Use retractable awnings for seasonal flexibility
- Combine blackout cellular shades with outdoor vegetation
These insulation strategies work together to minimize heat transfer through windows and walls.
You'll notice reduced energy bills as your air conditioning system won't have to work as hard to maintain desired temperatures, while also protecting your furniture from UV damage.
Maximizing Diffuse Solar Radiation
Three key factors determine the efficiency of diffuse solar radiation capture: panel orientation, tilt angle adjustment, and surface conditions.
You'll need to take these elements into account when positioning your oven's solar collectors for ideal preheating performance.
Position your collectors facing the equator to maximize radiation capture throughout the day.
While automated trackers offer precise adjustments, you can achieve effective results by setting fixed intervals that match your local solar patterns.
Use a combination of direct and diffuse radiation components by accounting for cloud transmittance and aerosol optical depth in your setup.
For best results, monitor your surface conditions regularly.
Cloud optical thickness and atmospheric conditions will affect your radiation capture.
You can implement gap-filling algorithms to compensate for inconsistent solar exposure, ensuring steady preheating performance even under variable conditions.
Frequently Asked Questions
Can I Use Aluminum Foil to Speed up Oven Preheating?
No, you shouldn't use aluminum foil to speed up preheating. It won't help and could actually damage your oven, disrupt heat distribution, and interfere with temperature regulation. Just follow your oven's normal preheating process.
Why Does My Oven Make Clicking Sounds During Preheating?
Your oven's clicking sounds during preheating are usually normal – it's just the heating elements switching on and off. If you haven't used it in a while, it could be trapped air in the system.
Should I Preheat My Oven With Multiple Racks Installed?
You shouldn't preheat with multiple racks if using rapid preheat mode – they'll slow down heating and affect temperature stability. For standard preheating, it's fine to leave your racks in, though it'll take longer.
Does Opening the Oven Door Reset the Preheating Process?
Yes, opening your oven door during preheating can reset the process, as it causes significant heat loss. Your oven may switch from preheat to cooking mode, delaying the time it takes to reach desired temperatures.
How Much Electricity Does Preheating Typically Use Compared to Cooking?
Your preheating typically uses about 20% of the total energy consumption, while cooking uses more due to longer duration. For example, if your oven uses 3,000 watts/hour, preheating consumes roughly 600 watts.
In Summary
You'll get the most from your solar oven by combining these shade preheating techniques. Position your dark surfaces strategically, adjust your reflectors throughout the day, and maintain proper insulation layers to capture diffuse light. Don't let cloudy weather discourage you – with these methods, you can still achieve efficient preheating. Remember to monitor your temperature control and container placement for consistent results.


Leave a Reply