For ideal solar bread proofing, you'll want to maintain temperatures between 75°F and 85°F (24-29°C). This range allows your dough to develop properly while creating balanced flavors during fermentation. You can expect primary fermentation to take 2-3 hours in these conditions, though enriched doughs may need slightly warmer temperatures. Keep humidity levels between 60-80% and make sure your proofing area stays draft-free for consistent results. If your temperatures drop below 75°F, you'll need longer proofing times, while temps above 85°F will speed up the process but may sacrifice flavor development. Understanding these temperature dynamics will help you master the art of solar proofing.
Understanding Solar Proofing Temperature Basics

Bread proofing requires precise temperature control for ideal results, though it doesn't actually involve solar energy or solar panels. When you're working with dough, you'll need to maintain temperatures between 70°F and 85°F (21°C to 29°C) for peak fermentation and rise. These temperatures directly affect how your yeast performs and how quickly your dough develops. Enriched doughs containing high amounts of fat tend to achieve better results at warmer temperatures.
You'll find that controlling your proofing environment is essential for success. Temperature management works hand-in-hand with humidity levels, which should stay between 60% and 80% to prevent your dough from drying out. You'll want to make certain your proofing area remains draft-free to maintain stable conditions throughout the process.
If you're aiming for artisanal results, you might prefer working with cooler temperatures, which slow down fermentation and develop more complex flavors. Alternatively, if you need faster results, warmer temperatures will speed up the process.
You can also use cold proofing techniques, such as refrigeration, for overnight fermentation. Whatever method you choose, remember that consistent temperature control, not solar energy, is the key to successful bread proofing.
Optimal Temperature Zones For Breads
Temperature control mastery is essential when proofing different types of dough, with each bread style requiring its own specific heat zone for ideal results. A draught-free area is crucial for maintaining consistent temperatures during the proofing process.
When you're working with standard bread recipes, room temperature proofing at around 24°C (75°F) will give you balanced flavors and typically takes 2-4 hours. For faster results, you'll want to aim for warm proofing between 27-29°C (80-84°F), which reduces proofing time to 1-3 hours but requires careful monitoring to avoid exceeding 35°C.
If you're after complex flavor development, cool proofing at 18-21°C (64-70°F) or cold proofing at 4°C (39°F) will be your best options. These methods extend proofing time considerably but reward you with deeper, more nuanced flavors.
- Room temperature proofing (24°C/75°F) offers the most versatile approach and works well for most bread types.
- Warm proofing (27-29°C/80-84°F) accelerates the process but requires closer monitoring to prevent over-proofing.
- Cool and cold proofing (below 21°C/70°F) develop complex flavors through extended fermentation times, making them ideal for artisanal breads and sourdoughs.
Seasonal Solar Proofing Adjustments

When using solar energy for bread proofing, you'll need to adapt your approach throughout the year to maintain those ideal temperature ranges.
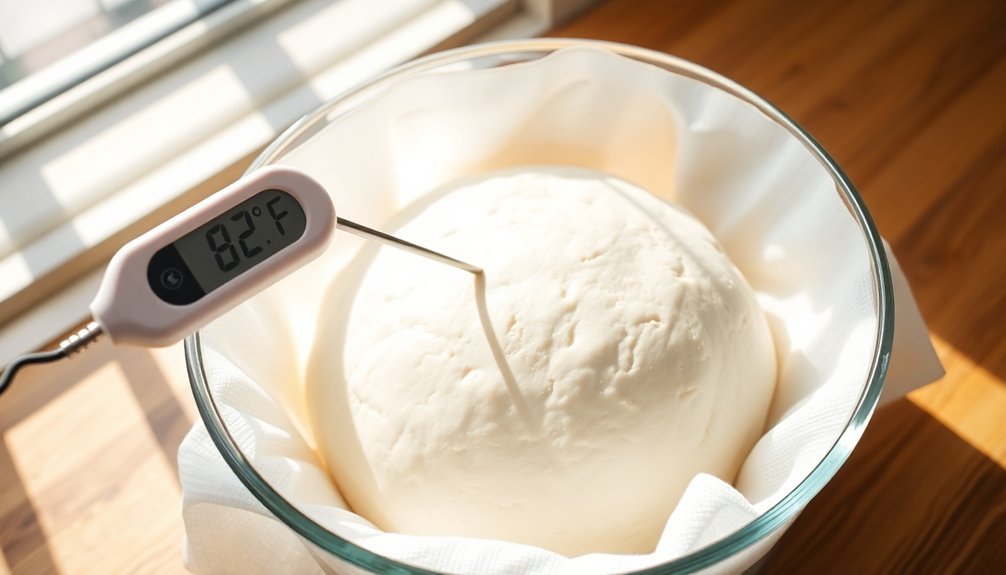
During warmer seasons, you'll want to monitor your solar proofing environment closely, as temperatures can quickly exceed the ideal 75°F – 78°F range. You can manage this by using colder liquids in your dough and guaranteeing proper ventilation to prevent overproofing. Using an instant-read thermometer helps ensure precise temperature monitoring during these challenging conditions.
In colder months, you'll face different challenges. Your solar proofing area may require additional time to reach proper temperatures, and you'll need to use warmer liquids to achieve the right dough temperature.
Plan for extended proofing times, potentially adding an extra hour per pound of dough in cold conditions.
Humidity control remains essential year-round. You'll want to maintain 60-80% humidity regardless of the season.
In dry conditions, place a water tray in your solar proofing area. During humid seasons, guarantee adequate airflow to prevent excess moisture.
Keep tracking your proofing environment's conditions and adjust accordingly – this might mean relocating your proofing spot seasonally or using additional controls to stabilize temperatures within the ideal range.
Temperature Control Methods
Solar proofing success hinges on implementing effective temperature control strategies. You'll need to monitor and adjust your setup carefully to maintain the ideal temperature range for your bread dough. By applying cooling techniques similar to those used in solar panel management, you can create a perfect proofing environment that won't overheat your dough.
To regulate temperature effectively, you'll want to incorporate proper airflow and utilize reflective materials. Just as solar panels benefit from space underneath for ventilation, your proofing setup should allow air circulation to prevent excessive heat buildup. You can install small fans or create natural ventilation pathways to maintain consistent temperatures throughout the proofing process.
- Mount your proofing container slightly elevated to allow air movement underneath, similar to solar panel installation techniques.
- Use thermally conductive materials for your proofing tray to help distribute heat evenly and prevent hot spots.
- Monitor the temperature regularly and adjust ventilation as needed, especially during peak sunlight hours.
Regular maintenance of your setup and ongoing temperature monitoring will guarantee your solar bread proofing delivers consistent results, regardless of seasonal changes or weather conditions.
Timing Your Solar Proof

Now that you've established proper temperature control, timing becomes the next key factor in successful solar proofing. You'll need to adjust your proofing duration based on the ambient temperature and your dough's behavior. At the ideal range of 75-85°F, you can expect primary fermentation to take 2-3 hours, while temperatures below this range will require longer proofing times.
| Temperature Range | Primary Proof | Final Proof |
|---|---|---|
| 75-85°F (Ideal) | 2-3 hours | 1 hour |
| Below 75°F | 4-6 hours | 1.5-2 hours |
| Above 85°F | 1-2 hours | 30-45 min |
Watch your dough closely during the final proof, which should typically last about an hour in ideal conditions. You'll know it's ready when the dough has roughly doubled in size and springs back slowly when gently pressed. If you're proofing at lower temperatures, extend your final proof time by 30-60 minutes. Remember that over-proofing can lead to collapsed loaves, so it's better to slightly under-proof than to let it go too long.
Frequently Asked Questions
Can Dough Collapse if Left Too Long in Direct Sunlight?
Yes, your dough will collapse if left too long in direct sunlight because excessive heat speeds up fermentation, causing the gluten structure to break down. You'll end up with a sticky, unmanageable mess.
How Do Different Colored Proofing Containers Affect Dough Temperature?
Your dark containers will absorb more heat, raising dough temperature faster than light-colored ones. You'll need to watch carefully, as dark containers can speed up fermentation and potentially lead to overproofing your dough.
Does Altitude Impact Recommended Solar Proofing Temperatures?
You'll find that altitude doesn't directly affect solar panel operating temperatures. While higher altitudes receive more intense solar radiation, the ideal temperature range for panel efficiency remains constant at around 77°F (25°C).
Should Humidity Levels Influence Solar Proofing Temperature Choices?
Yes, you'll need to adjust your proofing temperatures based on humidity. When it's more humid, use slightly lower temperatures to prevent overproofing. When it's dry, you can increase temperatures while maintaining moisture control.
Can Reflective Surfaces Help Maintain Consistent Temperatures During Solar Proofing?
No, you shouldn't rely on reflective surfaces for solar proofing. They'll bounce away needed heat and make temperature control harder. Instead, use dark surfaces with proper insulation to maintain consistent proofing temperatures.
In Summary
You'll find that maintaining temperatures between 75-85°F (24-29°C) gives you the best results for solar bread proofing. Watch your dough closely and adjust your setup if temperatures climb above 95°F (35°C), as this can lead to over-proofing. Don't forget to account for seasonal changes by modifying your proofing times and using simple controls like partial shade or ventilation when needed.


Leave a Reply