You can create delicious sun-baked brioche using a simple solar oven made from a pizza box, aluminum foil, and plastic wrap. This rich French bread needs high-protein bread flour, quality butter, and fresh eggs for the perfect tender crumb. You'll start by making an enriched dough, letting it rise until doubled, then shaping it for your solar oven. The key to success lies in maintaining consistent warmth during fermentation and guaranteeing proper proofing before baking. With careful attention to temperature and timing, you'll achieve a golden-brown crust and pillowy-soft interior. Our detailed guide guarantees your solar brioche adventure turns out perfectly.
What Makes Brioche Special

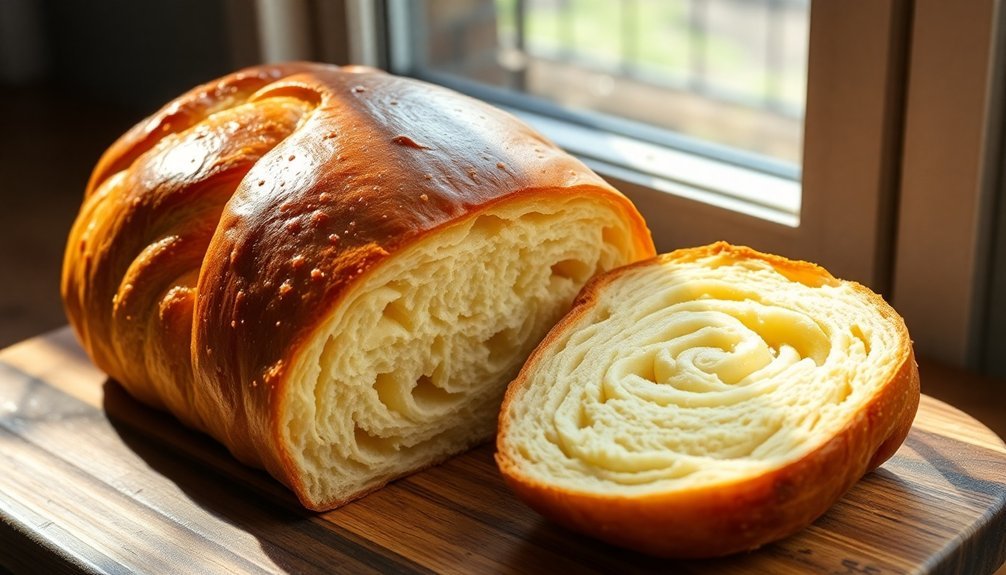
A luxurious French bread, brioche stands out from traditional loaves thanks to its enriched dough made with eggs, butter, and sometimes milk.
You'll notice its distinctive rich taste and tender texture, which come from the generous amounts of butter and eggs incorporated into the dough. The high fat content creates a softer, more moist bread that's slightly sweet and incredibly tender.
When you bite into a properly baked brioche, you'll experience a remarkable contrast between its glossy, golden-brown exterior and its pillowy-soft interior. The egg wash applied before baking creates that signature shiny crust, while the enriched dough produces an airy, light crumb that melts in your mouth. France's dedication to this pastry is evident in its over 30 regional variations, each showcasing unique local ingredients and flavors.
You'll find brioche's versatility makes it perfect for various dishes. Whether you're making French toast for breakfast, crafting gourmet hamburger buns, or serving it simply toasted with butter and jam, brioche elevates any meal.
Its adaptability extends to different shapes too – you can form it into dinner rolls, braided loaves, or even use it in bread pudding for a decadent dessert.
Essential Ingredients
You'll need high-quality flour with about 10% protein content to achieve that signature brioche texture, so select unbleached all-purpose flour for the best results.
When choosing butter, opt for unsalted varieties at room temperature (65-70°F) to guarantee proper incorporation into your dough.
Fresh, large eggs (about 50g each without shells) are essential for achieving the rich, tender crumb that makes brioche special. For the best rise in enriched doughs like brioche, SAF Gold instant yeast is the preferred choice.
High-Quality Flour Matters
Selecting the right flour stands as the cornerstone of any successful brioche recipe. For your brioche, you'll want to use bread flour with its 12-15% protein content, which provides the perfect balance of structure and tenderness.
When the proteins in bread flour interact with moisture, they form strong gluten networks that'll help your brioche maintain its signature pillowy texture while supporting the rich butter content.
The quality of your flour directly impacts your brioche's final characteristics in these essential ways:
- Higher protein content guarantees your dough can withstand the mechanical stress of kneading while incorporating large amounts of butter.
- Consistent protein levels help you achieve reliable results every time, maintaining the same golden-brown crust and tender crumb.
- Superior gluten development leads to better volume and that distinctive brioche crown.
- Proper moisture absorption capacity helps balance the high fat content typical in brioche.
Don't be tempted to substitute all-purpose flour, as its lower protein content won't provide adequate structure. Choosing flour with high-quality wheat proteins will ensure optimal gluten formation and enhanced dough elasticity.
The right bread flour will help you achieve that perfect balance between richness and stability, resulting in a brioche that's both tender and sturdy enough to hold its shape.
Butter Selection Tips
The perfect brioche demands butter of exceptional quality, as it forms up to 70% of the dough's richness.
You'll want to select unsalted Grade AA butter with at least 80% butterfat content, giving you complete control over the salt levels while guaranteeing ideal texture and flavor development.
European-style butter, with its higher butterfat content of 82-86%, can work exceptionally well in brioche, creating those signature tender layers and rich mouth feel.
However, you'll need to monitor the dough carefully, as the extra fat can make it greasier than intended.
When preparing your butter for brioche, make certain it's at room temperature (65-68°F) before incorporating it into your dough.
You'll achieve the best results by adding small cubes of butter gradually during mixing, allowing each addition to fully incorporate before adding more.
This method prevents over-mixing and maintains the dough's perfect consistency.
Don't use salted butter in your brioche, as the extra salt can interfere with yeast activity and proper fermentation.
Fresh Egg Importance
While quality butter forms the foundation of brioche, fresh eggs serve as its defining cornerstone. You'll find that eggs, particularly the yolks, are vital for creating the rich, distinctive flavor that makes brioche unique. The yolks, containing 30% fat, work to inhibit gluten formation, resulting in that characteristically light and fluffy texture you're aiming for.
When you're making brioche, you'll want to understand these key egg functions:
- The egg whites act as a natural coagulant, creating that bouncy, chewy crumb structure that's essential for perfect brioche.
- The yolks contribute richness and help create a looser dough that expands beautifully during baking.
- The protein content strengthens the dough structure while adding nutritional value.
- The eggs assist in achieving that signature golden-brown crust through caramelization.
You'll need to watch your baking temperature carefully, as the egg content can cause the crust to darken quickly. The combination of whites and yolks adjusts the dough's moisture content perfectly, while providing essential nutrients like vitamins, minerals, and healthy fats that elevate your brioche beyond just being delicious.
Solar Oven Setup

Building your own solar oven begins with gathering essential materials and setting up a modified pizza box. You'll need a cardboard pizza box, aluminum foil, clear plastic wrap, black construction paper, and newspapers for insulation.
| Step | Action |
|---|---|
| 1 | Cut three-sided flap in box lid, leaving hinge |
| 2 | Line box with smooth aluminum foil |
| 3 | Add newspaper insulation layers |
| 4 | Create clear plastic window seal |
Start by folding the pizza box edges inward for a tight seal. Cut the three-sided flap in the lid, creating a reflective surface when lined with foil. You'll want to verify the foil is completely smooth for maximum reflection. Line the bottom with black construction paper to absorb heat effectively.
For the critical insulation phase, pack crumpled newspapers around the sides. Create your window by securing two layers of plastic wrap across the opening – this traps heat while allowing sunlight to enter. When positioning your oven, prop the reflective flap at an angle that directs maximum sunlight inside. For best results, preheat your solar oven for 30 minutes between 11 am and 3 pm, adjusting its position as the sun moves.
Dough Preparation Steps
For perfect brioche dough, start by activating the yeast in warm milk with a pinch of sugar.
You'll want all your ingredients at room temperature, except for the slightly warm milk. Add your eggs, flour, and remaining dry ingredients to your stand mixer bowl, then use the dough hook to combine everything until you've got a shaggy, dry mixture.
Next, you'll knead the dough for 10-15 minutes on medium speed until it becomes cohesive. Once your dough is smooth and elastic, it's time to incorporate the softened butter.
Add it gradually in small portions, letting each bit fully blend in before adding more. Keep kneading for another 5-15 minutes until your dough becomes soft, slightly sticky, and beautifully shiny.
Here's your essential next steps:
- Cover the dough with plastic wrap and let it double in size
- Gently deflate the dough to redistribute the yeast
- Refrigerate overnight to develop flavor and strength
- Divide and shape the dough, then place in loaf pans for the final 2-hour rise
This methodical process guarantees you'll get that characteristic brioche texture that's perfect for sun-baking.
First Rise Requirements
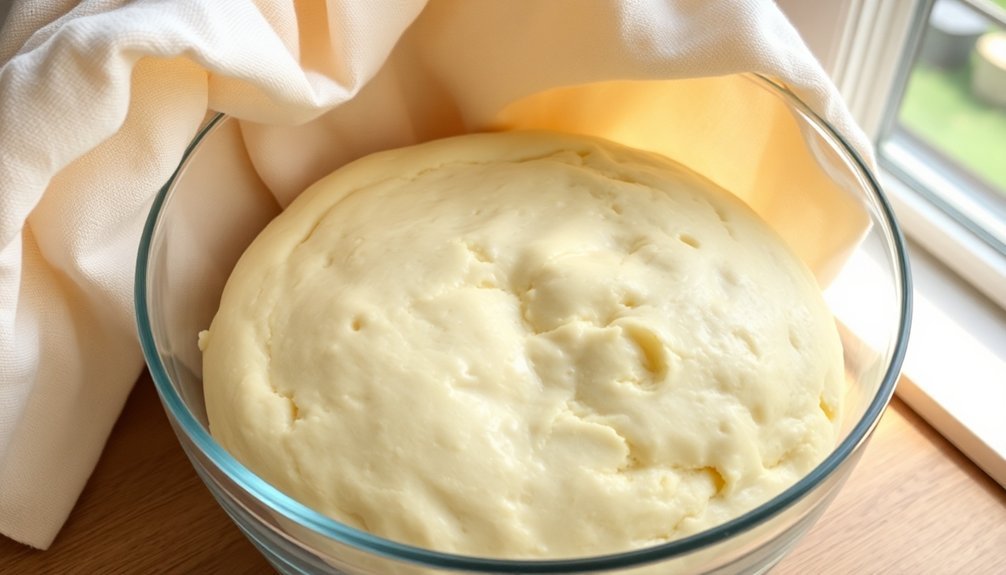
You'll want to let your brioche dough rise in a room-temperature environment around 72°F, as temperatures below 70°F will slow down the process while warmer temperatures above 75°F will speed it up.
For best results, place your dough in a lightly greased bowl and cover it with plastic wrap to maintain proper humidity during the 1-2 hour rise time.
Keep an eye on your dough as it rises until it doubles or almost triples in size, rather than strictly following the clock, since room conditions can affect the timing.
Temperature and Time Control
The brioche's first rise demands careful attention to both time and temperature for ideal results. You'll need to let your dough rise for about 1 to 1.5 hours at room temperature, though this time can extend to 2 hours depending on your kitchen conditions.
If your kitchen's below 70°F, expect a slower rise, while temperatures above 75°F will speed up the process.
To check if your dough's ready, press a lightly floured fingertip into its surface. The perfect dough will show a slight indentation that slowly fills in. If it bounces back immediately, it needs more time. If it completely deflates, you've overproofed.
- Monitor your kitchen temperature – cooler rooms require longer rise times
- Set a timer for 1 hour initially, then check every 15 minutes
- Look for doubling or tripling in size as a visual cue
- Test with the fingertip method before proceeding to shaping
If you find your dough has overproofed, don't panic. Gently press out the excess air, reshape into a ball, and let it rest for 10-15 minutes before proceeding with your shaping step.
This quick intervention can save your brioche from failure.
Optimal Rising Environment
Creating an ideal rising environment builds directly upon proper temperature control.
You'll want to maintain a consistent temperature between 72°F and 75°F throughout the first rise, ensuring your brioche dough develops properly. Place your dough in a lightly greased bowl that's large enough to accommodate doubling or even tripling in size.
Cover the bowl with plastic wrap or a clean kitchen towel to protect the dough from drafts and dust while maintaining warmth. You'll need to position the bowl away from any cold spots or air currents that could disrupt the rising process.
While moderate humidity can help, it's not essential for successful brioche.
Monitor the dough's progress by using the fingertip test: press your floured finger gently into the surface. The indentation should slowly fill back in, leaving a slight dent. If it collapses completely, you've over-proofed the dough. In this case, you'll need to press out the air and let it rest for 10-15 minutes before reshaping.
Remember to trust your eyes and touch more than strict timing guidelines, as environmental factors can affect rising speed.
Cold Fermentation Period
A crucial step in perfecting your brioche lies in the cold fermentation period, where both flavor development and dough structure come together.
You'll need to refrigerate your dough for at least 2 hours, though an overnight rest of 8-12 hours will yield the best results. During this time, you're allowing the flour to fully absorb the liquids while preventing the butter from melting, which makes the dough considerably easier to handle.
For ideal results during cold fermentation, follow these essential steps:
- Cover your dough tightly with plastic wrap to prevent it from drying out
- Place the dough in the refrigerator at a consistent temperature
- Allow up to 48 hours maximum for cold fermentation if your schedule requires flexibility
- Check the dough's temperature before proceeding to the next step
You'll notice that cold fermentation reduces the dough's stickiness and cuts your final proofing time in half.
This process strengthens the gluten network while developing complex flavors, resulting in a softer, more tender crumb.
Remember to plan your cold fermentation period according to your baking schedule, ensuring you've allowed enough time for proper development.
Shaping Your Solar Brioche

Shaping your brioche into the perfect form stands out as one of the most rewarding steps in the baking process. You'll need to decide between three classic shapes: the traditional brioche à tête, braided loaf, or Nantaise style.
For the classic brioche, divide your chilled dough into two portions – one being a third of the total. Shape the larger portion into a ball, then elongate the smaller piece with three fingers to create the topknot. Thread it through the center and seal it off.
| Shape Type | Difficulty Level | Key Steps | Time Required | Best For |
|---|---|---|---|---|
| Classic | Moderate | 2-part division, threading | 15 mins | Individual servings |
| Braided | Advanced | 3 equal ropes, braiding | 20 mins | Presentation |
| Nantaise | Beginner | 8 equal balls, zigzag | 10 mins | Easy pulling apart |
If you're opting for a braided loaf, divide the dough into three equal portions and form ropes. Create a tight braid and place it in your loaf pan. For the simpler Nantaise style, divide into eight equal balls and arrange them in a zigzag pattern. Remember to work on a lightly floured surface and let the dough rest briefly between shapings.
Final Proofing Guide
- Watch for key proofing indicators:
- The dough reaches the top of your loaf pan.
- An indentation from your finger test remains visible but doesn't deflate the dough.
- The surface appears slightly domed and smooth.
If you find your dough is over-proofed (collapses when touched) or under-proofed (springs back completely), don't panic.
Over-proofed dough can be reshaped and proofed again, while under-proofed dough simply needs more time to rise properly.
Solar Baking Method

To maintain consistent heat while baking your brioche in a solar oven, you'll need to position the oven box where it receives maximum sunlight exposure throughout the baking period.
Line your oven box with dark-colored, heat-absorbing materials and guarantee the glass top is clean and free from scratches to maximize solar heat collection.
You can enhance heat retention by using a well-insulated box design and positioning reflective panels at ideal angles to direct additional sunlight into the baking chamber.
Heat Retention Strategies
Successful solar baking of brioche requires careful attention to heat retention strategies that maximize temperature control. To achieve the perfect golden crust and tender crumb, you'll need to implement multiple layers of heat management in your solar oven. Dark materials on interior surfaces, combined with high-conductivity components like aluminum, create an ideal environment for maintaining consistent temperatures.
You'll want to focus on these critical heat retention elements:
- Line your oven's interior with black construction paper or dark paint, ensuring up to 95% absorption of incoming solar radiation.
- Place black granite stones or bricks at the base of your oven, as they'll store heat and release it gradually during the baking process.
- Use double-paned glass panels with anti-reflective coating to trap heat effectively while allowing maximum solar penetration.
- Incorporate rockwool or polystyrene insulation around the cooking cavity to maintain stable temperatures.
For extended baking sessions, position dark glass or cast iron baking vessels on top of your heat retention materials.
Remember to keep your reflector panels properly aligned throughout the baking process, and always cover your solar oven during cloudy periods to preserve accumulated heat.
Oven Box Setup
Building on our heat retention principles, the solar oven box setup requires careful assembly to create an effective baking environment for your brioche. Start by cutting a flap in your pizza box's lid – larger boxes work better as they'll accommodate your brioche pan more easily.
Line this flap with aluminum foil, securing it with clear tape to create a reflective surface that'll direct sunlight into your baking chamber.
Next, create a transparent window by covering the box's top opening with plastic wrap, ensuring it's tightly sealed with clear tape to trap heat.
Place black construction paper at the bottom of your box – this dark surface will absorb and retain heat effectively.
You'll want to position your solar oven in direct sunlight between 10 a.m. and 2 p.m. for ideal baking conditions. Adjust the reflective flap to maximize sunlight entry, and use a thermometer to monitor the internal temperature.
As the sun moves, you'll need to reposition your oven every 30 minutes to maintain consistent heat. For your brioche, you'll place the dough in a dark-colored pan to enhance heat absorption, then cover it with a transparent lid or plastic bag to maintain stable temperatures.
Golden Crust Development
The perfect golden crust on brioche bread begins with proper dough preparation and careful temperature control. You'll need to incorporate high-quality butter gradually into your dough while maintaining a kitchen temperature between 72°F and 75°F. This careful balance guarantees ideal gluten development and proper rise.
As your dough rises, you'll notice it doubling or even tripling in size. Test its readiness by pressing a floured fingertip into the surface – if it leaves a slowly-filling dent, you're ready for shaping. After shaping, allow the dough to rise again until doubled in size.
- Brush your shaped dough with egg wash (egg, milk, and salt mixture) just before baking.
- Bake at 350°F for 30-35 minutes until golden brown.
- Monitor internal temperature until it reaches at least 190°F.
- Cover with foil if top browns too quickly during baking.
Watch for that signature golden-brown color developing during baking. If you notice the top browning too quickly after 25 minutes, protect it with aluminum foil.
Once baked, let your brioche cool slightly in the pan before transferring to a cooling rack for the perfect golden crust.
Frequently Asked Questions
Can I Freeze Leftover Brioche Dough for Later Use?
Yes, you can freeze your leftover brioche dough after it's fully proofed. Let it rise twice, shape it, then freeze it. When you're ready, thaw it completely before baking for fresh bread.
Why Does My Brioche Dough Smell Slightly Sour After Overnight Refrigeration?
Your brioche dough might smell sour because it's over-fermented during refrigeration. You'll want to check your yeast amount, fermentation time, and make sure you're using fresh butter and ingredients next time.
How Long Will Homemade Brioche Stay Fresh at Room Temperature?
Your homemade brioche will stay fresh for 2-3 days at room temperature if you store it properly. You'll need to keep it in an airtight container or wrap it tightly with plastic wrap or foil.
What's the Best Way to Revive Day-Old Brioche Bread?
You can revive stale brioche using either a microwave or oven. Wrap it in a damp paper towel and microwave for 10 seconds, or wrap in foil and heat at 300°F for 5-20 minutes.
Can I Substitute Bread Flour With All-Purpose Flour for Brioche?
Yes, you can substitute all-purpose flour for bread flour in brioche. While you'll get a softer, more cake-like texture due to lower protein content, it'll still be delicious and buttery.
In Summary
You'll find that solar-baked brioche offers a uniquely tender crumb and golden crust that rivals traditional oven methods. While it takes patience to work with the sun's timing, you're rewarded with rich, buttery bread that's both sustainable and delicious. Once you've mastered this solar technique, you'll appreciate how natural heat creates an exceptional brioche that's worth every minute of careful preparation.


Leave a Reply