Your oven glass won't stay fixed due to several common issues. Physical impacts from slamming doors or bumping with cookware can create micro-cracks that loosen the glass over time. Temperature changes during cooking and cleaning cycles can also cause the glass to shift, especially if it wasn't properly installed with the correct foam tape and mounting hardware. Misaligned door frames, worn hinges, or damaged seals contribute to glass instability. You'll need to address both the immediate glass issue and any underlying door problems to guarantee a lasting fix. Our thorough guide will help you tackle this repair step-by-step.
Common Causes of Loose Glass

When your oven glass becomes loose, several common factors are typically to blame.
Physical impact plays a significant role, as repeatedly slamming the door or accidentally hitting it with cookware can create micro-cracks that weaken the glass's stability over time. You'll find that even minor collisions during everyday use can initiate these tiny fractures. Proper rack positioning helps prevent door glass from becoming loose due to misaligned or improperly inserted racks.
Manufacturing defects can also lead to loose glass, especially if there are flaws in the door assembly or poor quality control during production.
The way you clean your oven matters too – vigorous scrubbing or using harsh chemicals can deteriorate the glass's protective coating and mounting components.
Additionally, extreme temperature changes from regular cooking or self-cleaning cycles cause materials to expand and contract, potentially loosening the glass from its frame.
Proper Glass Installation Methods
When you're ready to install your new oven glass, you'll need essential tools including a screwdriver set, foam tape, work gloves, and a clean cloth.
Start by applying double-stick foam tape to the edges of the new glass panel, then carefully position it within the door frame, ensuring perfect alignment with the original placement. Proper positioning is critical to prevent future glass instability and damage.
Secure the glass using the appropriate brackets and screws, following your oven's manual for the correct tightening sequence and torque specifications.
Step-by-Step Assembly Guide
Proper installation of replacement oven glass requires four main stages: door removal, glass panel access, new glass installation, and final reassembly.
You'll start by opening the door, releasing the hinge tabs, and lifting the door off at a quarter-open position. Always wear protective work gloves when handling glass panels and metal parts.
- Remove all screws from the handle and bottom of the door
- Separate the inner panel assembly from the outer door panel
- Clean the frame thoroughly after removing old glass
- Apply double-stick foam tape to secure the new glass
- Test alignment before final tightening of all components
Once you've placed the new glass panel, reassemble in reverse order.
Lower the inner panel assembly, secure all screws (starting loosely), and reattach the top trim.
Finally, place the door back on its hinges and fasten the tabs.
Remember to verify the glass sits properly under the top cap before completing reassembly.
Tools and Materials Needed
Successful oven glass repair requires a specific set of tools and materials to confirm safe, accurate installation. You'll need several screwdrivers, including flat blade, Phillips, and sometimes Torx, along with a putty knife and cut-resistant gloves for safety.
| Essential Tools | Required Materials | Safety Items |
|---|---|---|
| Flat Blade Screwdriver | Tempered Glass Panel | Cut-resistant Gloves |
| Phillips Screwdriver | Replacement Screws | Circuit Breaker Off |
| Putty Knife | Adhesive Pads/Glue | Clean Workspace |
| Torx Screwdriver | Door Components | Microfiber Cloth |
Before starting your repair, verify you've gathered all necessary components, including any model-specific parts like top caps, side pieces, or lower brackets. Don't forget high-temperature adhesive if your model requires it, and keep glass cleaner handy for the final touches.
Cleaning Before Replacement

A thorough cleaning of your oven glass should be attempted before considering replacement, as many issues that appear to need repairs can be resolved through proper maintenance.
Start by ensuring your oven is cool, then tackle each glass surface systematically using natural cleaners like vinegar and baking soda.
- Create a baking soda paste for stubborn buildup on both inner and outer glass
- Use a vinegar-water solution to enhance the cleaning power of the paste
- Clean between glass panels using a modified wire hanger wrapped with damp paper towels
- Remove tough grease with a plastic scraper and buff with a microfiber cloth
- For persistent stains, carefully use fine steel wool with glass cleaner
Don't forget to place towels on the floor to catch drips and always work in a well-ventilated area while cleaning your oven glass.
Choosing Compatible Glass Parts
Selecting the right replacement glass for your oven requires careful attention to three critical factors: model compatibility, glass type, and installation specifications.
You'll need to match the glass precisely to your oven's make and model. Find your oven's model number and check the manufacturer's documentation or website for the correct OEM part number.
Don't forget to verify the dimensions to guarantee a perfect fit.
Always choose tempered, heat-treated glass that's designed for oven use. Consider whether you're replacing the inner or outer glass panel, as they've different specifications.
Make sure the color and finish match your existing oven door.
When ordering, confirm the number of glass layers your oven door requires. Some models use triple-layer glass for better insulation and safety.
Door Frame Inspection Tips

Before replacing your oven glass, thoroughly inspect the door frame to identify potential issues that could affect the installation or performance of the new glass panel.
You'll need to check several key components to guarantee a proper fit and function.
- Examine the hinges and springs for signs of wear, making sure they're properly attached and greased for smooth operation.
- Check the latch mechanism's alignment and functionality, looking for any debris or obstructions that might affect its performance.
- Look for rust or corrosion on metal components, particularly around hinge points and attachment areas.
- Verify that the door frame is properly aligned with the oven body and free from warping or damage.
- Test the door's movement to guarantee it opens and closes without catching or binding before installing new glass.
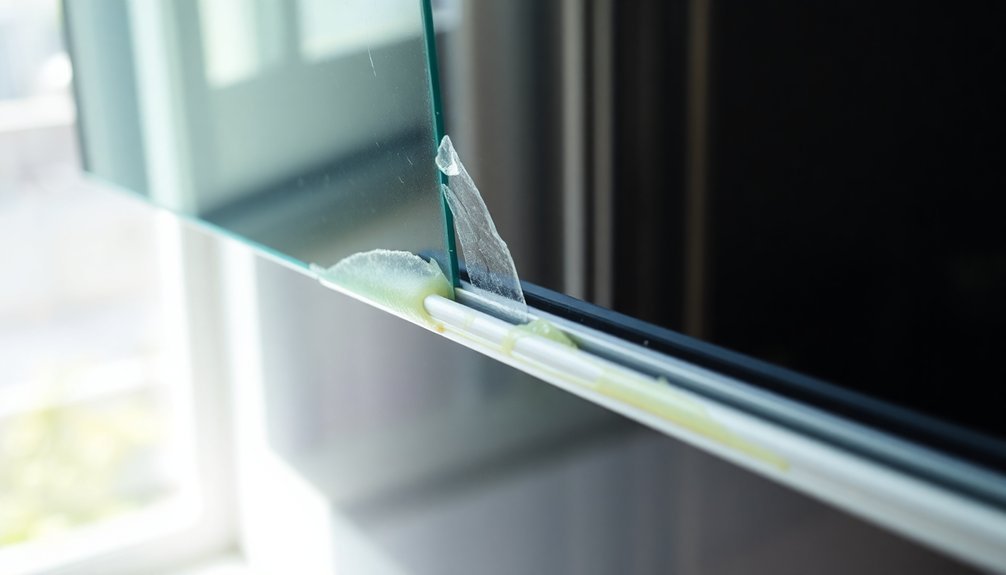
Adhesive and Sealant Application
Proper adhesive application marks the essential difference between a successful oven glass repair and potential failure.
You'll need to select a high-temperature silicone sealant specifically designed for oven use, which you can find at auto parts stores or online.
Before applying the sealant, thoroughly clean both the glass and metal frame using a glass scraper or razor blade to remove old residue.
Cut the sealant tube's tip and load it into a sealant gun.
Apply a consistent bead around the glass perimeter, making sure to coat both the glass and metal frame surfaces for ideal adhesion.
Use clamps or a heavy object to maintain pressure while the sealant sets.
Don't rush the process – allow a full 24-hour cure time before reassembling your oven door.
Tools Required for Glass Repair

A complete toolkit guarantees successful oven glass repair from start to finish.
You'll need various screwdrivers and specific tools to safely disassemble the door, remove the glass panels, and reassemble everything properly.
Essential tools for your oven glass repair include:
- A flat blade screwdriver for releasing hinge locks and alignment
- A Torx 15 screwdriver to handle top screws
- A 1/4" nut driver for bottom trim work
- A putty knife for glass separation and proper positioning
- Cut-resistant gloves for protection against sharp edges
Don't forget to prepare a clean work surface and grab your oven's manual before starting.
You might also want to use door supports or clamps to maintain stability while working.
Having the right model lookup tool will verify you're ordering the correct replacement parts if needed.
Safety During Glass Replacement
Safety precautions form the foundation of successful oven glass replacement, protecting you from potential injuries and electrical hazards. Before you start, unplug your oven or turn off the electricity at the meter.
You'll need to clear your workspace and guarantee the oven's completely cool.
When handling broken glass, always wear gloves and keep pets and children away from the area. Use a vacuum cleaner with a bag to collect glass shards safely – don't use bagless models as they can get damaged.
Place the door on a soft surface while working on it.
After replacement, you'll need to perform essential safety checks. Make sure the new glass fits properly and the door operates smoothly.
Don't overtighten the retaining screws, and remember to clean the frame thoroughly before installation.
Testing After Glass Installation

After completing your oven glass repair, you'll need to run essential safety checks by verifying all electrical connections and door seals.
Test the door's movement by opening and closing it several times, paying attention to any unusual resistance or misalignment.
Finally, you'll want to confirm proper heat resistance by running a brief heating cycle and checking for any hot spots or temperature irregularities around the newly installed glass.
Safety Checks First
Once you've completed the glass installation, performing thorough safety checks becomes essential to confirm your oven's reliability and safe operation.
Before testing your newly installed oven glass, you'll need to take several critical precautions to protect yourself and confirm accurate results.
- Unplug your oven or turn off the power supply to prevent any electrical accidents while inspecting
- Put on protective gear, including gloves and safety glasses, especially if you're cleaning up remaining debris
- Clear the area around your oven of children, pets, and any obstacles that could interfere with testing
- Check that the glass sits perfectly within its frame without any gaps or movement
- Inspect all mounting hardware, confirming screws and trim pieces are secure but not overtightened
Door Movement Assessment
Testing your oven door's movement marks the next step following safety inspections. Open and close the door gently several times to verify it's operating smoothly without any scraping or popping sounds.
Check that the door closes flush against the frame and doesn't wobble. Pay attention to the hinges and rollers, ensuring they're properly lubricated with high-temperature grease.
Focus on the moving parts where pieces slide up and down. If you notice misalignment, you'll need to adjust the hinge tension. You can do this by placing folded washcloths where the door hinges are and carefully pushing to reset the springs.
Keep testing until the door closes correctly, but don't force it. Make sure all screws remain tight and the rack guides align properly with the hinges.
Heat Resistance Verification
Before putting your oven back into regular service, you'll need to verify the newly installed glass can withstand normal operating temperatures.
Conducting proper heat resistance verification helps prevent future failures and guarantees your safety. Start with a thorough visual inspection for defects, then perform controlled temperature cycles to test thermal shock resistance.
Essential verification steps include:
- Inspect the glass surface for scratches, chips, or stress marks using strong lighting
- Run your oven through gradual temperature increases, starting at 200°F and working up to normal cooking temps
- Check that mounting hardware remains secure as the oven heats and cools
- Look for any signs of stress using a polariscope, if available
- Document all test results and observations for warranty purposes
If you notice any issues during testing, stop immediately and consult a professional.
Preventing Future Glass Issues
To maintain your oven's glass in prime condition, implementing preventive measures can save you time and money on future repairs.
Start by using gentle, natural cleaners like baking soda and vinegar instead of harsh chemicals that can damage the surface. Don't pour water directly onto hot glass, and always cover the door with a towel when adding steam to prevent thermal shock.
Make cleaning a regular habit by wiping spills immediately and using a damp microfiber cloth to remove loose debris.
When dealing with tough spots, use a razor blade at an angle with extreme care. You'll want to inspect the door frequently for cracks or seal issues, addressing problems promptly before they worsen.
Remember to keep the door properly aligned and guarantee all cleaning solutions are thoroughly removed to prevent residue buildup.
Frequently Asked Questions
Can I Temporarily Fix My Oven Glass With High-Temperature Silicone?
Yes, you can use high-temperature silicone as a temporary fix for your oven glass. Just make sure to clean surfaces thoroughly, apply silicone evenly, and let it cure completely before using your oven.
How Often Should I Check and Tighten the Oven Door Hardware?
You should check and tighten your oven door hardware every 3-4 months during regular use. After repairs, inspect immediately. Don't forget to examine the hardware before heavy-use seasons like holidays.
Will Using My Oven With Loose Glass Affect Cooking Temperatures?
Yes, loose glass in your oven will affect cooking temperatures considerably. You'll experience uneven heating and temperature fluctuations, which can disrupt your food's cooking process and lead to inconsistent results in your dishes.
Should I Replace Both Glass Panels if Only One Is Loose?
You don't need to replace both panels if only one is loose. However, it's worth inspecting the second panel for hidden damage. If both panels are old, replacing them together could prevent future issues.
Can Extreme Weather Changes Cause Oven Glass to Become Loose?
Yes, extreme weather changes can make your oven glass loose. Temperature fluctuations cause expansion and contraction of glass and surrounding materials, which may weaken seals and mounting points over time, affecting glass stability.
In Summary
You'll need to guarantee proper alignment, clean surfaces, and compatible parts when fixing your oven glass. If you've followed installation steps but still have issues, check your door frame for warping or damage. Don't cut corners on safety or materials – using the right tools and adhesives is essential. Regular maintenance and gentle handling will help prevent future glass problems.


Leave a Reply