
You'll love this vibrant one-pot sunshine dal that combines yellow split peas with aromatic spices like turmeric, cumin, and mustard seeds. Start by tempering whole spices in ghee until fragrant, then add onions, garlic, and ginger for depth. The pressure cooker transforms your lentils into a creamy, protein-rich comfort dish while fresh spinach adds nutrition and color. This versatile dal pairs perfectly with rice, naan, or your favorite grain, making it ideal for busy weeknights. Top with a fresh tadka of spices and herbs – just the beginning of your journey into authentic Indian dal mastery.
The Magic of Golden Dal
Golden dal consistently proves itself as a nutritional powerhouse, packing an impressive 356 calories per serving with a well-balanced macronutrient profile. You'll find a smart distribution of 42% carbs, 41% fat, and 17% protein, making it an ideal choice for balanced meals.
When you're looking to meet your daily nutritional needs, each serving delivers 29% of your daily protein and fiber requirements.
What makes golden dal truly magical is its extensive health benefits. You're not just getting a delicious meal; you're supporting your body's essential functions. The combination of complex carbohydrates and fiber helps regulate your blood sugar levels, while the protein content keeps you feeling satisfied longer. The addition of turmeric and curry powder enhances both flavor and nutritional benefits.
When you pair it with rice, you'll create a complete protein source containing all essential amino acids your body needs.
You'll also benefit from its rich vitamin and mineral content, including B-vitamins, iron, and potassium. The dish's antioxidants support your overall health, while its fiber content promotes gut health.
For anyone following a vegetarian or vegan diet, you'll find golden dal particularly valuable as a reliable protein source.
Essential Ingredients and Equipment
Your one-pot sunshine dal starts with basic pantry essentials: yellow split peas, aromatic spices like turmeric and cumin, and fresh ingredients such as onions, garlic, and ginger.
You'll need quality cooking tools including a heavy-bottomed pot or Dutch oven, measuring cups, and a whisk or immersion blender for the perfect consistency.
To set up for tempering spices, gather small bowls for pre-measured seasonings and keep your ghee or oil ready alongside whole spices like mustard seeds and curry leaves. For maximum nutrition and a beautiful presentation, make sure to have fresh spinach ready to add at the end, providing 15 grams of protein per serving.
Basic Pantry Must-Haves
A well-stocked pantry forms the backbone of successful dal preparation, where aromatic spices, wholesome lentils, and essential oils come together to create authentic Indian flavors.
You'll need a core selection of spices including coriander, turmeric, cumin, paprika, black mustard seeds, Kashmiri red chili powder, and cinnamon to build layers of flavor in your dal. Red pepper flakes or additional chili spices can be included to adjust heat levels to your preference.
For your legume collection, stock up on various lentils: brown, red, and yellow varieties, along with split gram dal. These form the protein-rich base of your dish.
Keep high-quality basmati rice on hand to serve alongside your dal.
You'll want to maintain a selection of cooking oils: coconut, ghee, peanut, sesame, and avocado oil each bring their unique characteristics to the dish.
Don't forget the aromatics – onions, garlic, and fresh ginger root are essential flavor builders.
Round out your pantry with canned tomatoes, jaggery or brown sugar for balance, white vinegar for acidity, and rose water for authentic finishing touches.
Keep fresh cilantro on hand for garnishing – it's the perfect way to add brightness to your finished dal.
Quality Cooking Tools Needed
Making exceptional dal requires more than just well-stocked ingredients – you'll need the right tools to bring out those authentic flavors and textures. First, invest in a quality pressure cooker, whether it's an Instant Pot or traditional stovetop model, as it's essential for achieving that perfectly creamy lentil consistency.
| Essential Tool | Purpose |
|---|---|
| Pressure Cooker | Cooks lentils evenly and quickly |
| Deep Pan | Tempers spices and sautés aromatics |
| Immersion Blender | Creates smooth, velvety texture |
You'll want a sturdy deep pan for tempering your spices and sautéing aromatics – this is where much of your dal's flavor develops. Don't forget basic prep tools like a sharp knife and cutting board for chopping your garlic, ginger, and chilies. For serving, you'll need proper ladles that can handle hot liquids and durable serving bowls that retain heat well.
If you're planning to make dal regularly, consider getting a dedicated wooden spatula for stirring, as it won't scratch your cookware and helps incorporate ingredients effectively. A lemon squeezer and small bowls for garnishes will help you finish your dish with professional flair.
Tempering Spice Setup
Proper spice tempering begins with organizing essential ingredients and tools before heating any oil.
You'll need to gather whole spices like cumin, mustard, and fenugreek seeds, alongside aromatic spices such as green cardamom, cloves, and cassia bark. Keep your ground spices – turmeric, red chili powder, and garam masala – within arm's reach, along with fresh ingredients like garlic, ginger, and curry leaves.
For your dal's tempering, select a high smoke point oil. While ghee offers traditional flavor, you can opt for peanut, safflower, or coconut oil. Don't use olive oil or regular butter, as they'll burn at tempering temperatures.
Set up your dedicated tempering station with a small tadka pan or similarly sized vessel that'll concentrate the oil and maintain consistent heat.
Place a heat-resistant spoon or spatula nearby for stirring, and keep a lid handy to control oil splatter. Position your spices in the order you'll use them: whole spices first, followed by ground spices and aromatics.
This organization guarantees you'll maintain proper timing when the oil reaches its ideal temperature.
Preparing Your Solar Cooking Setup

Successful solar cooking begins with assembling and positioning your equipment correctly. For your dal recipe, you'll want to select a solar cooker type that maintains steady temperatures – a box cooker or vacuum tube model works particularly well for legume dishes that require extended cooking times.
| Setup Step | Action | Purpose |
|---|---|---|
| Position | Face cooker toward sun | Maximum light exposure |
| Preheat | Allow 15-30 min warmup | Reach cooking temperature |
| Container | Use dark pot with lid | Enhance heat absorption |
| Placement | Set pot on trivet | Prevent heat loss |
| Monitor | Check temp regularly | guarantee cooking progress |
Before adding your dal ingredients, you'll need to preheat your solar cooker in direct sunlight. Place it where it'll receive unobstructed sunshine, and angle any reflectors to concentrate maximum light onto your cooking vessel. Don't forget to position the trivet correctly – it's essential for proper heat distribution. You'll know your setup is ready when the internal temperature reaches about 180-200°F. Remember to wear protective gloves when handling the equipment, as solar cookers can get surprisingly hot, even on mild days.
Base Aromatics and Spices
At the heart of a flavorful sunshine dal lies the careful selection and preparation of aromatics and spices.
You'll want to start by preparing your aromatic base: slice or finely chop your onions, mince fresh garlic, and grate ginger. Add ripe tomatoes and green chilies to create the foundation of your dish.
For the essential spices, you'll need turmeric powder for that signature golden color, cumin seeds for tempering, and red chili powder that you can adjust to your heat preference.
Don't forget to include garam masala for depth and warmth. Both ground coriander and fresh coriander leaves will enhance the overall flavor profile.
Your tempering (tadka) will require mustard seeds, dried red chilies, and curry leaves, all of which you'll fry in ghee or oil.
Add a pinch of hing (asafoetida) to aid digestion and boost flavor. For additional complexity, you can incorporate kasuri methi (dried fenugreek leaves), a splash of lemon juice, or a pinch of black salt.
These ingredients work together to create a harmonious blend of flavors that's characteristic of authentic Indian dal.
Perfect Lentil Selection Tips

Your perfect dal starts with choosing the right lentils, and you'll want to pay attention to both color and texture characteristics.
For a creamy, golden sunshine dal, reach for red or yellow lentils (like Masoor dal or Moong dal) which break down beautifully during cooking and offer sweet, nutty flavors that complement aromatic spices.
While black and green lentils hold their shape well and provide earthier notes, they won't give you that signature silky smoothness that makes a classic sunshine dal so comforting.
Know Your Dal Varieties
Understanding different dal varieties is essential for creating authentic Indian dishes, as each type brings its own unique texture, cooking time, and flavor profile to your recipes.
You'll find that toor dal shines in classic preparations like sambar and khichdi, while masoor dal's earthy notes make it perfect for hearty North Indian dishes. Moong dal's gentle digestibility makes it an excellent choice for light meals and sprouting.
For traditional Indian cooking, you'll want to familiarize yourself with urad dal, which is vital for creating rich dishes like dal makhani and crispy vadas.
When you're new to cooking with dals, start with split varieties as they cook faster and don't require pre-soaking. Each dal responds differently to tempering with spices, so knowing when to add your tadka can make or break your dish.
- Toor dal's golden hue and quick-cooking nature make it perfect for everyday meals
- Masoor dal's vibrant orange-red color transforms into a warm yellow when cooked
- Urad dal's dramatic black exterior gives way to a creamy white interior when split
Color and Texture Guide
Selecting the perfect lentils begins with recognizing their distinct colors and textures, which directly impact your final dish's appearance and consistency. For a sunshine dal, you'll want to focus on red and yellow lentils, which transform from vibrant hues to golden tones when cooked, creating that signature warm, inviting appearance.
Red and yellow lentils break down naturally during cooking, making them ideal for creating the creamy, comforting texture that's essential in traditional dal. They'll dissolve into a velvety consistency, perfect for thickening your one-pot creation.
If you're looking for more structure in your dal, consider adding some green or black lentils, which hold their shape remarkably well.
You can identify quality red lentils by their bright orange-red color, while yellow lentils should have a clear, consistent golden hue. Green lentils range from pale to dark, mottled appearances, and black lentils should be glossy and uniform in color.
When combining varieties, remember that red and yellow lentils cook faster and become softer, while green and black maintain their form, offering interesting textural contrasts in your dish.
Solar Cooking Time Management
Mastering solar cooking time management requires careful attention to both the sun's position and environmental conditions throughout the day.
You'll want to start your dal between 11:00 am and 3:00 pm when the sun's overhead position provides ideal cooking conditions. Pre-heat your solar cooker for 30 minutes starting around 10:30 am to make certain it's ready for your ingredients.
To maximize efficiency, track the sun's movement by rotating your cooker every 30 minutes. Cut your lentils, vegetables, and spices into smaller pieces to reduce cooking time. You'll need to account for longer cooking periods compared to conventional methods, so plan accordingly.
- Imagine your dal bubbling gently in the cooker as the sun's rays filter through the glass lid
- Picture the steam rising as you adjust the reflectors to capture maximum sunlight
- Visualize the rich golden color developing as your dal simmers in nature's own oven
Shield your cooker from wind to maintain consistent heat, and use high-heat paint or thermal mass materials like rocks to improve heat retention.
If you notice cloud cover approaching, you may need to extend your cooking time or adjust your schedule accordingly.
Traditional Tempering Techniques
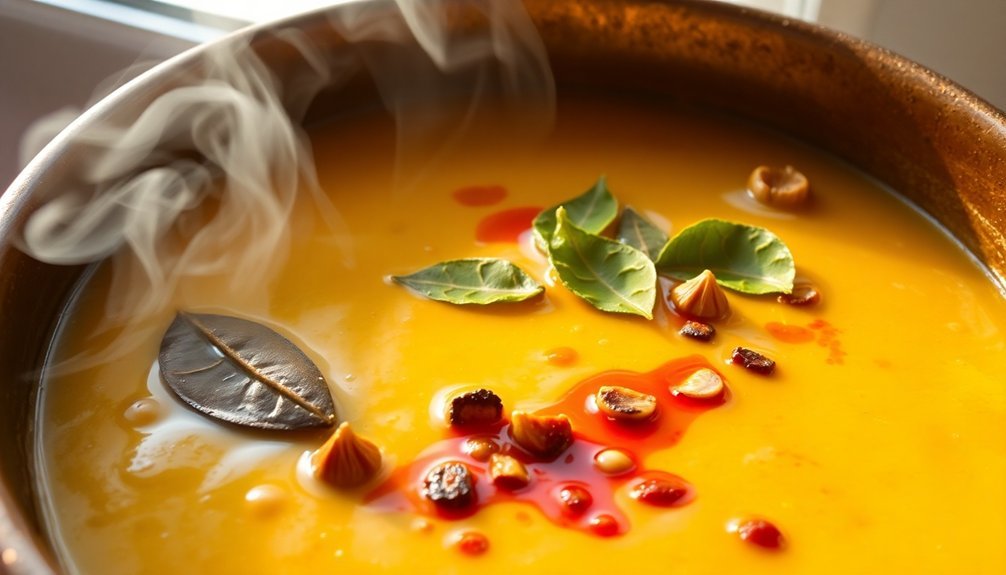
When tempering spices for your sunshine dal, you'll need to heat your ghee or high smoke-point oil until it's very hot but not smoking.
To master the blooming process, add your whole spices first (like cumin and mustard seeds), allowing them to sizzle and release their essential oils before reducing the heat to medium.
You'll know you've achieved the perfect tempering when the spices become fragrant and the seeds begin to pop, signaling it's time to incorporate them into your dal.
Spice Blooming Basics
The spice-blooming ritual transforms simple ingredients into aromatic treasures through the traditional technique of tempering.
You'll want to start with a small, heavy-bottomed pan over medium heat, ensuring your whole spices are ready for their grand performance. As you heat the oil, add your whole spices in sequence – mustard seeds first, followed by cumin seeds, watching them dance and pop in the hot oil.
For the perfect bloom, you'll need to master the delicate balance of timing and temperature. Keep the heat at medium-low to prevent burning, and be ready to move quickly once the spices start sizzling.
When you're adding ground spices like turmeric or chili powder, reduce the heat further to protect their delicate flavors.
- Mustard seeds popping like tiny fireworks, releasing their nutty aroma
- Cumin seeds turning a deeper shade of brown, their earthy fragrance filling the kitchen
- Whole spices glistening in golden oil, creating a symphony of colors and scents
Layer your spices thoughtfully throughout the cooking process, allowing each addition to develop its full potential.
Remember to taste and adjust as you go, creating a harmonious blend of flavors that will make your dal truly shine.
Hot Oil Method Mastery
Traditional tempering, known as tadka, starts with selecting the perfect fat for your dal. You'll want to choose oils with distinctive flavors like ghee or coconut oil, though neutral oils like peanut or grapeseed work well too. Just make sure your chosen oil can withstand temperatures between 325°F and 350°F without smoking.
Getting the oil temperature right is essential for ideal flavor extraction. You can test the readiness by dropping a few mustard or cumin seeds into the oil – they should sizzle immediately. Keep the heat at medium to medium-high, as overheating will result in bitter, burnt spices.
Once your oil's ready, add your whole spices first, allowing them to pop and release their essential oils. Lightly crack cardamom pods before adding them, and incorporate ground spices like turmeric to create that signature yellow-orange hue.
You can also add aromatics like garlic, ginger, or curry leaves for additional depth.
Pour your completed tadka over your cooked dal immediately, stirring to distribute the flavors evenly throughout the dish. You'll notice how the infused oil creates concentrated pockets of flavor that elevate your dal's taste profile.
Achieving the Right Consistency
Mastering dal consistency requires understanding the relationship between cooking methods and water ratios. Start with the basic 1:3 ratio of dal to water, but remember you'll need less water in a pressure cooker or Instant Pot due to minimal evaporation.
When using the stovetop method, keep extra water nearby as you'll likely need to add more during cooking.
Your dal's texture should conjure these sensory experiences:
- A velvety stream of dal flowing from your spoon, neither too runny nor too thick
- Tender lentils that hold their shape yet partially melt into the surrounding sauce
- A silky-smooth finish that coats the back of your spoon without clumping
To achieve the perfect consistency, stir frequently and mash some lentils against the pot's side. Add ghee or oil at the beginning to prevent boiling over and enhance creaminess.
If you're using a slow-cooking method, you'll notice the dal naturally thickens and becomes richer over time. Don't rush to add salt until the end – this helps you maintain better control over the final consistency.
Remember to adjust the heat between high and low to guarantee even cooking and prevent sticking.
Regional Dal Variations

Throughout India's diverse regions, dal preparations showcase distinct personalities shaped by local ingredients, cooking methods, and cultural preferences.
In the North, you'll find rich and creamy preparations like Dal Makhani, made with urad dal and kidney beans, simmered with butter and tomatoes. The region also offers Tadka Dal, which you can make with various lentils and customize with spinach or bottle gourd.
Southern India brings tangy variations like Rasam and Sambar, both featuring toor dal and tamarind. Karnataka's Bisi Bele Bath combines toor dal with rice and a complex blend of spices, while Tamil Nadu's Pongal offers a simpler, comforting preparation of mung dal with rice.
Eastern India's Dalma from Odisha incorporates vegetables like green papaya and pumpkin with toor dal, seasoned with distinctive panch phutana.
In the West, you'll discover unique preparations like Gujarat's Dal Dhokli, where toor dal meets wheat-based dough pieces, and Rajasthan's Dal Banjara, combining chana and urad dal with robust spices.
Each regional variation reflects local tastes and available ingredients, making dal one of India's most versatile dishes.
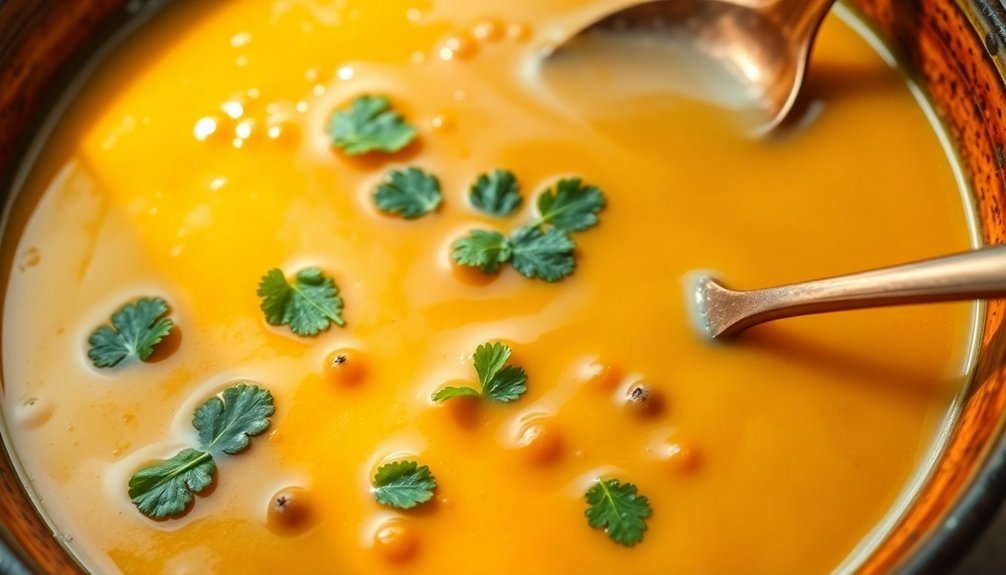
Plating and Garnishing
A well-garnished dal transforms from a simple comfort food into an eye-catching centerpiece. To achieve this transformation, you'll want to set aside your garnishing ingredients while cooking, ensuring they're fresh and readily available when you're ready to serve.
Traditional Indian garnishes like fresh coriander leaves, crispy fried onions, and a squeeze of lemon can elevate your dal's presentation while complementing its flavors.
When plating your sunshine dal, start by creating a gentle dome in the center of your serving bowl. Float the aromatic tadka on top, letting the golden-hued oil create striking patterns across the surface.
You can enhance the visual appeal and texture by incorporating these classic elements:
- A crown of fresh herbs, particularly vibrant coriander leaves, scattered across the surface
- A rim of thinly sliced lemon wedges arranged at intervals around the edge
- A sprinkle of crushed peanuts or toasted almonds for added dimension and crunch
Remember to keep your presentation balanced and uncluttered. Serve your dal alongside complementary items on a thali, using small metal or earthenware bowls to create an authentic Indian dining experience.
Suggested Pairings and Accompaniments
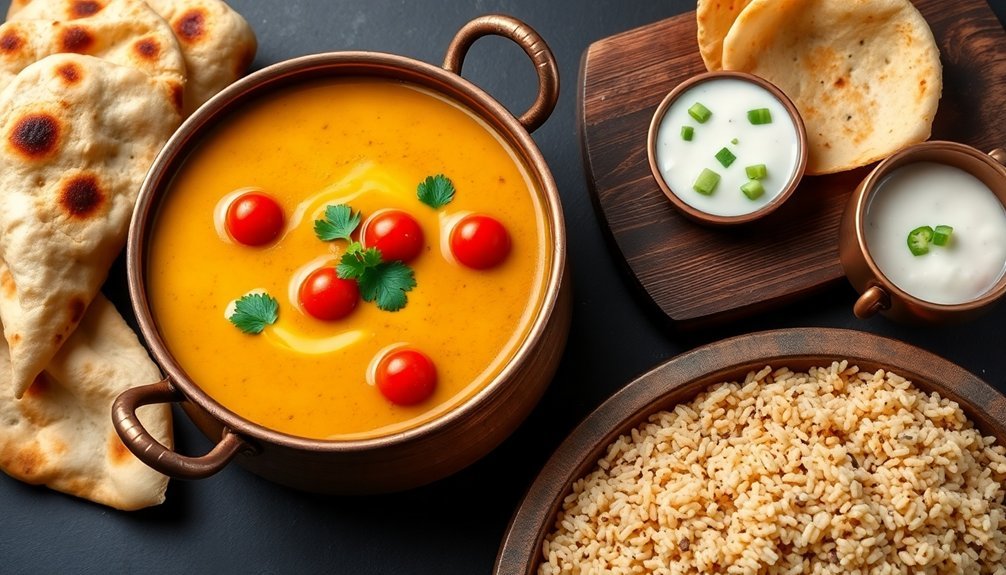
Creating a complete Indian meal experience starts with thoughtful pairings for your sunshine dal. You'll find traditional breads like naan, chapati, or roti serve as perfect vehicles for scooping up the creamy lentils. For a grain-based foundation, try aromatic jeera rice or plain basmati rice, or opt for healthier alternatives like cauliflower rice or quinoa.
Don't forget the vital accompaniments that'll elevate your dal experience. Crispy papad adds textural contrast, while tangy achaar and cooling raita balance the flavors. Fresh chutneys and a simple Indian-style salad bring brightness to your plate.
| Category | Traditional Choice | Modern Alternative |
|---|---|---|
| Bread | Naan or Chapati | Cauliflower Flatbread |
| Rice | Jeera Rice | Quinoa |
| Sides | Papad & Achaar | Roasted Vegetables |
| Protein | Tandoori Chicken | Grilled Fish |
For a more substantial meal, you can pair your dal with protein options like tandoori chicken or fried fish. Vegetable-based sides such as saag spinach curry or roasted vegetables will round out your plate while adding nutritional value and complementary flavors.
Storage and Reheating Methods
Proper storage extends the life of your sunshine dal, letting you enjoy its vibrant flavors for days or even months to come.
You'll want to let your dal cool completely before transferring it to glass containers or leak-proof silicone bags. For freezing, portion your dal into serving sizes that work for your household, and don't forget to label the containers with the date.
When you're ready to enjoy your stored dal, you've got several reheating options. If it's frozen, you can add it directly to a pot with hot water or use your microwave for quick defrosting.
To restore the dal's original vibrancy, create a fresh tadka by tempering spices in ghee or oil and adding it to the reheated dal. You might need to adjust the seasoning after reheating to maintain ideal flavor.
- Picture your dal stored in traditional brass vessels, steam rising as you open the lid the next day
- Imagine perfectly portioned containers of golden dal lined up in your freezer, ready for busy weeknights
- Visualize the sizzle of cumin seeds dancing in hot ghee as you prepare a fresh tadka for reheating
Frequently Asked Questions
Can I Substitute Coconut Milk With Other Plant-Based Alternatives?
You can use oat milk, almond milk, or soy milk as coconut milk substitutes. Add a teaspoon of cornstarch to thicken them, and include coconut oil for richness. Cashew cream's another great option.
Does Dal Freeze Well for Batch Cooking?
Yes, you'll find dal freezes excellently! You can store it for up to 3 months when properly portioned in airtight containers or zip-top bags. Just remember to cool it completely before freezing.
Which Lentils Are Best for People With Digestive Sensitivities?
For digestive sensitivities, you'll want to use tinned lentils, which are easier to digest. They're low FODMAP up to ¼ cup per serving. Rinse them well, and start with small portions to build tolerance.
Can I Make Dal in a Slow Cooker Instead?
Yes, you can easily make dal in a slow cooker! Just soak your lentils overnight, cook them on HIGH for 3-4 hours or LOW for 8-12 hours, adding spices and cream near the end.
Are Dried Curry Leaves as Effective as Fresh Ones?
No, dried curry leaves aren't as effective as fresh ones. You'll need to use double the amount of dried leaves to achieve a similar flavor, and even then, you won't get the same robust, aromatic results.
In Summary
You'll find this sunshine dal brings warmth to any table, whether served family-style or packed for lunch the next day. Don't hesitate to adjust the spices to your taste – that's the beauty of homemade dal. Remember to store leftovers in an airtight container for up to five days, and add a splash of water when reheating to maintain that perfect consistency.


Leave a Reply