You'll love this simple sun-cooked chicken recipe that only needs four ingredients. Cut 1½ pounds of boneless, skinless chicken into 1-inch pieces, season with salt and pepper, add garlic powder and paprika, then drizzle with olive oil. Place everything in a dark-colored pot with a tight lid and position it in your preheated solar oven (around 275°F). Let it cook for 4-5 hours, adjusting the oven's position every 30-45 minutes to follow the sun. Check that the internal temperature reaches 165°F before serving. With the right setup and timing, you'll discover how solar cooking transforms ordinary chicken into a tender, flavorful meal.
Why Choose Solar Cooking
While traditional cooking methods have served us well for centuries, solar cooking represents a powerful shift toward sustainable and healthier food preparation. When you choose to cook with solar power, you'll protect both your health and the environment.
You'll reduce your exposure to harmful smoke and soot that often cause respiratory problems in traditional cooking, while eliminating the risk of burns from conventional cooking fires. Living in Utah provides an ideal environment with 226 sunny days annually for consistent solar cooking success.
You'll save significant money since you won't need to purchase cooking fuel, which can consume up to half of some families' income. By switching to solar cooking, you'll help prevent deforestation, as each solar cooker saves approximately one ton of wood annually.
You'll also contribute to reducing CO2 emissions, with solar cookers collectively avoiding 5.8 million metric tons of emissions each year.
The practical benefits are equally compelling. You'll have the ability to cook various foods, from meats to baked goods, using free and sustainable energy from the sun.
You can even pasteurize water in 1-4 hours, ensuring safe drinking water for your family while supporting global sustainability goals and enhancing community resilience.
Essential Solar Cooking Equipment
You'll need a reliable solar oven, which can be a box-style cooker, panel cooker, or parabolic dish system, depending on your cooking needs.
Your solar cooker must have highly reflective panels made of materials like aluminum foil or special reflective film to effectively concentrate sunlight onto your cooking vessel. Using clear plastic wrap as a heat-trapping cover is crucial for maintaining consistent cooking temperatures.
A good cooking thermometer is essential for monitoring your oven's internal temperature, ensuring your chicken reaches a safe cooking temperature of at least 165°F (74°C).
Solar Oven Base Types
Four main types of solar ovens serve as the foundation for sun-based cooking: basic box ovens, insulated box ovens, advanced box ovens, and vacuum tube ovens.
If you're just starting out, a basic box solar oven made from cardboard, aluminum foil, and plastic wrap can reach temperatures up to 300°F. Most effective cooking occurs when using the oven between 11-3pm. You'll need to add insulation like newspapers or black construction paper, and pre-heat it for an hour in direct sunlight.
For better performance, consider an insulated box oven with its double-box design. The space between boxes, filled with newspapers or sawdust, helps maintain high temperatures even during cloudy periods. The glass cover and angled reflectors maximize sunlight absorption.
Advanced box ovens offer superior efficiency with sophisticated reflector systems and interior racks. You'll appreciate their ability to cook for larger groups and track the sun with minimal adjustments.
The most powerful option is the vacuum tube oven, which can exceed 480°F and cook in light overcast conditions. Its solar vacuum tube provides exceptional insulation, keeping food hot for hours after sunset.
While more fragile, these ovens offer the highest performance for solar cooking.
Reflective Panel Requirements
Selecting the right reflective materials for your solar oven's panels can make the difference between a lukewarm meal and properly cooked food.
Glass mirrors offer the highest efficiency, but if you're looking for a more budget-friendly option, vinyl car wrap provides excellent reflectivity at 1.8 times better than aluminum foil tape.
You'll want to guarantee your panels are properly mounted with hinges for easy adjustment and storage, while maintaining the correct angle for ideal heat reflection.
To maximize your solar cooking success, you'll need to take into account these essential panel requirements:
- Use glass mirrors for the best heat reflection if budget isn't a concern
- Choose vinyl car wrap as a cost-effective alternative with superior reflectivity
- Install hinges for easy panel adjustment and storage when not in use
- Add proper support systems like props or strings to maintain correct angles
- Clean your reflective surfaces regularly to maintain peak performance
Don't forget to factor in durability when selecting your materials.
While aluminized polycarbonate films are available, they scratch easily and can't be re-polished.
You'll need to protect your panels during storage and handle them carefully to prevent damage that could reduce their effectiveness.
Temperature Monitoring Tools
Solar cooking's success relies heavily on accurate temperature monitoring tools, which serve as your eyes and ears during the cooking process. For your chicken recipe, you'll need reliable temperature sensors that can withstand the sun's intense heat while providing precise readings.
| Equipment Type | Purpose |
|---|---|
| Probe Thermometer | Measures internal chicken temperature (-50°C to 300°C) |
| Data Logger | Records temperature changes throughout cooking |
| Solar Apps | Provides real-time monitoring and cooking profiles |
Your primary monitoring tool should be a slim probe thermometer with an LCD screen to check the chicken's internal temperature without letting heat escape. You can pair this with apps like GoSun or Solar Cooker Pro to track your cooking progress and receive alerts when your chicken reaches the desired temperature.
For ideal results, calibrate your thermometer regularly and consider environmental factors like wind and cloud cover. If you're using an advanced setup, you can integrate your temperature monitoring with motor-powered trackers that automatically adjust your solar oven's position based on the sun's movement, ensuring consistent cooking temperatures throughout the process.
Preparing Your Ingredients

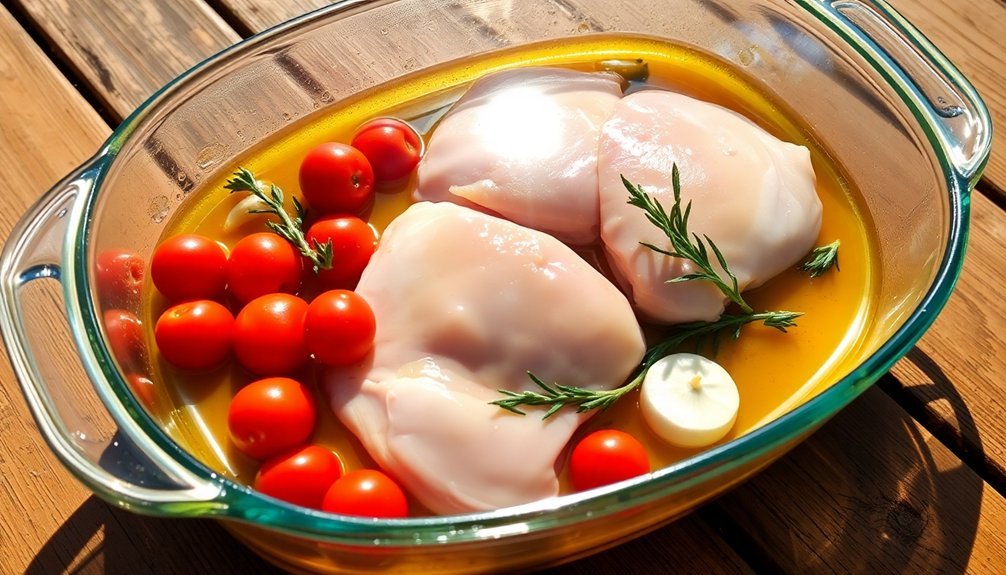
Proper preparation of ingredients sets the foundation for this flavorful sun-cooked chicken dish. You'll need to start with 1½ pounds of boneless, skinless chicken, cutting it into uniform 1-inch pieces. Pat the chicken dry with paper towels to guarantee proper seasoning absorption and ideal cooking results.
Season your chicken generously with salt, black pepper, garlic powder, and paprika, then drizzle with extra virgin olive oil to lock in the flavors.
While the chicken marinates, prepare your supporting ingredients. Chop your vegetables uniformly, measure out your liquids, and have your fresh herbs ready. You'll want all components within arm's reach once you begin cooking, as organization is key to a successful one-pot dish.
- Cut sun-dried and cherry tomatoes into bite-sized pieces
- Dice onions, carrots, and celery into similar-sized chunks
- Measure your broth and other liquids into easy-pour containers
- Strip fresh herbs from their stems and rough chop them
- Portion out your spices and seasonings into small bowls
Your mise en place should be complete before you start the cooking process, guaranteeing a smooth and efficient preparation of your sun-cooked chicken.
Solar Cooking Setup Methods
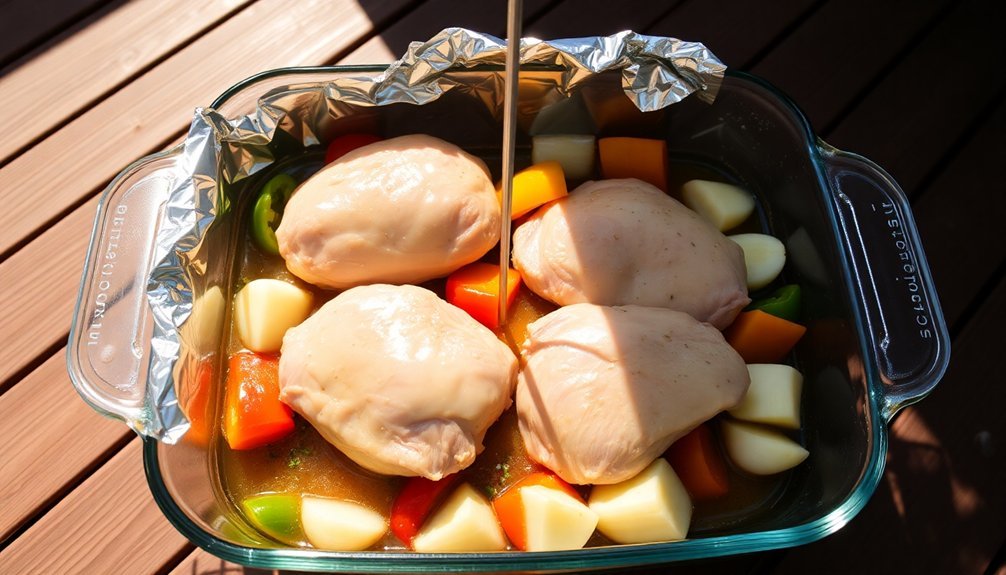
A well-designed solar oven setup forms the backbone of successful sun-cooked meals. You'll need to start by cutting a three-sided flap in your box's lid and covering its inner surface with aluminum foil, making certain the shiny side faces out.
Create an airtight cooking window by sealing the box's opening with two layers of clear plastic wrap for better heat retention.
Before placing your chicken in the oven, you'll want to pre-heat it for at least an hour in direct sunlight. Line the bottom with black construction paper to maximize heat absorption, and insulate the walls using newspaper or sawdust.
Position a cooking rack at least two inches above the bottom surface to guarantee even heat distribution.
You'll need to monitor your solar oven throughout the cooking process. Place it in full sunlight and prop the reflector flap open using a ruler or wooden spoon.
As the sun moves, adjust the reflector's angle every 15-20 minutes to maintain peak sunlight capture. Keep track of the internal temperature using a thermometer, and remember not to look directly at the reflected sunlight while making these adjustments.
Timing and Temperature Control
Managing time and temperature in solar cooking requires attention to three key elements: preheating, duration, and safety monitoring.
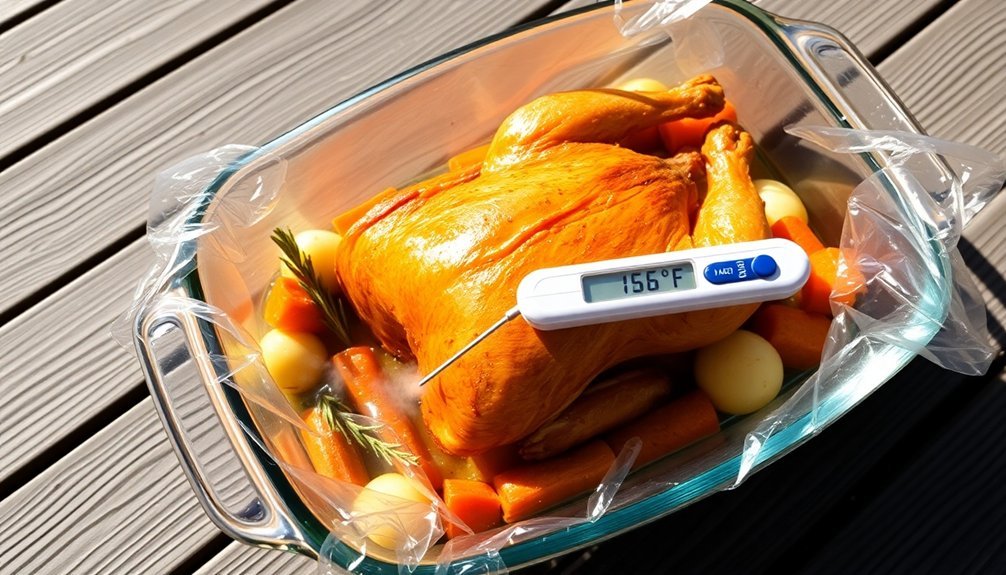
You'll need to allow 30 minutes for your solar oven to preheat to around 275 degrees, and expect the entire cooking process to take 4-5 hours. For perfectly cooked chicken, you'll want to maintain temperatures between 250-280 degrees, using dark-colored pots and a clear lid for ideal heat retention.
Safety is essential when cooking chicken. You must guarantee the internal temperature reaches at least 165°F, though you can achieve safe results at lower temperatures with longer holding times. If sunlight becomes insufficient, don't hesitate to finish cooking in a conventional oven.
- Use an accurate thermometer (±0.5°F) to monitor internal temperatures throughout cooking
- Adjust reflectors or move the oven to regulate temperature as needed
- Keep the lid closed as much as possible to maintain consistent heat
- Consider using pasteurization tables for longer cooking at lower temperatures
- Plan for a 10-15 minute finish in a conventional oven at 425-500 degrees for golden brown skin
Recipe Modifications for Solar Cooking
When converting traditional chicken recipes for solar cooking, you'll need to extend cooking times by 1.5 to 2 times longer than conventional methods.
You'll want to choose dark-colored, thin-walled pots with tight-fitting lids to maximize heat absorption and retention in your solar cooker.
For best results, guarantee your cooking containers have enough capacity to accommodate the chicken and vegetables while leaving some space for steam circulation.
Solar Cooking Time Adjustments
Successful solar cooking requires strategic timing and environmental adaptations to guarantee your chicken cooks thoroughly. Start your chicken dish between 10:00 a.m. and 2:00 p.m. when the sun's intensity peaks. You'll need to preheat your solar oven for at least an hour before adding your chicken, and expect cooking times to range from 3-5 hours depending on the size of your portions and weather conditions.
To enhance your cooking time, you'll need to make regular adjustments. Position your cooker so sunlight hits the glass at a 90-degree angle, and reorient it every 30-45 minutes to maintain ideal sun exposure. If you're cooking on a slightly overcast day, you can still achieve results by adjusting your oven's position, though cooking times will increase.
- Monitor your chicken's internal temperature until it reaches 180°F for safe consumption
- Use dark, thin-walled pots to reduce initial heating time
- Place a folded towel over the glass after cooking to keep your meal warm
- Set up windbreaks if necessary to maintain consistent cooking temperatures
- Choose cooking days with minimal cloud cover for best results
Container and Equipment Selection
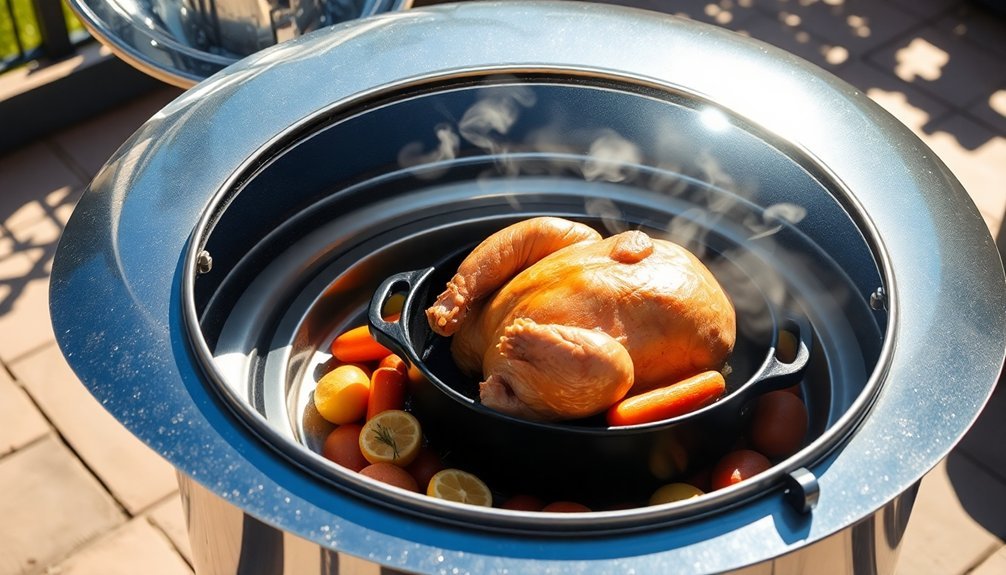
Beyond mastering timing, your choice of cooking equipment can make or break your solar-cooked chicken recipe. You'll need to select a well-insulated solar oven that can maintain consistent temperatures – popular options include the All American Sun Oven or GoSun Sport, which both provide reliable heat distribution for poultry.
For your cooking vessel, opt for a dark-colored roasting pot with a tight-fitting lid, as it'll absorb heat more effectively. If you're using a specific model like the GoSun Sport, you'll want their designated Fusion Roaster or a similar pan with a center cone for even cooking.
Don't forget to include an internal meat thermometer – it's essential for ensuring your chicken reaches safe temperatures.
Before placing your chicken in the solar oven, you'll need to preheat it for at least an hour in direct sunlight. Position your cooking vessel carefully using heat-resistant tongs or spatulas. If your solar oven comes with reflectors or additional panels, use them to maximize sun exposure.
Consider keeping a ceramic Crock-Pot insert as a backup vessel – it works well in most solar ovens and retains heat efficiently.
Storage and Leftover Guidelines
Proper storage of your sun-cooked chicken guarantees both safety and flavor for future meals. After cooking, let your chicken cool slightly, then transfer it to an airtight container and refrigerate within two hours.
You'll want to store your leftovers for no more than 4-5 days in the fridge, making sure to label the container with the date you stored it.
When you're ready to enjoy your leftover sun-cooked chicken, reheat it thoroughly in the microwave or in a skillet over medium-low heat until it reaches 165°F. Remember to stir occasionally for even heating.
If you don't plan to eat your leftovers within five days, freeze them in a freezer-safe container for up to three months.
- Always check for signs of spoilage before reheating – look for unusual odors or visible mold
- Reheat your chicken only once to maintain food safety
- Store leftovers in portions you'll consume in one sitting
- Cool completely before freezing to prevent ice crystal formation
- When thawing frozen leftovers, use the refrigerator method or cold water submersion technique
Don't leave your sun-cooked chicken at room temperature for extended periods, as this can promote bacterial growth.
Frequently Asked Questions
Can This Recipe Work on Cloudy or Partially Sunny Days?
You don't need to worry about cloudy days since this recipe doesn't rely on actual sunlight. It's cooked on your stovetop using sun-dried tomatoes, so you'll get great results regardless of weather conditions.
What Backup Cooking Method Should I Have Ready Just in Case?
You'll want a camping stove with propane as your primary backup. It's reliable, portable, and efficient. Keep extra fuel handy. A rocket stove or BBQ grill can also work as secondary options.
How Do I Prevent the Chicken From Drying Out During Solar Cooking?
You'll prevent dryness by using a covered pot, adding vegetables around the chicken, applying a marinade, and maintaining moisture with herbs. Don't open the lid frequently, and use a thermometer to avoid overcooking.
Does Altitude Affect Solar Cooking Time for This Recipe?
Yes, you'll need to add 5-10 minutes of cooking time for every 1,000 feet above sea level. At higher altitudes, the thinner air means it'll take longer to reach proper cooking temperatures.
Can I Use Frozen Chicken Pieces Instead of Fresh Ones?
Yes, you can use frozen chicken pieces, but you'll need to increase your cooking time by about 50%. Make sure they're completely thawed in the center before serving for food safety reasons.
In Summary
Solar-cooked chicken offers a sustainable, hassle-free meal option you'll love. By choosing a simple marinade and following proper solar cooking techniques, you've created a tender, flavorful dish without traditional energy sources. Don't forget to store any leftovers in an airtight container within two hours of cooking. With this eco-friendly method mastered, you're ready to explore more solar cooking adventures.


Leave a Reply