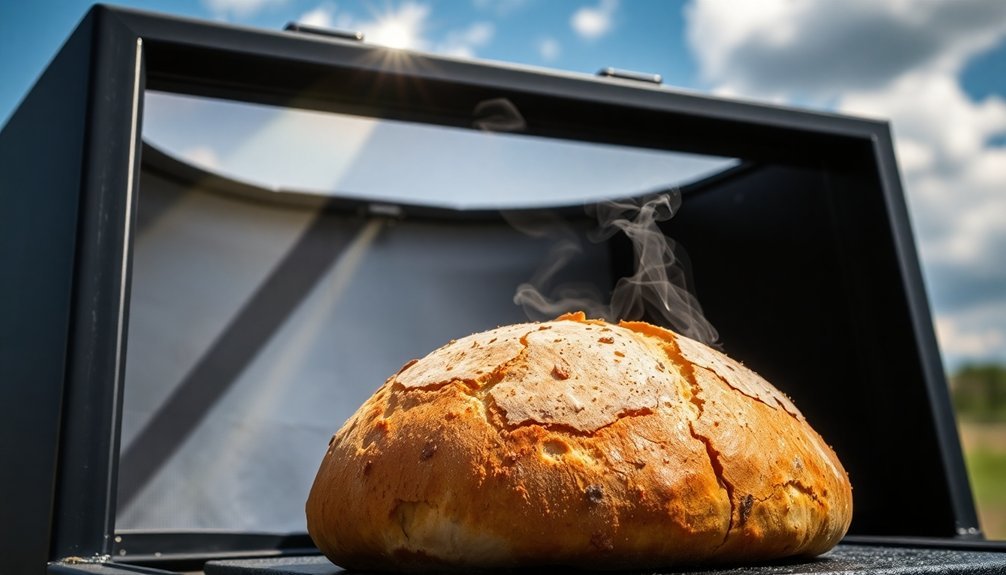
For the fastest no-fuss solar bread, you'll want to use a tubular solar oven like the GoSun Sport, which can reach temperatures up to 480°F. Mix 8 cups of whole wheat flour, 1 teaspoon of yeast, and 1½ teaspoons of salt with 4 cups of warm water the night before. Let it ferment overnight, then pour your dough into a dark-colored baking pan. Preheat your solar oven for 30 minutes and bake for about 2 hours, flipping once halfway through. You'll get perfectly crusty bread without the hassle of kneading. The simple combination of basic ingredients and smart solar technology can transform your outdoor baking game.
Quick Solar Bread Basics

Solar bread baking requires a careful balance of traditional bread-making techniques and solar oven know-how. You'll need to start with warm liquid, whether it's whey, water, or milk, and combine it with yeast and sugar to activate the rising process. For the fastest results, mix your flours ahead of time, using a ratio of ⅔ whole wheat to ⅓ unbleached white flour. The solar baking process lets you create energy efficient bread without relying on conventional power sources.
While your solar oven preheats, you'll develop your dough by combining the initial yeast mixture with half the flour, then incorporating butter and salt. The key to quick solar bread is achieving the right dough consistency – it should be elastic and not sticky after kneading. You'll know you've reached this point when the dough feels pliable under your hands.
Don't skip the rising stages, as they're essential for proper bread development. Let the dough double in bulk for its first rise, then shape it into loaves for a second rise.
While you're waiting, keep your solar oven focused directly on the sun to maintain ideal temperature. Remember, you can't burn bread in a solar oven, but you'll need to monitor it closely for proper doneness.
Choosing Your Solar Oven
Now that you understand the basics of solar bread baking, selecting the right solar oven will make or break your success. For the fastest bread results, you'll want to focus on two key options: tubular solar ovens and parabolic cookers.
Tubular ovens like the GoSun Sport can bake cornbread in just 15 minutes, reaching temperatures up to 480°F, while maintaining heat even in partial cloud cover. The GoSun Go Camp Stove model offers under 2 pounds of portability for more flexible baking locations.
If speed isn't your only priority, consider a box cooker. Though slower, with cornbread taking about 50 minutes, they offer more cooking space and better temperature control between 194-392°F. They're ideal if you're planning to bake multiple loaves simultaneously.
Panel cookers are the most affordable and portable option, but they're also the slowest, taking over 150 minutes for cornbread. While parabolic cookers can hit temperatures above 400°F, they're more complicated to use and require a steeper learning curve.
For most beginner solar bread bakers, a tubular oven offers the best balance of speed, efficiency, and ease of use. You'll get consistently quick results, and the vacuum tube technology helps maintain steady temperatures even as sun conditions change.
Essential Tools and Ingredients

You'll need a reliable solar oven like a parabolic cooker or Solavore Sport, along with standard baking pans that fit your chosen model.
Your mixing tools should include measuring cups and spoons, mixing bowls, and a wooden spoon or whisk for combining ingredients.
A 24-centimeter diameter baking pan is ideal for this recipe. These essential items, combined with your choice of bread ingredients, will guarantee you're properly equipped for successful solar baking.
Basic Equipment Checklist
Preparing the perfect solar oven bread starts with gathering the right tools and ingredients.
You'll need a reliable solar oven – either box-type or parabolic – and a 24 cm-diameter bread pan. Make sure you've got clear plastic wrap or a plastic bag to cover your oven or dough, as this helps trap heat effectively.
For ideal heat absorption and reflection, you'll want black construction paper and aluminum foil. The black surface absorbs sunlight while the foil reflects it toward your bread.
Don't forget a thermometer to monitor your bread's internal temperature – it's vital for achieving the right doneness.
Keep these essential tools handy: a ruler or wooden spoon for measuring and mixing, utility knife or scissors for cutting materials, and newspapers for insulation.
You'll also need wheat bran or oil to prevent the dough from sticking to your pan.
Your ingredients checklist should include multigrain flour (or a mix of whole wheat and unbleached white), salt, warm water (or whey/milk), and baker's yeast.
If you're making sourdough, add your starters and the additional ingredients like butter, sugar, and filtered water to your list.
Mixing Tools You Need
Successful solar bread making requires a specific set of mixing tools to guarantee proper dough consistency.
You'll need a large mixing bowl as your primary workspace, along with both dry and liquid measuring cups for precise ingredient portions. A wooden spoon or dough whisk serves as your main mixing implement, while a standard whisk helps incorporate dry ingredients thoroughly.
For your basic bread recipe, gather these essential ingredients:
- All-purpose flour or multigrain flour, which forms your bread's foundation
- Sugar or your preferred sweetener to feed the yeast
- Active dry yeast for traditional breads, or baking powder/soda for quick breads
- Water, milk, or buttermilk as your liquid base
- Salt to enhance flavor and control yeast growth
Don't forget to keep a clean kitchen towel handy for covering your dough during rising periods.
You'll also want to prepare your baking pan with cooking spray or oil before use. If you're making sourdough, you'll need additional items like a plastic bag for proofing and wheat bran or extra flour for dusting your bowl to prevent sticking.
No-Knead Solar Bread Recipe
With minimal effort and maximum reward, making no-knead solar bread starts with combining simple ingredients in a large bowl. Mix 8 cups of whole wheat flour, 1 teaspoon of yeast, and 1½ teaspoons of salt. Add 4 cups of warm water, stirring until smooth. If the dough feels too thick, add more water gradually. Let the mixture rest overnight on your counter.
The next day, preheat your solar oven for at least 30 minutes in direct sunlight, aiming for a temperature between 150-200°F (66-93°C). Place the dough in a greased baking pan and position the oven facing the sun.
| Time | Action | Important Note |
|---|---|---|
| 0:00 | Place dough in pan | Use greased pan |
| 0:30 | Check bread | Adjust oven position |
| 1:00 | Monitor temperature | Maintain 150-200°F |
| 1:30 | Test for doneness | Core should reach 200°F |
| 2:00 | Flip bread | Continue until fully baked |
Bake for two hours, then flip and continue baking for another hour. Check the bread every 30 minutes, adjusting the oven's position to maintain ideal sunlight exposure. Your bread is done when it reaches an internal temperature of 200°F (93°C).
Solar Baking Tips

To bake the fastest solar bread, you'll need to position your oven at a 45-degree angle between 11 am and 3 pm when the sun's energy peaks.
Keep your oven's temperature steady at 180-200°F by monitoring it every 15 minutes and adjusting the reflectors as needed.
Use dark, thin metal baking pans or coat your regular bread pan with high-temp black paint to maximize heat absorption and guarantee even baking.
Maximize Sun Angle Position
Maximizing your solar oven's sun angle position requires three key positioning techniques: proper alignment, reflector adjustment, and continuous tracking. You'll need to start by finding a stable, south-facing location where your oven can receive unobstructed sunlight throughout the baking period.
For ideal heat capture, use these essential positioning strategies:
- Raise your oven's leg during non-summer months to match the sun's lower position in the sky, guaranteeing shadows are even on both sides.
- Position aluminum foil reflectors at precise angles to direct maximum sunlight into the oven, potentially reaching temperatures up to 300 degrees.
- Keep your baking dish level using a gimbaled tray or stable surface while adjusting the oven's angle.
- Track and adjust the oven's position every 30 minutes to follow the sun's movement.
Remember to imagine a straight line from the sun to the ground when setting your oven's angle. If you're at a higher latitude, you'll need to make more considerable angle adjustments.
Confirm your reflectors have smooth, shiny surfaces and are positioned to capture maximum sunlight. These positioning techniques, combined with proper insulation and thermal mass, will greatly speed up your bread baking process.
Monitor Temperature Control Points
Proper positioning sets the stage for success, but monitoring temperature control points makes the difference between perfectly baked bread and disappointing results. You'll need to maintain temperatures between 150°F and 400°F, with a minimum of 180°F for food safety. Keep a reliable thermometer in your solar oven to track these temperatures accurately throughout the baking process.
To maintain consistent heat levels, you'll want to minimize heat loss by keeping the oven sealed. Don't open the lid frequently to check on your bread, as this can greatly drop the internal temperature. Instead, use clear plastic wrap or a glass lid to observe your bread's progress while trapping valuable heat inside.
Position your dark-colored bread pan in the center of the oven, and line the bottom with black construction paper to enhance heat absorption.
You'll need to adjust for environmental factors, so keep track of weather conditions and seasonal changes. During winter months, you'll want to reposition your oven more frequently to follow the sun's path.
Remember that wind can quickly reduce internal temperatures, so verify all seals are airtight and insulation is properly maintained.
Best Pan Materials Guide
Selecting the right pan material greatly impacts your solar bread baking success.
You'll want to focus on lightweight, dark-colored pans that heat up quickly and maintain consistent temperatures. While cast iron might be your go-to for conventional baking, it's too heavy for efficient solar cooking and takes too long to heat.
For the fastest solar bread results, choose matte black or dark-colored pans with these key features:
- Lightweight restaurant-grade black steel pans that heat rapidly
- Dark non-stick loaf pans that maximize sun absorption
- Black speckled enamel pans that combine good heat retention with reasonable weight
- Pyrex containers painted black or covered with black construction paper
Don't be afraid to repurpose old baking pans by spray-painting them black, but avoid shiny or white containers that reflect precious sunlight.
If you're shopping on a budget, check thrift stores for suitable pans you can modify.
Remember to always use pans with lids to trap heat effectively.
The combination of proper pan material and color will greatly reduce your solar bread baking time and guarantee more consistent results.
Temperature and Timing Guide
Success in solar oven baking depends heavily on maintaining the right temperature and timing. You'll want to aim for 300°F (148°C) as your ideal baking temperature, though this can fluctuate based on weather conditions and sun exposure. Using an oven thermometer will help you track these variations accurately.
To achieve the fastest baking times, you'll need to preheat your solar oven while preparing your ingredients. Dark-colored cookware will speed up the process by absorbing heat more effectively. Remember to line your pans with parchment paper for easy removal.
| Recipe Type | Temperature | Baking Time |
|---|---|---|
| Walnut Date | 300°F/148°C | 1h 15min |
| No-Knead Sourdough | 300°F/148°C | 1.5h |
| Cranberry Nut | 300°F/148°C | 2-2.5h |
Check your bread periodically using the toothpick test to verify it's fully baked. Cloudy conditions will extend your baking time, so you'll need to adjust accordingly. Quick breads typically bake faster than yeast-based ones, and thicker batters require more time. Keep monitoring the oven's focus on the sun throughout the baking process to maintain consistent heat.
Storage and Serving Suggestions

Fresh solar-baked bread deserves careful storage to maintain its delicious taste and texture. You'll want to let your bread cool completely before storing it to prevent unwanted moisture buildup. For the best results, store your bread cut-side down on a cutting board for the first day or two.
In dry climates, you'll need to keep your bread in a sealed plastic bag to maintain softness. However, if you live in a humid area, opt for breathable storage options like paper bags or kitchen towels. A breadbox offers an ideal solution for most environments, keeping your loaf fresh longer while allowing proper air circulation.
For long-term storage, you can freeze your solar bread effectively:
- Slice the bread before freezing and arrange pieces in an alternating pattern
- Remove as much air as possible from the freezer bag
- Wrap whole loaves in plastic, then place in a freezer bag
- Label with the date and use within 3 months
When you're ready to serve, toast frozen slices directly from the freezer, or thaw whole loaves overnight on your counter.
Don't store your bread in the refrigerator, as this speeds up the staling process.
Troubleshooting Common Baking Problems
Despite the simplicity of solar oven baking, several common problems can affect your bread's quality. Temperature fluctuations in your solar oven can greatly impact your bread's success. If you notice your bread isn't rising properly, it's likely because your oven hasn't reached the ideal temperature. You'll need to guarantee proper positioning to maximize sun exposure.
When your bread turns out dense or heavy, check your ingredient measurements and mixing technique. Over-mixing develops too much gluten, while under-mixing results in uneven texture. Make certain you're using fresh ingredients, especially yeast, as expired leavening agents won't provide proper rise.
Pay attention to your pan placement and preparation. Your solar oven's grate must be level to guarantee even rising, and your pan should be properly greased to prevent sticking.
If you're baking on a humid day, you might need to adjust your liquid measurements slightly, as humidity affects dough consistency.
Watch for cold ingredients affecting your dough's development. Let your eggs and other refrigerated items reach room temperature before mixing.
If your bread consistently turns out underbaked, you'll need to extend the baking time or improve your oven's heat retention.
Frequently Asked Questions
Can I Bake Bread in Cloudy Weather Using a Solar Oven?
You shouldn't attempt baking bread in cloudy weather with a solar oven. It won't reach proper temperatures, and your bread will likely be undercooked. Wait for a sunny day for the best results.
What Happens if Birds or Insects Land on My Solar Oven?
You don't need to worry much about birds or insects on your solar oven. They rarely cause damage, but if they leave droppings or debris, just clean the surface to maintain efficiency. The reflective materials usually deter them.
Does Altitude Affect Solar Oven Bread Baking Time?
Yes, altitude will affect your solar oven's baking time. You'll need longer baking times at higher elevations due to lower air pressure and thinner atmosphere. Consider increasing your dough's moisture content to compensate.
Can I Use My Solar Oven Indoors Near a Sunny Window?
You'll get limited results using your solar oven indoors. Modern windows block UV rays, reducing cooking efficiency. For best results, place your solar oven outside where it can receive direct, unfiltered sunlight.
How Long Does a Typical Solar Oven Last Before Needing Replacement?
You'll typically get 20+ years from a well-maintained solar box cooker, while parabolic models last 5-15 years. With proper care and occasional component replacements, your solar oven can serve you for decades.
In Summary
You'll find solar oven bread-making surprisingly simple once you've mastered the basics. Remember to start early on sunny days, keep your dough loose, and monitor temperatures closely. Don't worry if your first loaf isn't perfect – solar baking takes practice. With this no-knead method and your solar oven's free energy, you're set to bake fresh, crusty bread while reducing your carbon footprint.


Leave a Reply