
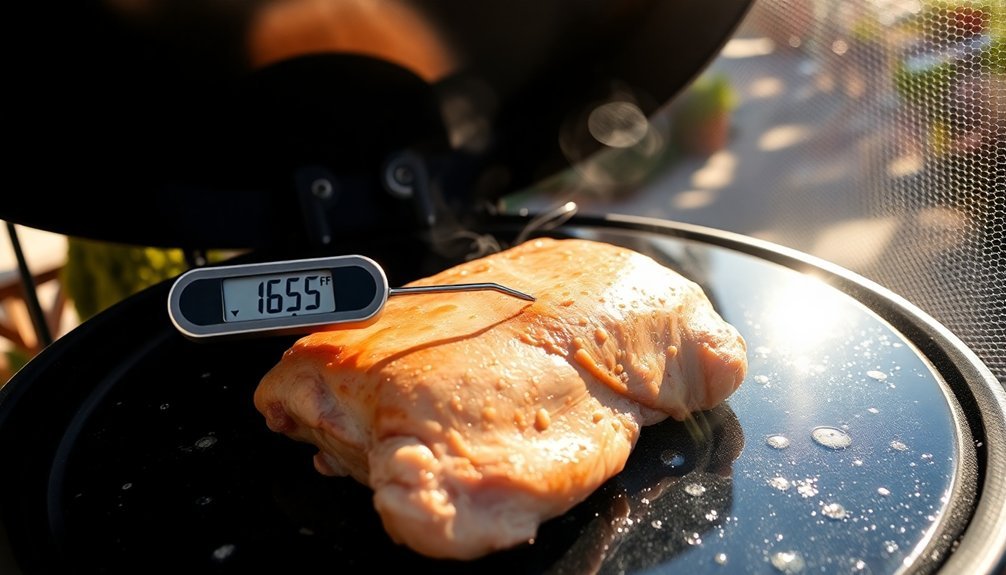
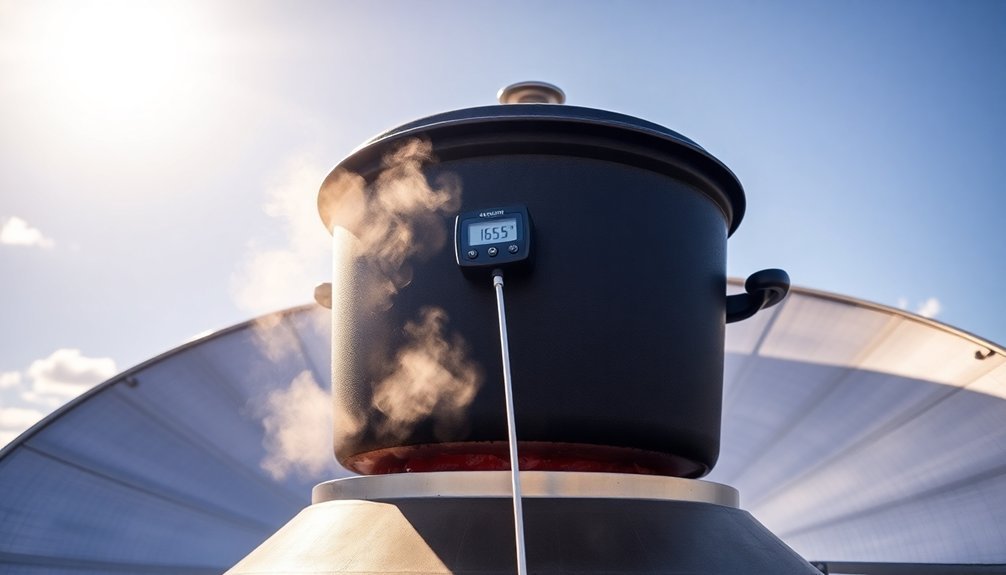
When you're cooking food outside using a solar cooker, you need to reach 165°F to kill harmful bacteria that can cause foodborne illness. This temperature isn't just a suggestion – it's a critical food safety requirement that applies to all cooking methods, whether you're using your kitchen stove or the sun's heat. The "danger zone" between 40°F and 140°F is where bacteria multiply rapidly, making your food unsafe to eat. While solar cooking can be highly effective, maintaining and monitoring proper temperature is essential for your health and safety. Understanding the specifics of temperature control can help you master this eco-friendly cooking method.
Understanding Solar Cooking Temperature Requirements
Three main types of solar cookers offer different temperature capabilities to meet various cooking needs.
Box-type ovens can reach 150°F to 400°F, with ideal cooking between 200°F to 300°F. Panel cookers operate in a moderate range of 200°F to 300°F, while parabolic cookers can achieve impressive temperatures up to 800°F, making them suitable for frying and grilling.
You'll get the best results between 11:00 am and 3:00 pm when the sun's intensity is highest. Good quality insulation helps trap thermal energy and ensures food cooks thoroughly.
Your cooker's performance depends heavily on proper insulation, reflector positioning, and weather conditions. Using dark-colored cookware and quality insulation materials like cotton balls or newspapers will help maintain necessary temperatures.
During winter, you'll need to adjust your reflectors more frequently to track the sun, while summer allows for longer unattended cooking periods.
Basic Food Safety Principles
Following four essential principles can help keep your food safe: clean, separate, cook, and chill.
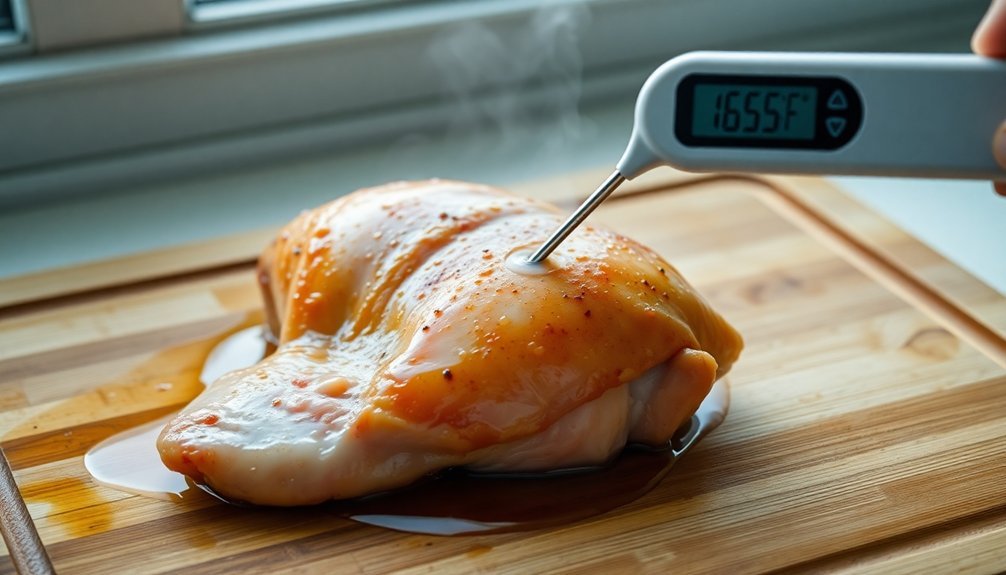
You'll need to wash your hands, utensils, and surfaces thoroughly with hot, soapy water. Keep raw meats separate from other foods using leak-proof containers and different cutting boards. Cook foods to proper temperatures, especially reaching 165°F for chicken to kill harmful bacteria. Chill foods promptly, keeping your refrigerator at 40°F or below. Thoroughly rinse fresh produce to remove any chemical residues that could contaminate your food.
| Principle | Key Actions |
|---|---|
| Clean | Wash hands, surfaces, and utensils with hot water |
| Separate | Use different cutting boards for raw meat and produce |
| Cook | Use thermometer to verify safe temperatures |
These basics form the foundation of food safety and help prevent foodborne illness, ensuring your meals are both delicious and safe to eat.
Bacterial Growth in Solar Cooking
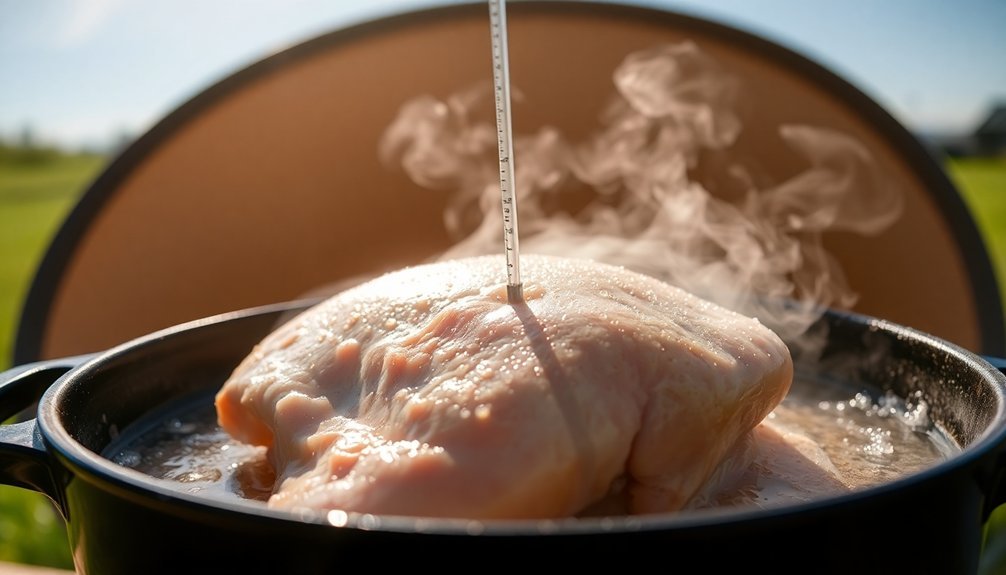
When using a solar cooker, managing bacterial growth becomes a critical safety concern due to potential uneven heating. You'll need to be especially vigilant with high-risk foods like meat, poultry, and dairy products, as harmful bacteria can multiply rapidly between 40°F and 140°F.
While solar cookers can reach temperatures of 200°F to 300°F, you must guarantee proper positioning and insulation to maintain these temperatures consistently. Box and panel cookers typically require longer cooking times for thorough pathogen elimination. Your food needs to reach a minimum internal temperature of 165°F to kill pathogens like Salmonella, E. coli, and Campylobacter.
To achieve this safely, you'll want to preheat your solar cooker, use a reliable cooking thermometer, and stir food periodically. Environmental factors like cloud cover and wind can affect cooking efficiency, so you'll need to adjust cooking times accordingly.
Proper Temperature Monitoring Methods
To accurately monitor food temperatures, you'll need reliable tools like digital thermometers with properly calibrated probes or infrared sensors that can quickly measure surface temperatures.
You should always insert probe thermometers into the thickest part of your food items to get the most accurate core temperature readings.
Modern monitoring systems can even track temperatures continuously through wireless sensors and alert you instantly if temperatures fall below or exceed critical safety thresholds.
Temperature Tools and Techniques
Three essential temperature monitoring tools stand at the forefront of food safety: digital thermometers, infrared thermometers, and probe thermometers. You'll need these tools to accurately measure food temperatures and maintain safety standards in your kitchen.
When using temperature monitoring tools, remember these key practices:
- Calibrate your digital thermometers weekly using ice water
- Sanitize probe thermometers between different food items
- Store thermometers in easily accessible locations
- Use automated monitoring systems for continuous tracking
- Keep detailed temperature logs for all measurements
For maximum effectiveness, you'll want to combine traditional tools with modern technology.
Wireless monitoring systems and data loggers can help you track temperatures in real-time, while cloud-based systems guarantee your records stay secure and accessible.
Checking Critical Food Points
Proper temperature monitoring hinges on four Critical Control Points (CCPs) in your food preparation process.
You'll need to watch these specific points where you can prevent, eliminate, or reduce food safety hazards to acceptable levels.
To maintain food safety, you must monitor critical limits at each CCP. For instance, you'll need to guarantee cooked foods cool from 135°F to 70°F within 2 hours, then to 41°F within 4 more hours.
Ready-to-eat foods must reach 41°F within 4 hours total.
You can track these temperatures manually or use automated systems like wireless sensors.
Check internal temperatures every 30 minutes during hot holding or every 1.5 hours during cooling.
If you spot any deviations, take immediate corrective action, such as reheating food to 165°F for 15 seconds.
Solar Cooking Time Adjustments

When you're using a solar oven, you'll need to double your cooking times during winter months due to reduced sun intensity and shorter daylight hours.
You'll also want to add 30 minutes to your expected cooking time for every hour that clouds block direct sunlight.
Since solar cooking relies entirely on the sun's power, you'll get the fastest cooking results between 10:00 a.m. and 2:00 p.m. when sunlight is most intense.
Seasonal Solar Intensity Changes
Since solar intensity varies dramatically throughout the year, you'll need to adjust your cooking times and methods accordingly.
During winter months, when the sun sits lower on the horizon, you'll experience reduced solar intensity and shorter cooking windows. Conversely, summer brings higher sun angles and longer periods of effective cooking time.
- Peak cooking hours typically fall between 11:00 am and 3:00 pm
- Winter cooking may require extended hours (10:00 am to 4:00 pm)
- Your location affects cooking efficiency – desert regions perform better than cloudy areas
- Higher latitudes experience more seasonal variation in cooking effectiveness
- You'll need more frequent cooker adjustments during winter to track the sun
Consider using a Lazy Susan to help rotate your cooker throughout the day, ensuring ideal sun exposure and maintaining consistent cooking temperatures.
Cloud Cover Cooking Times
Cloud cover greatly impacts your solar cooking schedule, requiring careful adjustments to achieve proper food temperatures.
Under light cloud cover, you'll need to extend cooking times by about 24%, while heavy clouds can reduce efficiency by up to 67%. During rainy conditions, expect cooking times to increase by 80-90%.
You'll get the best results between 11:00 AM and 3:00 PM when the sun is strongest. On cloudy days, start cooking earlier and plan for longer cooking windows.
High clouds reflect less sunlight but trap heat, making cooking possible, while low, dense clouds greatly reduce available energy. Watch for cloud movement and adjust accordingly.
Consider cooking faster items like bread during peak sunlight hours, saving slower-cooking dishes for periods of less intense sun.
Weather Impact on Cooking
Although many cooks focus primarily on ingredients and timing, weather conditions play an essential role in how your food turns out.
You'll need to adjust your cooking approach based on temperature, humidity, and altitude to achieve the best results.
- High temperatures make grills cook faster, which can lead to overcooked food if you're not careful.
- Humid conditions slow down moisture evaporation, requiring longer bake times for cookies and cakes.
- Cold weather affects grill temperature stability, making it harder to maintain consistent heat.
- High-altitude cooking requires lower temperatures and longer cooking times due to reduced atmospheric pressure.
- Humid days call for reduced liquid in recipes, while dry conditions might require adding more moisture.
Understanding these weather impacts helps you adapt your cooking methods and achieve better results, whether you're grilling outdoors or baking in your kitchen.
Safe Food Storage Tips
To keep your food safe, you'll need to check storage temperatures in your refrigerator and freezer daily using reliable thermometers.
You must store foods in airtight containers or properly sealed packaging to prevent contamination and maintain freshness.
It's critical to store raw meats on lower shelves away from ready-to-eat foods to avoid cross-contamination through drips or spills.
Monitor Storage Temperatures Daily
Since food safety depends heavily on proper storage temperatures, monitoring your refrigerator and freezer daily is vital for preventing foodborne illness. Your refrigerator should stay at or below 40°F (4°C), while your freezer needs to maintain 0°F (-18°C) or lower.
You'll want to use reliable appliance thermometers and check them regularly to guarantee accurate readings.
- Install thermometers in both your refrigerator and freezer units
- Check temperatures at least once daily, especially during peak usage times
- Keep a temperature log to track any concerning patterns
- Ensure proper air circulation by avoiding overcrowding
- Consider installing an automated monitoring system for real-time alerts
Remember that the temperature danger zone between 41°F and 140°F (5°C to 60°C) provides ideal conditions for bacterial growth, so maintaining proper storage temperatures is essential for food safety.
Keep Foods Properly Sealed
Proper food sealing plays an essential role in preventing contamination and maintaining food quality during storage. You'll need to use tight-fitting lids, foil, or plastic film to protect your food from external contaminants. When storing raw meats, verify they're well-wrapped and placed at the bottom of your fridge to prevent juices from dripping onto other items.
| Storage Type | Sealing Requirements |
|---|---|
| Refrigerated | Airtight containers, plastic wrap |
| Frozen | Freezer-weight containers, proper headspace |
| Pantry | Moisture-proof containers, sealed lids |
| Leftovers | Tightly sealed containers, proper wrapping |
Don't forget to transfer opened canned goods into suitable containers and label everything with contents and dates. Using the FIFO method verifies you'll use older items first, reducing waste and maintaining food safety.
Separate Raw From Ready
Beyond sealing your food correctly, keeping raw and ready-to-eat items separate stands as a fundamental food safety practice.
You'll need to store raw meat, poultry, fish, and eggs below ready-to-eat foods to prevent cross-contamination through drips. When possible, use separate fridges and freezers for raw and prepared items.
- Store unwashed produce above raw meats but separate from ready-to-eat foods
- Use sealed containers for raw items to prevent juice leakage
- Remove outer packaging from deliveries to reduce bacterial spread
- Schedule separate delivery times for raw and ready-to-eat items
- Maintain different preparation areas for raw and prepared foods
If you're using the same storage unit, always follow proper stacking order – ready-to-eat items on top, followed by produce, then raw meats at the bottom.
Temperature Zones While Cooking
Mastering kitchen temperatures is essential for food safety and preventing foodborne illness. You'll need to keep foods out of the danger zone between 40°F and 140°F, where bacteria can multiply rapidly. In just 20 minutes, harmful bacteria like Salmonella and E. coli can double in number.
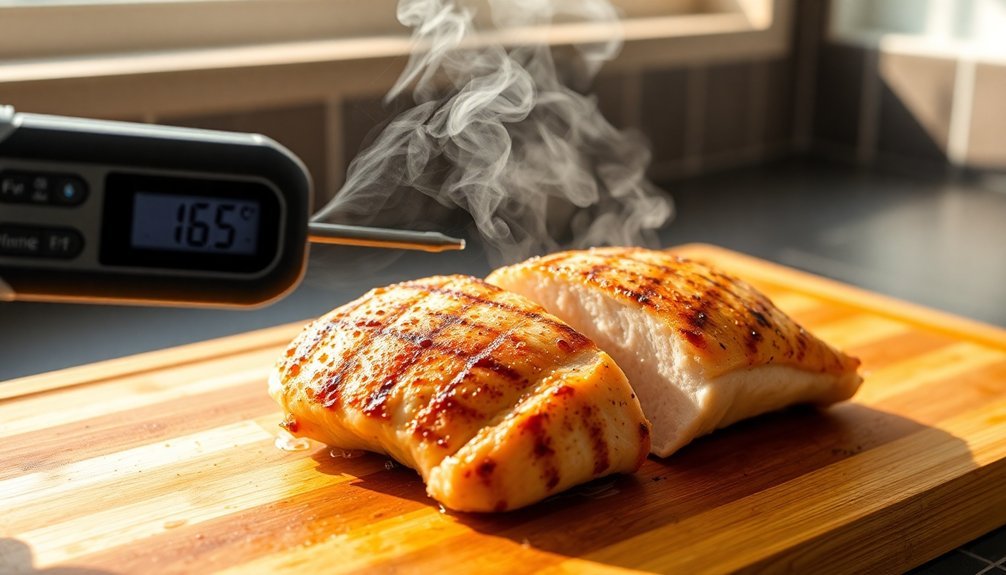
When you're cooking, different foods require specific internal temperatures. You'll need to heat poultry to 165°F, ground meat to 160°F, and whole cuts of meat to 145°F with a three-minute rest period.
Fish and eggs must reach 145°F. Once cooked, you'll need to maintain hot foods at 135°F or above.
If you're cooling foods, they must go from 135°F to 70°F within two hours, then reach 41°F within four more hours. Always use a thermometer to verify temperatures.
Preventing Foodborne Illness
Preventing foodborne illness starts with a thorough approach to food safety in your kitchen.
You'll need to maintain proper temperatures, practice good hygiene, and avoid cross-contamination to keep your food safe.
- Wash your hands thoroughly for 20 seconds before and after handling raw ingredients
- Keep your refrigerator at 40°F or below and your freezer at 0°F or lower
- Use separate cutting boards and utensils for raw meats and ready-to-eat foods
- Cool cooked foods quickly – from 140°F to 70°F within two hours
- Check meat temperatures with a food thermometer to verify safe cooking
Remember to clean surfaces frequently with hot, soapy water and paper towels.
Don't let food sit in the danger zone (40°F-140°F) for more than an hour, and always store raw meat separately from other ingredients.
Essential Solar Cooking Equipment
Successful solar cooking requires a specific set of basic equipment to harness and trap the sun's energy effectively.
You'll need a sturdy cardboard or insulated box as your cooker's foundation, which you can reinforce with extra materials for durability.
To maximize heat collection, you'll want to line your cooker with reflective surfaces like aluminum foil. These surfaces direct sunlight onto your cooking area.
You'll also need transparent materials like plastic wrap or glass to create a window that lets sunlight in while trapping heat inside.
Finally, dark-colored cooking containers and surfaces are essential – they'll absorb and retain heat efficiently. Black pots with tight-fitting lids or dark construction paper work well for this purpose, helping you achieve the necessary cooking temperatures.
Best Times for Solar Cooking
Once you've gathered your solar cooking equipment, timing becomes the next key factor for success. The prime hours for solar cooking fall between 11:00 am and 3:00 pm when the sun's UV rays are strongest. Your food will cook most efficiently during this window, though you'll need to plan for longer cooking times than with conventional methods.
- Position your cooker in direct sunlight, away from shadows
- Start preheating as early as 10:00 am, especially during winter
- Track the sun's movement and adjust your cooker accordingly
- Use dark-colored pots with lids to maximize heat absorption
- Expect cooking times to be twice as long as traditional ovens
Seasonal Temperature Variations
Throughout the year, cooking methods and food choices need to adapt alongside changing temperatures and seasonal ingredients.
In spring, you'll want to focus on quick-boiled or steamed preparations, serving foods chilled with light seasonings like vinegar and fresh herbs.
Summer calls for cool, invigorating options like chilled grain salads and pressed vegetables.
As fall arrives, switch to slower cooking methods that create warmth, incorporating root vegetables and stronger seasonings like miso and sea salt.
Winter's cold weather demands heartier fare – think robust soups, steamed winter greens, and baked sweet vegetables.
You'll find butternut squash, kale, and root vegetables become your kitchen staples during these colder months.
These seasonal adjustments help your body maintain proper temperature balance while making the most of nature's available bounty.
Frequently Asked Questions
Can I Cook Multiple Types of Meat Together at 165°F?
Yes, you can cook different meats together at 165°F. While whole cuts can be cooked at lower temperatures, cooking them with ground meats or poultry means you'll need to bring everything to 165°F for safety.
Does Altitude Affect the Required Cooking Temperature of 165°F?
No, altitude doesn't affect the required cooking temperature of 165°F. While you'll need longer cooking times at high altitudes due to lower boiling points, you must still reach the same safe internal temperature for food safety.
Why Don't All Countries Use 165°F as Their Safety Standard?
You'll find that countries set their own standards based on local needs, scientific research, and cultural practices. They don't all use 165°F because different foods require different temperatures for safety and quality assurance.
Will Cooking Above 165°F Make My Food Taste Worse?
Yes, cooking above 165°F can make your food taste worse. You'll notice meats becoming drier and tougher. Stick to the minimum safe temperature unless you're specifically aiming for well-done or crispy textures.
Does Marinating Meat Affect the Required 165°F Temperature Requirement?
No, marinating your meat doesn't change the required safe cooking temperature. You'll still need to cook ground poultry and whole poultry to 165°F, regardless of how long you've marinated it.
In Summary
You'll want to maintain 165°F when solar cooking outside to kill harmful bacteria and guarantee your food is safe to eat. By following proper temperature guidelines and using a reliable thermometer, you're protecting yourself from foodborne illness. Remember to adjust your cooking times based on weather conditions and seasons, and always use proper equipment for successful solar cooking throughout the year.


Leave a Reply